background image

 33 


18.  Take the quick release skewer from the 

parts box and slide it through the axle 
from the non-deraileur side, screw the nut 
on the end till the lever requires a very 
firm push to close.  

19.  Take the yellow wheel reflectors from the 

parts box and fit one to each wheel, 
opposite the valve. 

20.  Stand the bike on its wheels and 

kickstand to finish the handlebar 
adjustments. (Turn the handlebars to the 
right, about 120 degrees and the bike will 
rest well on the kickstand. Block the wheel 
with a brick or similar if you need to while 
you work with the front triangle facing 
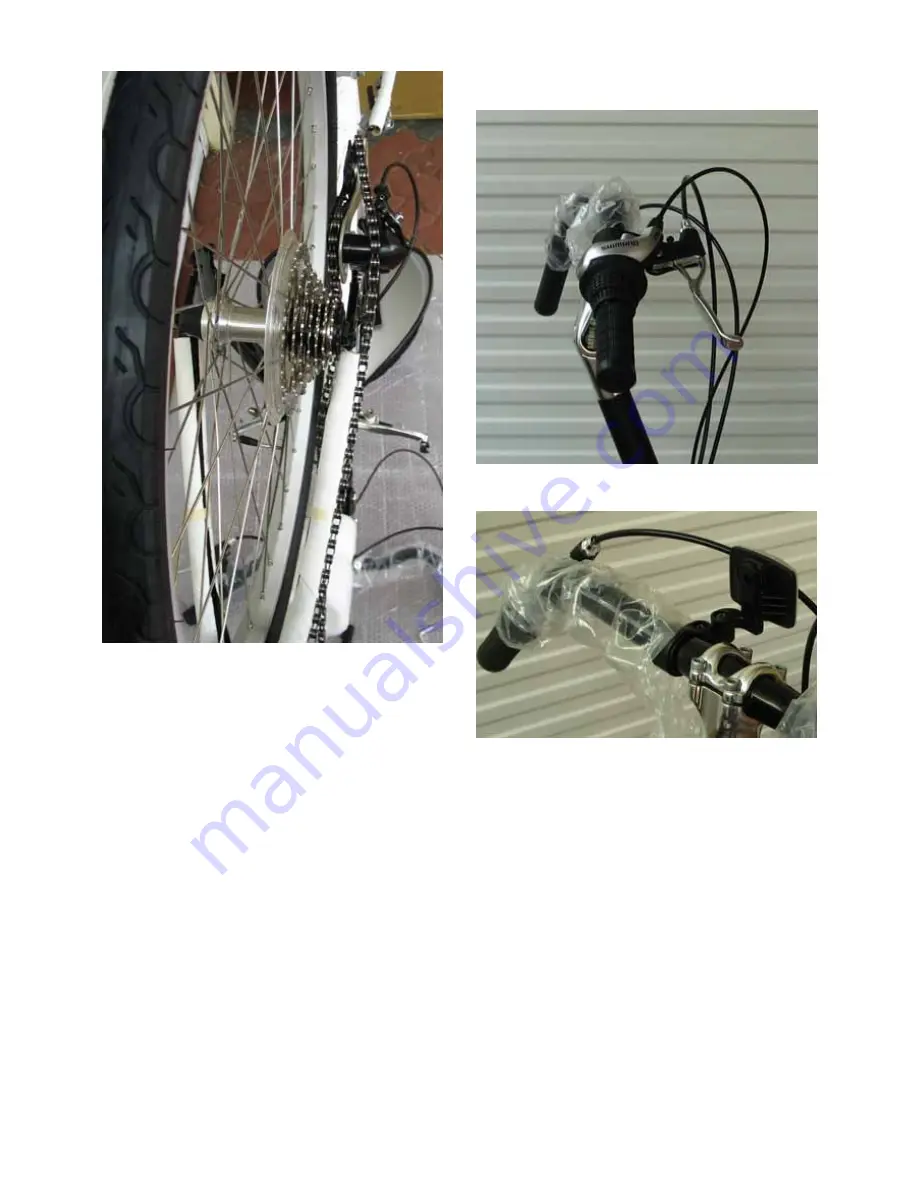
forward.) Loosen the handlebar clamp 
and rotate the bar so the grips point down 
(when viewed from the side). Retighten 
the handlebar clamp bolts. Loosen the 
brake lever clamps (5mm Allen key) and 
the twist grip gear changer (3mm Allen, 
accessed from underneath) and rotate the 
controls so that the levers are pointing 
forwards.  

21.  While sitting on the bike, check that the 

controls and grips fall naturally to hand. 


22.  Fit the front reflector as shown, using the 

spacing ring provided. 


23.  That completes the Cruzbike-specific 

assembly instructions.  

24.  Once you have the bike assembled, take 

it to your dealer or local bike shop to have 
them check it over and to adjust the 
brakes and gears. If you are an 
experienced bicycle mechanic, there is 
information provided in Section 8 for 
adjusting brakes and gears, and there is 
additional information provided in the 
standard bicycle manual that you will find 
in the parts box. Please also refer to the 
next section on the correct setting of the 
Telescopic Front Tube Safety Bolt.  

Содержание Freerider

Страница 1: ...rive system that is unlike and other bicycle on the market Like a child s tricycle the pedaling and steering system are unified and create a unique set of handling characteristics Starting up from a s...

Страница 2: ...possible to anticipate every situation or condition that can occur while riding this Manual makes no representation about the safe use of the bicycle under all conditions There are risks associated wi...

Страница 3: ...Safety 14 Wet Weather Riding 15 Night Riding 15 Extreme stunt or competition riding 16 Changing Components or Adding Accessories 17 8 Technical Information 18 A Wheels 18 B Seatpost Quick Release 21...

Страница 4: ...ty performance and service information for specific components such as suspension or pedals on your bicycle or for accessories such as helmets or lights that you purchase may also be available Make su...

Страница 5: ...ia of the steering function and so calls for the rider to become familiar with its feel and its responsiveness Front Triangle and Fork The front triangle takes the form of a tetrahedron and is pivoted...

Страница 6: ...he seatback or lift your leg over the seat pan Or you need to be comfortable that you can lie the bike over step over it and lift it up between your straddling legs If you cannot comfortably use at le...

Страница 7: ...brake lever reach the more critical it is to have correctly adjusted brakes so that full braking power can be applied within the available brake lever travel Brake lever travel insufficient to apply f...

Страница 8: ...Your local bike shop may also be a good resource NOTE Correct fit is an essential element of bicycling safety performance and comfort Making the adjustments to your bicycle that result in correct fit...

Страница 9: ...ated see Section 8 G 1 Check by putting one hand on the seat one on the intersection of the handlebars and stem then bouncing your weight on the bike while looking at tire deflection Compare what you...

Страница 10: ...d condition If not have your dealer or local bike shop replace them Make sure the handlebar ends and extensions are plugged If not plug them before you ride If the handlebars have bar end extensions m...

Страница 11: ...you will need to adjust the distance of the pedals for your leg length Loosen the quick release clamp on the TFT and firmly grip the outer TFT Keeping at least one foot on the ground push or pull the...

Страница 12: ...ng the brakes or the rear wheel could lift off the ground the bike rotate forward and tip you over the handlebars causing serious injury Applying brakes too hard can lock up a wheel which could cause...

Страница 13: ...ction 8 D 4 Be careful to keep body parts and other objects away from the sharp teeth of chain rings the moving chain the turning pedals and cranks and the spinning wheels of your bicycle 5 Always wea...

Страница 14: ...or jumps If you intend to do stunts wheelies jumps or go racing with your bike despite our advice not to read Section 2 F Downhill Stunt or Competition Biking now Think carefully about your skills bef...

Страница 15: ...ight is many times more dangerous than riding during the day A cyclist is very difficult for motorists and pedestrians to see Therefore children should never ride at dawn at dusk or at night Adults wh...

Страница 16: ...k your dealer or local bike shop about traffic safety classes or a good book on bicycle traffic safety Extreme stunt or competition riding Whether you call it Aggro Hucking Freeride North Shore Downhi...

Страница 17: ...ltimately avoiding injury is your responsibility Changing Components or Adding Accessories There are many components and accessories available to enhance the comfort performance and appearance of your...

Страница 18: ...it works how to use it properly and how much force you need to apply to secure the wheel WARNING The full force of the cam action is needed to clamp the wheel securely Holding the nut with one hand an...

Страница 19: ...the caliper See also Section 8 C 1 Move the quick release lever so that it curves away from the wheel This is the OPEN position 2 Insert the rear wheel between the dropouts of the rear triangle so th...

Страница 20: ...fork leg and is curved toward the wheel fig 7a fig 8 To apply enough clamping force you should have to wrap your fingers around a frame tube for leverage and the lever should leave a clear imprint in...

Страница 21: ...trol and fall 1 If your bike has rim brakes disengage the brake s quick release mechanism to open the clearance between the tire and the brake pads see Section 4 C figs 11 through 15 2 Shift the rear...

Страница 22: ...ut clockwise a quarter turn then try again C Brakes WARNING 1 Riding with improperly adjusted brakes or worn brake pads is dangerous and can result in serious injury or death 2 Applying brakes too har...

Страница 23: ...speed at which it was going This causes a transfer of weight to the front wheel or under heavy braking around the front wheel hub which could send you flying over the handlebars A wheel with more weig...

Страница 24: ...chain from one gear sprocket to another The smaller sprockets on the gear cluster produce higher gear ratios Pedaling in the higher gears requires greater pedaling effort but takes you a greater dista...

Страница 25: ...cquired with practice Until it becomes a reflex action the technique requires concentration that can distract your attention and cause you to lose control and fall Practice the use of toeclips and str...

Страница 26: ...zard free area Suspension can increase control and comfort by allowing the wheels to better follow the terrain This enhanced capability may allow you to ride faster but you must not confuse the enhanc...

Страница 27: ...direction than in the other The sidewall marking of a unidirectional tire will have an arrow showing the correct rotation direction If your bike has unidirectional tires be sure that they are mounted...

Страница 28: ...may be a modest charge for this service A Service Intervals Some service and maintenance can and should be performed by the owner and require no special tools or knowledge beyond what is presented in...

Страница 29: ...omponent s life cycle is exceeded the component can suddenly and catastrophically fail causing serious injury or death to the rider Scratches cracks fraying and discoloration are signs of stress cause...

Страница 30: ...t 3 Carefully lift the bike from the carton and place on your prepared area 4 Cut the cable ties holding the handlebar to the frame 5 Turn the front triangle forward and with a 5mm Allen key loosen th...

Страница 31: ...the parts box Tighten the four bolts using a 4mm Allen key and a 10 mm spanner 11 Take the red reflector from the parts box and the clamp as shown in the picture below slide over the seat post and ad...

Страница 32: ...ain ring arrange the chain as pictured and release the front brake cable 17 Take the front wheel the one with the cluster of gears and place it as pictured before pushing it home so that the axle is s...

Страница 33: ...handlebar clamp bolts Loosen the brake lever clamps 5mm Allen key and the twist grip gear changer 3mm Allen accessed from underneath and rotate the controls so that the levers are pointing forwards 21...

Страница 34: ...pairs of pictures note the location of the safety bolt and the clearance to the U bracket When the TFT is fully extended top it comes to rest against the bolt head above and so the TFT cannot disengag...

Страница 35: ...lowing parts do any subassembly needed to prepare the items as pictured 1 Telescoping Front Tube TFT Sleeve with Quick Release Clamp 2 Chainstay with bushings inserted and three piece bolt 3 Chainstay...

Страница 36: ...shown 5 Bolt nut grommet pair of washers x 2 not shown 6 Seat back cushion not shown 1 Seat Pan 2 Seat Mount 3 Bolt washer nut x 4 4 Rubber Strip 5 Ring Clamps 6 Seat pan cushion not shown 1 bushings...

Страница 37: ...Now is the time to buy a mirror of your choosing Most are convex meaning they curved outward not inward These give a wider view BUT TRAFFIC APPROACHING FROM BEHIND MAY BE TOO SMALL TO SEE CLEARLY part...

Страница 38: ...ere is 135 mm betwe en the dropout sof the fork legs The legs must not be squeezed together or pushed apart they must remain parallel 55 The clearance between the top of the tyre and the fork crown is...

Страница 39: ...r part of the arc to be 8 20 cm in front of the seat post tube Make sure that the highest part of the row of tabs is towards the FRONT 79 There are 4 pairs of holes in the centre of the seat pan Place...

Страница 40: ...nd the knees adjust pedals closer 100 Sore on top of knees adjust pedals further away 101 Recumbent butt bum kind of goes to sleep feels sore seat is too flat move it forward on the seat support so th...

Страница 41: ...feels too small then you have reached that limit 111 Upgrade the drive train componentry 112 Visit http www cruzbike com forums and see the Conversion Kit board for contact with other cruzbikers who...

Страница 42: ...collateral to or affecting this agreement Any implied warranty of merchantability or fitness for a particular purpose is limited in duration to the duration of this warranty Some states do not allow a...

Отзывы: