background image

Crux Interfacing Solutions • 21541 Nordhoff Street, Unit C, Chatsworth, CA  91311

phone: (818) 609-9299 • fax: (818) 996-8188 • www.cruxinterfacing.com

rev.071219

5 of 13

R

INTERFACING SOLUTIONS

ACPBM-77Z

Smart-Play Integration with Rear-View Camera Input

for F Series BMW with 6.5”, 7”, 8.8”, & 10.25” Monitor and 4+2 LVDS Connector

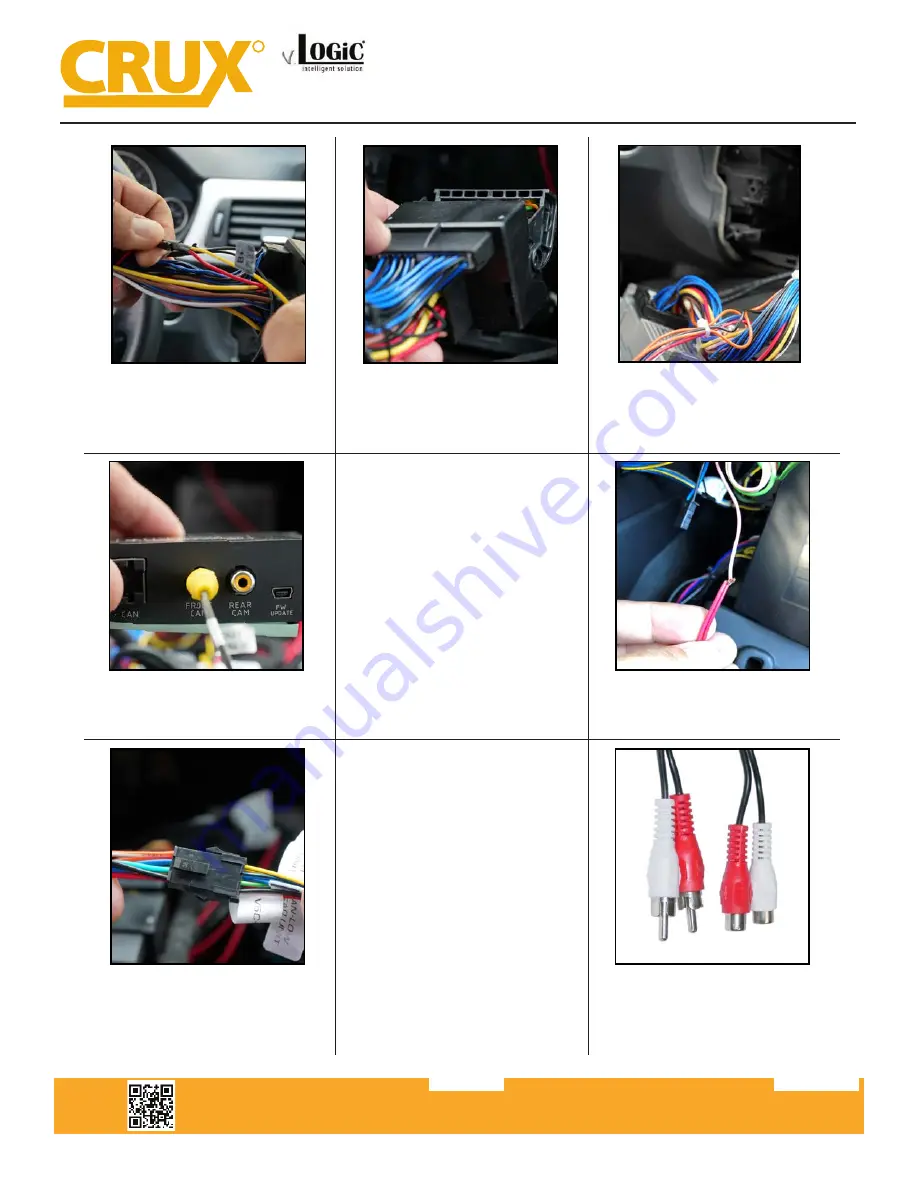
18. Tap the Yellow constant wire from 

the Smart-Play Power/Video harness to 

the Red constant wire on the ACPBM-

77Z vehicle harness (Male Side).

19 Connect the male side of the 

ACPBM-77Z vehicle harness to the fac

-

tory female Quadlock connector that 

was originally connected to the radio.

20. Connect the female side of the 

ACPBM-77Z vehicle harness to the 

factory radio.

22. If installing an aftermarket back-up 

camera, plug the camera’s video out 

to the REAR CAM input on ACPBM-77Z 

module. You will also need to power 

the camera for it to work. Use the 

PINK power output 1 wire provided 

on the Power/CAN harness to do this. 

An image is displayed in step 23. If 

retaining an OEM camera, skip steps 22 

and 23.

21. Plug the Video Out from the Smart-

Play Power/Video harness into the 

FRONT CAM input on the module.

23. Connect the camera power wires to 

the PINK power output 1 wire.

25. Tap the RED ACC wire from the 

Power/Video harness to the green 

+12V output, from the previous step’s 

8-pin male connector.  

24. Connect the male 8-pin connector 

from the vehicle harness to the female 

8-pin connector on the Power/CAN 

harness.

26. Connect the male audio RCA 

outputs from the Power/Video harness 

to the Female RCA-to-3.5mm cable.

Содержание ACPBM-77Z

Страница 1: ...factory iDrive High Low Knob Adds aftermarket rear view camera input Forced rear view camera option only on vehicles with PDC button Picture in picture mode combining after market rear view picture with factory parking sensor graphics Interactive parking guide lines with calibration function Simultaneous use of picture in picture factory parking sensor graphics and interactive lane lines Built in ...

Страница 2: ...ion 8 8 monitor ON OFF No function 10 25 monitor ver 1 ON OFF No function 10 25 monitor ver 2 ON ON No function 12V Switching Output 1 Pink Wire Rear View Camera Not Included Pink factory LVDS Cable Back of Headunit Aftermarket Crux LVDS Cable Back Side of Factory LCD Screen If using OEM Back up camera leave REAR CAM input unoccupied If installing after market Back Up camera use the pink wire to p...

Страница 3: ...W with 6 5 7 8 8 10 25 Monitor and 4 2 LVDS Connector INSTALLATION INSTRUCTIONS 1 Installation is done behind the front panel 2 Remove the dashboard front panel 3 Remove the front panel 4 We must now remove the four screws behind the front panel 5 Use a T 20 bit to remove these 4 screws 6 Remove the panel below the A C control 7 Remove the two torques behind the panel 8 Remove the LCD monitor 9 Un...

Страница 4: ... unit 12 Remove the radio unit 13 Remove the Quadlock connector from behind the radio 14 Insert the CRUX LVDS Cable into the LVDS OUT port on the ACPBM 77Z module 15 Funnel the CRUX LVDS cable from the radio cavity to the LCD screen cavity 16 Connect the otherside of the CRUX LVDS Cable to the LVDS port on the LCD screen and place it to rest 17 Funnel the Pink LVDS cable to the radio cavity and co...

Страница 5: ...o the factory radio 22 If installing an aftermarket back up camera plug the camera s video out to the REAR CAM input on ACPBM 77Z module You will also need to power the camera for it to work Use the PINK power output 1 wire provided on the Power CAN harness to do this An image is displayed in step 23 If retaining an OEM camera skip steps 22 and 23 21 Plug the Video Out from the Smart Play Power Vi...

Страница 6: ... ACPBM 77Z module 31 Connect the white wire with the 4 pin connector from the Power CAN harness to the UART port on the Smart Play module 32 Connect the Power Video harness to the POWER VIDEO port on the Smart Play module 35 Check the OSD settings and makesure they match those on the next page Test the Back Up camera Put gear in reverse and check for rear camera image on screen Go to Smart Play mo...

Страница 7: ... sec Hold for 3 sec to enter Smart Play menu to exit hold for 3 sec R INTERFACING SOLUTIONS ACPAD 81Y Smart Play Integration with Multi Camera Inputs USB Player for AUDI Vehicles with MMI MIB MIB2 Systems OSD Menu Menu Item OSD POS X 0 xxx POS Y 0 xxx Size Small Small OSD menu window Large Large OSD menu windows Osd TimeOut 2 20 Info Version X XX XX Displays the current SW version Factory Reset CO...

Страница 8: ...ME screen of the Smart with a USB thumb drive plugged in to the USB port 2 Using the iDrive knob of the vehicle navigate the cursor to the Bluetooth icon scrolling right Image above will appears on the screen the BT device name and pairing code 0000 device and connect to CRUX Smart Play_XXXX 4 Once the ACPBM 77Z has connected via Bluetooth it 5 Use the iDrive knob to navigate the cursor to the 6 I...

Страница 9: ... XX Speed setting for deactivating of the camera image Option 2 PDC Graphic OFF OEM PDC display of the vehicle deactivated Horizontal Vehicles with horizontal OEM PDC display Vertical Vehicles with vertical OEM PDC display Crux Interfacing Solutions 21541 Nordhoff Street Unit C Chatsworth CA 91311 phone 818 609 9299 fax 818 996 8188 www cruxinterfacing com rev 071219 9 of 13 R INTERFACING SOLUTION...

Страница 10: ...7 mph speed adjustable RGearTime Enabled while parking process and up to 20 seconds Option 1 RVC Lines ON Interactive lane lines activated Option 2 R F Cam Till XX Speed setting for deactivating of the camera image Option 2 PDC Graphic OFF OEM PDC display of the vehicle deactivated Horizontal Vehicles with horizontal OEM PDC display Vertical Vehicles with vertical OEM PDC display Option 2 Cam Trig...

Страница 11: ... Unit C Chatsworth CA 91311 phone 818 609 9299 fax 818 996 8188 www cruxinterfacing com rev 071219 11 of 13 R INTERFACING SOLUTIONS ACPBM 77Z Smart Play Integration with Rear View Camera Input for F Series BMW with 6 5 7 8 8 10 25 Monitor and 4 2 LVDS Connector Tip We recommend for all camera to use power out setting Cam and for Smart Play the power out setting of AVS or ACC Interactive Lane Lines...

Страница 12: ...trast Saturation Hue and Sharpness Click Exit to leave the settings menu Crux Interfacing Solutions 21541 Nordhoff Street Unit C Chatsworth CA 91311 phone 818 609 9299 fax 818 996 8188 www cruxinterfacing com rev 071219 12 of 13 R INTERFACING SOLUTIONS ACPBM 77Z Smart Play Integration with Rear View Camera Input for F Series BMW with 6 5 7 8 8 10 25 Monitor and 4 2 LVDS Connector OSD Settings You ...

Страница 13: ...gration with Rear View Camera Input for F Series BMW with 6 5 7 8 8 10 25 Monitor and 4 2 LVDS Connector VEHICLE APPLICATIONS 2015 2016 i3 2016 M2 2016 X1 2010 Up X3 2014 Up X4 2014 Up X5 2015 Up X6 2015 Up M4 2014 Up 4 Series 2012 Up M3 3 Series 2014 Up 2 Series 2012 Up 1 Series 2010 Up 5 Series 2011 Up 6 Series 2008 2015 7 Series BMW This product is designed to work for the NBT infotainment syst...

Отзывы: