


Setting the DIP switches of the Interface Box.
DIPs 1 and 2 on the back of the interface-box is used to set the monitor size. DIP 3 must be set to OFF.
After each change of the DIP switch settings you have to execute a power reset of the interface box!
Crux Interfacing Solutions • 21541 Nordhoff Street, Unit C, Chatsworth, CA 91311
phone: (818) 609-9299 • fax: (818) 996-8188 • www.cruxinterfacing.com
rev.071219
2 of 13
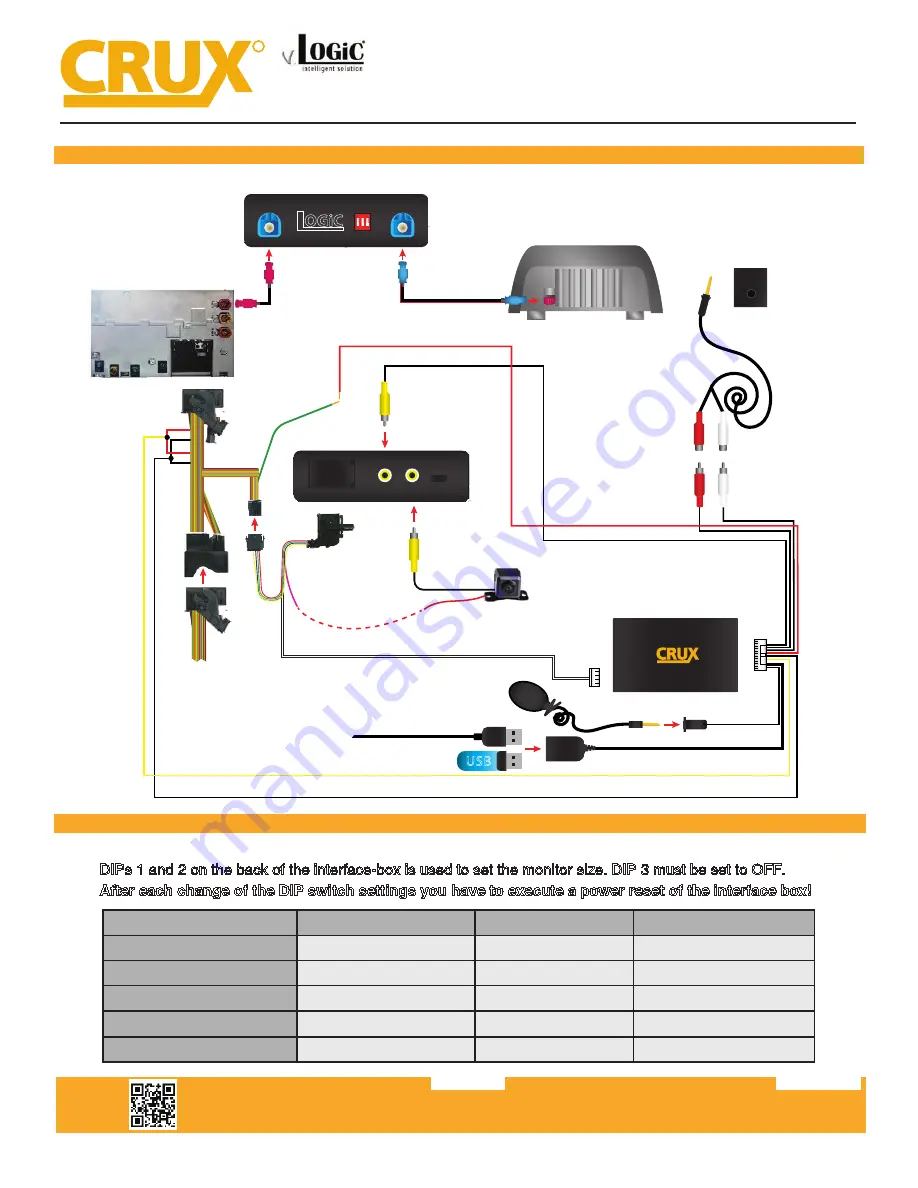
INSTALLATION DIAGRAM:
R
INTERFACING SOLUTIONS
ACPBM-77Z
Smart-Play Integration with Rear-View Camera Input
for F Series BMW with 6.5”, 7”, 8.8”, & 10.25” Monitor and 4+2 LVDS Connector
DIP SWITCH SETTINGS:
Vehicle/ Navigation
Dip 1
Dip 2
Dip 3
6.5“ monitor.
OFF
OFF
No function
7“ monitor
OFF
OFF
No function
8.8“ monitor
ON
OFF
No function
10.25“ monitor (ver.1)
ON
OFF
No function
10.25“ monitor (ver.2)
ON
ON
No function
+12V Switching
Output 1 (Pink Wire)
Rear-View
Camera
(Not Included)
Pink factory
LVDS Cable
Back of Headunit
Aftermarket Crux
LVDS Cable
Back-Side of Factory
LCD Screen
*If using OEM Back-up
camera, leave REAR CAM
input unoccupied.*
*If installing after-market Back-Up
camera, use the pink wire to provide power to
to the camera, if not, please ignore this connection*
ACPBM-77Z
Vehicle Harness
UA
RT
POWER/VIDEO
Smart-Play Module
Vehicle Auxiliary
Input (AUX input)
Female RCA to
3.5mm jack
Male L & R RCA
Outputs (Audio)
AUX
POWER / CAN
FRONT
CAM
REAR
CAM
FW
UPDATE
Smartphone Cable
USB Input
OR
12V Green Output 2
to ACC power
(on Smart-Play Harness)
Power/CAN
Harness
iDrive Knob
Retention Cable
LVDS
IN
LVDS
OUT
v.
1 2 3
O N
Intelligent Solution
ACPBM-77Z Module
ACC Power
Ground
Constant
LVDS OUT
LVDS IN


