background image

Isys

®

 Wired 5.7 Inch Tabletop Touchpanel 

Crestron 

TPS-1700 


8  

  Isys

®

 Wired 5.7 Inch Tabletop Touchpanel: TPS-1700 

Operations Guide - DOC. 6223A 
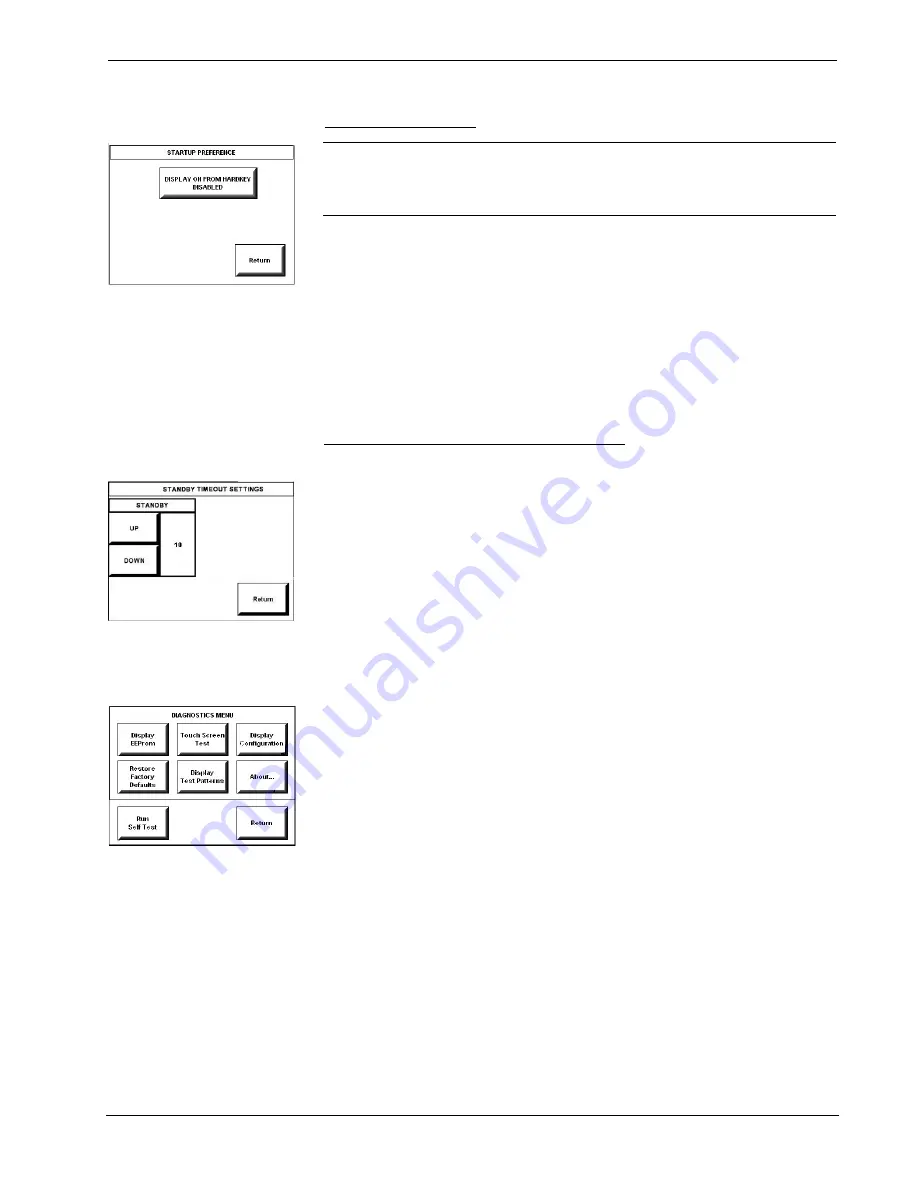
 

STARTUP PREFERENCE


Startup Preference 

NOTE:

  This feature applies only to units with the optional bezel and “hard” 

pushbuttons installed (refer to “Appendix:  Installation of Optional Pushbuttons”). 
You can use these buttons to access any frequently used commands. For detailed 
information, refer to “Optional Pushbuttons” on page 16. 

The Startup Preference option allows (when the touchpanel is off or in standby) the 
display to come on or stay off when a “hard” pushbutton is pressed. From the 
SETUP MENU, press the 

Startup Preference 

button to open the STARTUP 

PREFERENCE screen.  
When pressed, the 

DISPLAY ON FROM HARDKEY

 button toggles between 

ENABLED and DISABLED. With ENABLED selected, the display comes on when 
one of the “hard” pushbuttons is pressed. With DISABLED selected, the display 
stays off when a “hard” pushbutton is pressed (if touchpanel was off). The default is 
DISABLED. 
Select the 

Return

 button to return to the SETUP MENU. 

Power Management Timeout Settings 

POWER MANAGEMENT TIMEOUT 
SETTINGS 


The Power Management Timeout feature is a screen saver. From the SETUP menu, 
press the 

Timeout

 button to display the POWER MANAGEMENT TIMEOUT 

SETTINGS screen. Use the STANDBY 

UP

 and 

DOWN

 buttons to set the timeout 

from 0 through 120 minutes, where 0 disables the timeout. Adjustment is in one-
minute increments from 1 to 10; in ten-minute increments from 20-120. 
STANDBY timeout turns the display and backlight off when the touchpanel is 
inactive for the specified time. When the touchpanel is reactivated, the last screen to 
be displayed reappears. The specified time is displayed in minutes. The default 
STANDBY timeout is 10 minutes. 

Press

 Return 

to save the settings and return to the SETUP MENU. 


Diagnostics Menu 

DIAGNOSTICS MEMU 


The 

Diagnostics 

button from the MAIN MENU should only be used under 

supervision from a Crestron customer service representative during telephone 
support. Many options available from the DIAGNOSTICS MENU, shown to the left, 
are numeric in nature and their interpretation is beyond the scope of this manual. 


Содержание Isys TPS-1700

Страница 1: ...Crestron TPS 1700 Isys Wired 5 7 Inch Tabletop Touchpanel Operations Guide...

Страница 2: ...by the Technical Documentation department at Crestron Electronics Inc 15 Volvo Drive Rockleigh NJ 07647 1 888 CRESTRON All brand names product names and trademarks are the property of their respectiv...

Страница 3: ...tware Requirements for the PC 10 Programming with Crestron System Builder 11 Programming with SIMPL Windows 11 Programming with VT Pro e 15 Optional Pushbuttons 16 Reserved Join Numbers 16 MultiByte I...

Страница 4: ......

Страница 5: ...el TPS 1700 Introduction Functions and Features The TPS 1700 is a compact Crestron Isys wired 5 7 inch tabletop touchpanel that provides user interface to a Crestron remote control system Cresnet syst...

Страница 6: ...ctive matrix Touchscreen Illumination Backlit fluorescent Touchscreen Composition Resistive Membrane Operating Temperature 50 to 113 F 10 to 45 C Humidity 10 to 90 RH non condensing Overall Dimensions...

Страница 7: ...P only New users may be required to register to obtain access to certain areas of the site including the FTP site Physical Description The touch sensitive viewing screen is located on the front of the...

Страница 8: ...cal Views of TPS 1700 continued Four rubber feet on the underside of the unit are for stability and to prevent slippage on flat surfaces Industry Compliance As of the date of manufacture this unit has...

Страница 9: ...d be used in the following resistance equation to calculate the value on the right side of the equation Resistance Equation R Resistance refer to table below L Length of run or chain in feet PF Power...

Страница 10: ...SETUP MODE the MAIN MENU shown to the left displays four buttons Touch Screen Calibration Exit and Run Program Setup and Diagnostics Selecting Exit and Run Program verifies that all of the setup infor...

Страница 11: ...o set the Cresnet network identity CRESNET ID After the Cresnet ID setting has been verified touch the Return button at the bottom of the screen to save the setting and display the SELECT INTERFACE me...

Страница 12: ...The default is DISABLED Select the Return button to return to the SETUP MENU Power Management Timeout Settings POWER MANAGEMENT TIMEOUT SETTINGS The Power Management Timeout feature is a screen saver...

Страница 13: ...able are supplied to convert a 4 pin Cresnet connection on the control system to the 6 pin connection in the touchpanel The following figure shows the pinout for the 6 pin RJ 11 Recommended Touchpanel...

Страница 14: ...ing using the easiest method Crestron System Builder and use advanced techniques that are available from SIMPL Windows to customize the job VT Pro e is a Windows compatible software package for creati...

Страница 15: ...with SIMPL Windows NOTE The following assumes that the reader has knowledge of SIMPL Windows If not refer to the extensive help information provided with the software NOTE In the following description...

Страница 16: ...d into the upper pane of System Views Additional touchpanels are assigned different Net ID numbers as they are added C2Net Device Slot 9 Setting the Net ID in Device Settings Double click the TPS 1700...

Страница 17: ...inition the signal connected there will be an analog signal In SIMPL Windows the signal types are color coded as follows Digital Blue Analog Red Serial Black Other Green NOTE Other signals are a combi...

Страница 18: ...a to which it points Thus serial signals are used to facilitate the transmission of serial data strings of characters These signals can be generated by incoming data on a COM port or by a symbol that...

Страница 19: ...ional graphics and text A set of pages which make up a project can be designed for each TPS 1700 touchpanel application Each page contains objects such as custom control graphics two and three dimensi...

Страница 20: ...VT Pro e Select a button from the Button drop down list and then select the desired page from the Page Flip drop down list When the button is pressed the page is displayed The quick pushbuttons can a...

Страница 21: ...as more than 256 characters 28 in a font For example Chinese fonts contain several thousand characters Other multibyte languages include Japanese and Korean There are two separate issues with multibyt...

Страница 22: ...velopment tools when uploading programs and projects The following sections define how one would upload a SIMPL Windows program VT Pro e project or upgrade the firmware of the TPS 1700 touchpanel Howe...

Страница 23: ...rt SIMPL Windows or VT Pro e and from the menu bar select Tools Viewport 2 From the Viewport menu select Setup Communications settings alternatively press Alt D to open the Port Settings window Refer...

Страница 24: ...ntrol system Uploading a SIMPL Windows Program A control system source file has the extension smw A compiled SIMPL Windows file has the extension spz for a 2 Series control system bin for CNX generati...

Страница 25: ...not contain any SIMPL modules only the SIMPL Program check box will be enabled If it does contain SIMPL modules then the SIMPL check box will also be enabled Select one or both check boxes and then c...

Страница 26: ...e VT Pro e file vtp and click Open 3 Select File Upload Project Upload via Crestron Viewport 1 Verify that the procedure for Communication Settings that begins on page 18 has been performed 2 As shown...

Страница 27: ...nsion csf To take advantage of all the TPS 1700 touchpanel features it is important that the unit contains the latest firmware available Therefore please check the Crestron website http www crestron c...

Страница 28: ...select File Transfer Update Touchpanel Firmware from the Viewport menu File Transfer Update Touchpanel Firmware Command 3 As shown after this step select the Net ID of the TPS 1700 touchpanel and then...

Страница 29: ...COM port being used to communicate to the control system Transfer speed discrepencies Do the following 1 Lower the baud rate to 38400 to match the Cresnet bus speed 2 Confirm RTS CTS is checked Xon X...

Страница 30: ...headquarters at 1 888 CRESTRON 1 888 273 7876 In Europe call Crestron International at 32 15 50 99 50 In Asia call Crestron Asia at 852 2341 2016 In Latin America call Crestron Latin America at 5255...

Страница 31: ...the front bezel to the base Holding the bezel to the base return the unit to its normal position and lift the bezel from the base 3 Assemble the supplied membrane switches to the pushbutton sets Noti...

Страница 32: ...cluding but not limited to using the Software a either directly or through commands data or instructions from or to another computer b for local campus or wide area network internet or web hosting ser...

Страница 33: ...ubstantially in accordance with the published specifications for a period of ninety 90 days from the date of receipt and b that any hardware accompanying the Software will be subject to its own limite...

Страница 34: ...isplay and overlay components are covered for 90 days batteries and incandescent lamps are not covered This warranty extends to products purchased directly from CRESTRON or an authorized CRESTRON deal...

Страница 35: ...Crestron TPS 1700 Isys Wired 5 7 Inch Tabletop Touchpanel Operations Guide DOC 6223A Isys Wired 5 7 Inch Tabletop Touchpanel TPS 1700 31 This page intentionally left blank...

Страница 36: ...Crestron Electronics Inc Operations Guide DOC 6223A 15 Volvo Drive Rockleigh NJ 07647 10 04 Tel 888 CRESTRON Fax 201 767 7576 Specifications subject to www crestron com change without notice...

Отзывы: