manualshive.com logo in svg
background image

14

15

OPERATION cont. 

  RUNNING YOUR BUFFER / POLISHER AND WAXING VEHICLE cont.
 
 11. When you have finished applying wax with 

        the applicator, bonnet, SHUT OFF the 

        buffer / polisher before removing from the 

        car’s surface. 
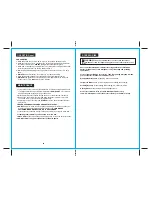
  12. Remove the wax applicator bonnet and use 

        it to hand polish all the hard-to-reach 

        surfaces (under bumpers, around door 

        handles, etc.) (see Fig. 10).  
  13. Properly dispose of wax applicator bonnet.

Fig. 10

Fig. 11

Fig. 12


WARNING: 

When changing 

 accessories, 

BE SURE that the switch is 

 in the

 OFF position and the cord is 

 unplugged.

!

  ATTACHING THE POLISHING BONNET TO THE FOAM PAD (Fig. 11)    


   1. Place the terry bonnet on foam pad as 

       shown in Fig. 11.
   2. 

ALWAYS  make sure that the elastic strip 

       on the bottom of the bonnet is securely 

       tucked on the underside of the foam pad.

  BUFFING AND POLISHING - REMOVING THE WAX FROM THE SURFACE

  (See Fig. 12)
 
 NOTE: Remove wax in the same order in which 

  it was applied.
  1. Wait until wax has dried to an even haze 

      on vehicle.
  2. Place extension cord over your shoulder. 
  3. Turn buffer / polisher ON.
  

IMPORTANT: DO NOT apply excessive 

  pressure against the work surface with this tool. 

  The random orbital motion feature on this tool

  will perform better when less pressure is applied. Appling excessive pressure will 

  slow the random orbital motion and reduce the effectiveness of the tool.
  

NOTE: For best results, use long, sweeping strokes in a criss-cross pattern when 

  removing wax.
  4. Buff and polish the entire surface until all dried wax is removed. Remove the 

      bonnet from time to time and shake out the dried wax residue. A bonnet with 

      excess residue will cause streaking. You may need to replace the bonnet with a 

      new one if you can’t get it clean enough to avoid streaking.
  5. Use a clean terry cloth bonnet for final buffing and polishing. Or use a foam 

      polishing bonnet (sold separately) for the ultimate “showroom” shine.

OPERATION cont. 

  RUNNING YOUR BUFFER / POLISHER AND WAXING VEHICLE
 
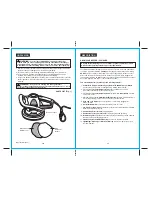
 1. After plugging tool into extension cord, loop 

      extension cord over tool’s stub length plug. 

      Then wrap hook and loop strip around 

      extension cord to secure it in place.
  2. To avoid splashing wax, 

ALWAYS start and 

      stop the buffer / polisher against the surface 

      to be polished. 
  3. Place the extension cord over your shoulder 

      to keep it safely out of your way (see Fig. 6).
  4. Place buffer / polisher against vehicle and 

      turn buffer / polisher 

ON by sliding switch 

      to On position.
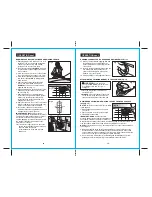
  5. Apply wax in a straight line with either a 

      side-to-side or back and forth motion. 

      ALWAYS use broad, even strokes when 

      applying wax (See Fig. 7).    
  6. Start applying wax to the flat surfaces (hood, 

      trunk and roof) first. Wax one section at a 

      time (see Fig. 8). 
  7. After flat surfaces are covered with wax,  

      do the sides. The perimeter handle system 

      allows easy polishing of horizontal and 

      vertical surfaces. Hold tool with the cord 

      hanging free (see Fig. 9).    
  8. Apply wax in a thin, even coat. Too much wax

      does not add any more protection and only 

      makes the wax removal more difficult.
  9. The random orbit motion of the buffer / 

      polisher provides was application that cannot 

      be duplicated, not even “by hand”.
  

IMPORTANT: DO NOT apply excessive 

  pressure against the work surface with this tool. 

  The random orbital motion feature on this tool

  will perform better when less pressure is 

  applied. Applying excessive pressure will slow 

  the random orbital motion and reduce the 

  effectiveness of the tool.  
  10. It is easiest to apply the wax to the entire 

        surface before starting the removal phase; 

        however, follow the specific 

        recommendations of the wax or polish 

        being used.

Fig. 7

Fig. 8

1

2

3

4

LEFT

RIGHT

Fig. 6

Fig. 9

Fig. 9

Содержание 10721 - 7 in. Buffer/Polisher

Страница 1: ...ACKING DESCRIPTION OPERATION MAINTENANCE ACCESSORIES CAUTION Read understand and follow all Safety Rules and Operating Instructions in this manual before using this product Sears Roebuck and Co Hoffman Estates IL 60179 U S A Visit our Craftsman website www sears com craftsman ...

Страница 2: ...ersonal injury to yourself or others or property damage Always follow the safety precautions to reduce the risk of fire electric shock and personal injury DAMAGE PREVENTION AND INFORMATION MESSAGES These inform user of important information and or instructions that could lead to equipment or other property damage if not followed Each message is preceded by the word NOTE as in the example below The...

Страница 3: ...t all times Proper footing and balance enables better control of the tool in unexpected situations 7 USE SAFETY EQUIPMENT Always wear eye protection SAFETY INSTRUCTIONS cont 1 DO NOT use the tool if switch does not turn it On or Off Any tool that cannot be controlled with the switch is dangerous and must be repaired 2 DISCONNECT the plug from the power source before making any adjustments changing...

Страница 4: ...risk of electric shock CAUTION Keep the extension cord clear of the working area Position the cord so that it will not get caught on lumber tools parts of the vehicle or other obstructions while you are working with a power tool SAFETY INSTRUCTIONS cont SERVICE SAFETY 1 If any part of this tool is missing or should break bend or fail in any way or should any electrical component fail to perform pr...

Страница 5: ...erate properly and perform its intended function Check for misalignment or binding of moving parts breakage of parts and any other condition that may affect the tool s operation A guard or other part that is damaged should be properly repaired or replaced at a Sears Service center 6 SAVE THESE INSTRUCTIONS Refer to them frequently and use them to instruct others who may use this tool If someone bo...

Страница 6: ... contours for efficient buffing polishing Chemical resistant for long life 8 One Wax Applicator Bonnet for applying wax 9 One Reusable Terry Cloth Bonnet for removing wax and polishing 10 Non marring Flat Top of buffer polisher provides a stable base when applying wax to bonnets and changing bonnets 11 Permanently lubricated Ball Bearings for smooth efficient operation 12 Lightweight High impact R...

Страница 7: ...nnet is securely tucked on the underside of the foam pad KNOW YOUR BUFFER POLISHER cont Before attempting to use your tool familiarize yourself with all of the operating features and safety requirements DESCRIPTION cont OPERATION Fig 2 Stub Lengh Cord On Off Slide Switch Perimeter Handle System Foam Pad Base PRODUCT SPECIFICATIONS Pad Diameter 7 in Motor OPM 3800 Rating 120 volts 60 Hz AC Amps 1 0...

Страница 8: ...avoid streaking 5 Use a clean terry cloth bonnet for final buffing and polishing Or use a foam polishing bonnet sold separately for the ultimate showroom shine OPERATION cont RUNNING YOUR BUFFER POLISHER AND WAXING VEHICLE 1 After plugging tool into extension cord loop extension cord over tool s stub length plug Then wrap hook and loop strip around extension cord to secure it in place 2 To avoid s...

Страница 9: ...on the top and work down 4 Remove bugs bird droppings tree sap and tar from the car s surface on a daily basis 5 ALWAYS make sure that the car s surface is cool before washing 6 Avoid parking near sprinklers because water spots are difficult to remove 7 ALWAYS keep glass cleaner chemicals away from painted surfaces Spray the cleaner onto a towel NOT directly on the windows MAINTENANCE 1 Terry clot...

Страница 10: ......

Отзывы: