10
FENCE RAILS
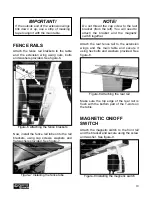
Attach the fence rail brackets to the table
and the extension wing using nuts, bolts
and washers provided. See figure-6.
Figure-6 Attaching the fence brackets
Now, install the fence rail tube onto the rail
brackets, using cap screws, washers and
flat washers provided. See figure-7.
Figure-7 Installing the fence tube
Attach the rear fence rail to the extension
wings and the main table and secure it
using hex bolts and washers provided. See
figure-8.
Figure-8 Attaching the rear rail
Make sure the top edge of the rear rail is
flush with the bottom part of the T-slots on
the table.
MAGNETIC ON/OFF
SWITCH
Attach the magnetic switch to the front rail
and the bracket and secure using the screw
and washer. See figure-9.
Figure-9 Installing the magnetic switch
IMPORTANT!
If the outside end of the extension wings
tilts down or up, use a strip of masking
tape to align it with the main table.
NOTE!
Do not thread the cap screw to the last
bracket (from the left). You will need to
attach the bracket and the magnetic
switch together.
Содержание CX208
Страница 1: ...MODEL CX208 10 CABINET TABLE SAW WITH 30 FENCE USER MANUAL Version 1 0 ...
Страница 11: ...11 DETAILED INSTRUCTIONS ON FENCE INSTALLATION ...
Страница 19: ...19 CX208 PARTS DIAGRAM ...
Страница 20: ...20 ...
Страница 21: ...21 ...
Страница 22: ...22 ...
Страница 29: ...29 FENCE PARTS DIAGRAM ...
Страница 30: ...30 FENCE PARTS LIST ...


