Coyote C1PB Скачать руководство пользователя страница 20


19


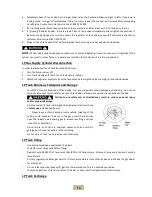
Your side burner is designed to reach a temperature that you set by adjusting a valve that in turn adjusts the amount 

of gas  that  goes through each burner. This valve is located behind your knob and is the key to your heat and  fuel 

consumption. 

Furthermore,  the  way  to  ignite  the  burners  is  through  the  valves,  so  please  understand  the  importance  of  the 

valves/knobs and the position/care taken with respect to them. 


Example: If you forget to turn a knob off and the burner is not lit, then you will have a gas leak out of that 

valve. You must be aware of your side burner’s status and be responsible! 

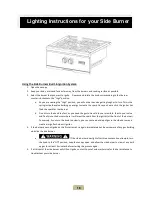
When you first ignite your side burner, burn the side burner to get rid of any odors or trace debris that may be 
left over from manufacturing and transit. This is done by operating your side burner at the “HIGH” setting with 
the  hood  closed  for  no  more  than  5  minutes.  After  you  have  “burned  off”  the  side  burner,  you  are  ready  for 
cooking! 

Preparing Food for the Side Burner 


Always observe safe food-handling and safe food-preparation practices when using 

this Side burner, to prevent food-borne illnesses. 

Always cook foods adequately. Undercooked foods can retain bacteria, especially if thawed or exposed to 
warm conditions prior to cooking.


Always use separate plates and utensils for the handling of raw food. Never place raw food and cooked 
food on the same plate, and never place cooked food on a plate that was used for handling raw food.   

Always carefully wash all plates and utensils used to handle raw food before using them to handle cooked 
food. 

Always wash all vegetables, seafood and poultry before cooking. 

Always leave uncooked foods in the refrigerator until you are ready to start cooking. 

Always marinate meat in the refrigerator. Dispose of the excess marinade, and never reuse it. 
 

Side burnering Tips:


If you pre-cook meat or poultry, do so immediately before side burnering. 

Refrigerate leftovers within 2 hours of taking food off the side burner. 

Never let the tray boil dry, as that could be hazardous. Grease from fatty foods that have collected in the 
tray could ignite and possibly cause bodily injury or property damage. 

Use a meat thermometer to be sure food has reached a safe internal temperature. 

Always trim excess fat from your foods to reduce the occurrence of flare-ups during cooking. 

Apply a light coating of cooking oil to the cooking grids before side burnering, to prevent foods from 
sticking. 

Cook similar portion sizes together, so that they all cook evenly. 

Use tongs to turn foods on the side burner. 

Never pierce foods while they are cooking on the Side burner, as this will dry them out. 

Turn foods infrequently. Some chefs say that a good steak should never be turned more than once. 

Apply sugar-based sauces such as commercial barbecue sauces only during the latter stages of cooking, to 
prevent charring. 

Soak the string you use to tie up roasts and poultry on the rotisserie spit to protect it from burning.   

Using Your Burners and Grilling Safely


Содержание C1PB

Страница 1: ...sense To installer or person assembling grill Leave this manual with grill for future reference To consumer Keep this manual for future reference as it contains important Warnings and Instructions COY...

Страница 2: ...y your new side burner and thank you for choosing our product We hope you consider us for future purchases Read and save the instructions Obey all Warnings and Instructions This Manual provides specif...

Страница 3: ...l not be stored in the vicinity of this or any other appliance DANGER DANGER indicates an imminently hazardous situation which if not avoided will result in death or serious injury CAUTION CAUTION ind...

Страница 4: ...specified clearances listed in this Manual on page 9 7 NEVER leave the side burner unattended while cooking 8 Risk of Explosion NEVER use natural gas in a unit designed for liquid propane gas or vice...

Страница 5: ...the rack located just under the side burner 25 Fire Hazard Grease is extremely flammable Let hot grease cool down before attempting to handle or dispose of it After use and cool down the drip tray sho...

Страница 6: ...rust or burn through 5 years limited Flavorizer Bars no rust or burn through 2 years limited Ignition systems Valves 1 year limited Stainless steel frame housing Limited Lifetime Coyote Outdoor Living...

Страница 7: ...ice or damages caused by flashback fire or grease fire This limited warranty does not cover scratches dents corrosion or discoloration caused by weather heat abrasive and chemical cleaners pool or spa...

Страница 8: ...on that will ensure there is adequate area for the smoke to dissipate IN ORDER TO AVOID INHALATION OF POTENTIALLY TOXIC FUMES Ventilation Requirements for Proper Operation of your Coyote Side burner V...

Страница 9: ...pen fully If you wish to use the rotisserie option you will want to make sure that you leave adequate space at least 6 on each side of the side burner so that the motor and rotisserie spit handle will...

Страница 10: ...llustrations demonstrate how the slide in type unit isdesigned to fit into open front enclosures and supported at the Countertop Do not install this unit under unprotected flammable surfaces Do not in...

Страница 11: ...LP NG Rotisserie Lights C1PB 10 1 4 21 21 13 24 24 1 4 60 000 60 000 No No Height Minimum of 2 vents but optimally 4 vents per cabinet that has any sort of gas supply or connection Each vent must be a...

Страница 12: ...A 119 2 NFPA 1192M and CSA Z240 RV Series Recreational Vehicle Code as applicable Gas valves are preset at the factory to operate on liquid propane or natural gas If you wish to convert be sure to con...

Страница 13: ...does not permit gas flow until a positive seal has been obtained The cylinder must be arranged for vapor withdrawal It must also include a collar to protect the cylinder valve A safety relief device...

Страница 14: ...sting 1 Do not insert any tool into the valve outlet or safety relief valve You may damage the valve and cause a leak Leaking propane may result in explosion fire severe personal injury or death 2 If...

Страница 15: ...k coupling nut counterclockwise LP Tank Removal Transport and Storage Turn OFF all control knobs and LP tank valve Turn coupling nut counterclockwise by hand only do not use tools to disconnect Instal...

Страница 16: ...y company However it is the responsibility of the owner installer to verify that the correct regulator is purchased for the intended application and that it is installed properly o As codes vary from...

Страница 17: ...result in a low flame or a hazardous condition that could result in a fire or explosion Natural Gas Supply and Connection 1 Make sure all burner valves are in the OFF position 2 All NG units need to...

Страница 18: ...e grill when lighting ALWAYS inspect the hose before using the grill If there is excessive abrasion or wear or if the hose is cut it must be replaced prior to the outdoor cooking gas appliance being p...

Страница 19: ...then to your valve and finally into the burner where it will meet the spark from the igniter at the front of the burner Conversely if you turn the knob too slowly you can cause a build up of gas in t...

Страница 20: ...food on a plate that was used for handling raw food Always carefully wash all plates and utensils used to handle raw food before using them to handle cooked food Always wash all vegetables seafood and...

Страница 21: ...er through the drain hole DRIP TRAY The drip tray located below the side burner should be cleaned periodically to prevent buildup of debris NOTE Allow the drip tray to cool before attempting to clean...

Страница 22: ...olishing stainless steel Do not clean or polish your side burner s stainless steel when the gill is in operation or still hot 2 To clean the stainless steel wash off all dirt and debris from the steel...

Страница 23: ...tub 4 Do not store pool chemicals in your island or island cabinets How to Remove Scratches from your Stainless Steel If your situation is a little more serious and you have obtained scratches in your...

Страница 24: ...d other flammable vapors and liquids 2 Do not obstruct the flow of combustion and ventilation air 3 Keep the ventilation opening s of the cylinder enclosure free and clear from debris 4 Visually check...

Страница 25: ...ts contact our Coyote Customer Service line at 855 520 1559 Problem Possible Causes and Solutions Burner will not light when the igniter button is turned Is your gas supply turned on If this is an L P...

Страница 26: ...lve is open and cylinder has fuel Low heat with the knob on HIGH Check to see if the fuel hose is bent or kinked Make sure the cooking area is clear of dust Check your gas supply and gas pressure If i...

Страница 27: ...26 C1PB Parts List...

Страница 28: ...E COLLIMATOR C1PB 003 4 BURNER STAINLESS STEEL C1PB 004 5 AIR SHUTTER C1PB 005 6 CONTROL PANEL C1PB 006 7 FIRE TUBE C1PB 007 8 CONTROL KNOB C1PB 008 9 FIRE BOX C1PB 009 10 DRIP TRAY ASSEMBLY C1PB 010...

Отзывы: