background image

− 16 −

Operating Procedure

 Time Settings

(1)  Press the MENU switch for three seconds while the gas 

concentration screen is displayed to display the time setting 
screen. Refer to page 11.

(2)  Press the MENU switch to make time settings.

The  CL5  indication  will  then  start  flashing.  Use  the 
BZ.STOP switch (

) to select the setting unit from Year, 

Month, Date, Hour, and Minute.

(3)  Minute Setting

When the MENU switch is pressed, CL5 will change from 
flashing to steady illumination, and the minute value will 
change from steady illumination to flashing.
Use the BZ.STOP switch (

) or the LIGHT switch (

) to 

change the setting and press the MENU switch to enter the 
value.

(4)  Hour Setting

When the MENU switch is pressed, CL4 will change from 
flashing to steady illumination, and the hour value will 
change from steady illumination to flashing.
Use the BZ.STOP switch (

) or the LIGHT switch (

) to 

change the setting and press the MENU switch to enter the 
value.

(5)  Date Setting

When the MENU switch is pressed, CL3 will change from 
flashing to steady illumination, and the date value will 
change from steady illumination to flashing.
Use the BZ.STOP switch (

) or the LIGHT switch (

) to 

change the setting and press the MENU switch to enter the 
value.

(6)  Month Setting

When the the MENU switch is pressed, CL2 will change 
from flashing to steady illumination, and the month value 
will change from steady illumination to flashing.
Use the BZ.STOP switch (

) or the LIGHT switch (

) to 

change the setting and press the MENU switch to enter the 
value.

(7)  Year Setting

When the MENU switch is pressed, CL1 will change from 
flashing to steady illumination, and the year value will 
change from steady illumination to flashing.
Use the BZ.STOP switch (

) or the LIGHT switch (

) to 

change the setting and press the MENU switch to enter the 
value.

(8)    Press  the  POWER  switch  twice  to  return  to  the  gas 

concentration screen.

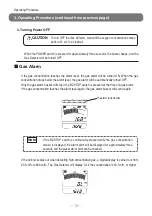
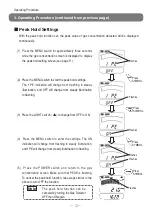
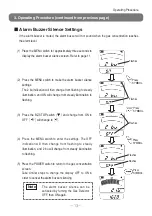
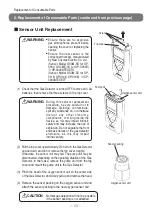
3. Operating Procedure (continued from previous page)

Flashes

Flashes

Flashes

Flashes

Flashes

Содержание XP-3180

Страница 1: ...the use of two models listed on the left Please keep this instruction manual available for quick reference when needed Before use carefully read this instruction manual and fully understand the conten...

Страница 2: ...arm Buzzer Silence Settings 13 Logging 14 Data Logger Communications Screen 15 Time Settings 16 4 Error Message Malfunction Alarm 17 5 Replacement of Consumable Parts 18 Filter Element Replacement 18...

Страница 3: ...Mbytes or more CD ROM drive A CD ROM drive capable of reading CD R data The software is provided in a CD R disc USB port A USB1 1 or higher grade port available to Windows which allows connection wit...

Страница 4: ...antistatic clothing and electrically conductive shoes antistatic work shoes The floor should also be electrically conductive with an electrical leakage resistance of 10 M or less In the measurement of...

Страница 5: ...or modify the Gas Detector or change the structure or electric circuits of the Gas Detector Otherwise the explosion proof performance of the Gas Detector will be damaged Do not leave the Gas Detector...

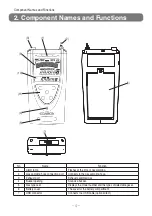
Страница 6: ...ampling hose connection port Connects to the gas sampling hose 3 Exhaust port Exhausts sampled gas 4 Buzzer opening Sounds a buzzer 5 Gas type seal Displays the model number and the types of detectabl...

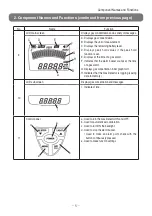
Страница 7: ...the time of a gas alarm G Displays gas concentration in bar graph form H Indicates that the Gas Detector is logging saving data in memory 10 LCD sub screen Displays gas concentration and messages I In...

Страница 8: ...ted 4 Suction attachment pipe AT 3A Gas suction port 1 m gas sampling hose for XP 3180 2 Component Names and Functions continued from previous page Cooling Drain Filter Set for XP 3180E No Name Functi...

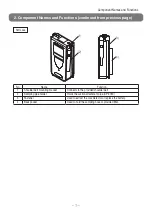
Страница 9: ...ame Function 1 Shoulder belt mounting bracket Connects to the provided shoulder belt 2 Sampling pipe holder Holds the suction attachment pipe XP 3180 3 Fastener Used to extract the Gas Detector or rep...

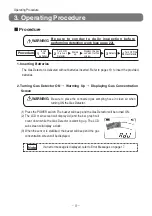
Страница 10: ...count down while the Gas Detector is warming up The LCD sub screen will display a clock 3 When the sensor is stabilized the buzzer will beep and the gas concentration screen will be displayed WARNING...

Страница 11: ...replace the sensor unit If the Gas Detector is not turned on in clean air E may be displayed regardless of the lifetime condition of the sensor Always turn ON the Gas Detector in clean air 21vol Cali...

Страница 12: ...h is pressed at the time of a gas alarm If the gas concentration reaches the alarm level again the gas alarm buzzer will sound again If the pointer scales out when detecting high concentration gas a d...

Страница 13: ...on reaches the alarm level P 13 3 Detectable gas selection XP 3180 and XP 3180E cannot be set 4 LCD selection XP 3180 and XP 3180E cannot be set 5 Execution and completion of logging Logs saves in mem...

Страница 14: ...nation to flashing 3 Press the LIGHT swit ch to change from OFF to ON 4 Press the MENU switch to enter the settings The ON indication will change from flashing to steady illumination and 1PE will chan...

Страница 15: ...tion to flashing 3 Press the BZ STOP switch and change from ON to OFF will change to 4 Press the MENU switch to enter the settings The OFF indication will then change from flashing to steady illuminat...

Страница 16: ...s the LIGHT switch to change OFF to ON 4 Press the MENU switch to enter the settings The ON indication will then change from flashing to steady illumination and 5 LG will change from steady illuminati...

Страница 17: ...op flashing and ON will start flashing Data logger communication with the PC will then be possible Operate the PC for data logger communication 4 When communication is finished press the POWER switch...

Страница 18: ...the setting and press the MENU switch to enter the value 5 Date Setting When the MENU switch is pressed CL3 will change from flashing to steady illumination and the date value will change from steady...

Страница 19: ...tage drops and the remaining battery level is low The Gas Detector will not work when the battery voltage is low Replace the batteries see pages 19 Use approved batteries Duracell MN1500 Panasonic LR6...

Страница 20: ...ment with a new one and reassemble the parts XP 3180E 1 Remove the drain cup of the cooling drain filter 2 Remove the O ring on the end of the drain cup 3 Replace the FE 10 Filter Element with a new o...

Страница 21: ...into the case part No 3620584053 and zip it shut before entering the hazardous location WARNING Use Panasonic LR6XJK Toshiba LR6 or Duracell MN1500 batteries Use of any other manufacturer or type wil...

Страница 22: ...ARNING Ensure there are no explosive gas atmospheres present before opening the cover or replacing the sensor Ensure the new sensor is the correct part number manufactured by New Cosmos Electric Co Lt...

Страница 23: ...the gas sampling hose and check that the motor sound of the pump disappears and that Err P is displayed If Err P is not displayed the sensor packing may not have been attached Open the top cover and...

Страница 24: ...1 m long gas sampling hose and replace the filter element with a new one see page 18 Remaining battery level If the remaining battery level is low replace the batteries with new ones see page 19 Airti...

Страница 25: ...ries again in the correct polarity B a t t e r y r e p l a c e m e n t P19 Battery life Replace the batteries The buzzer does not sound The instrument has been set to the Silent mode Deactivate the Si...

Страница 26: ...non conforming product or refund of the original purchase price of the non conforming product In no event will New Cosmos be liable for any other special incidental or consequential damages or losses...

Страница 27: ...Ex d ib IIB T4 Gb Other major alarms Remaining battery level sensor error and flow rate drop Main functions 21vol calibration The automatic 21vol calibration of the sensor is possible at the time of...

Страница 28: ...Ed Rev 2009 12 08 UL 60079 11 5th Ed Rev 2011 05 05 UL 60079 1 6th Ed Rev 2009 04 10 EN 60079 0 2012 EN 60079 0 2012 EN 60079 11 2012 EN 60079 1 2007 IEC 60079 0 6th Ed Corr 1 IEC 60079 0 6th Ed Corr...

Страница 29: ...for the variation in ambient temperature 21 vol adjustment To adjust meter in fresh air to 21 vol indication Explosion proof A structure applied to electrical equipment to prevent the equipment from i...

Страница 30: ...MEMO...

Страница 31: ......

Страница 32: ...If this instruction manual is lost contact New Cosmos Electric or the nearest branch or sales office shown below A copy of the instruction manual will be delivered to you A fee is charged XP 3000ATEX...

Отзывы: