


Before you dock your iPod™ and use it with the DMIX-600 there
are a few setup tasks you must do first:
(A) Enable your iPod™ for disk use
(B) Prepare your computer so that when you rip music into your
computer it will be of the supported format.
(C) Convert any files that you have pre-ripped and or
downloaded so they will work with your DMIX-600
ENABLE YOUR iPOD
™
FOR DISK USE
First and most important is setting up your iPod™ so your Cortex
player can read it. Plug in your iPod™ to your computer and wait
for iTunes™ to identify it. When you see a representation of your
iPod™ on your main screen, scroll down to options and un-click
the “manually manage music” box and make sure that the
“Enable for disk use” box is checked. Then you can re-check “the
manually manage music box depending on whether you do or do
not want iTunes™ to manage your music.
iTunes
™
SETUP FOR MAC OR PC
(PC SHOWN
)
The following are the prefered settings you will want, to optimize
iTunes and ensure all your music files are supported and will play
on your DMIX-600.
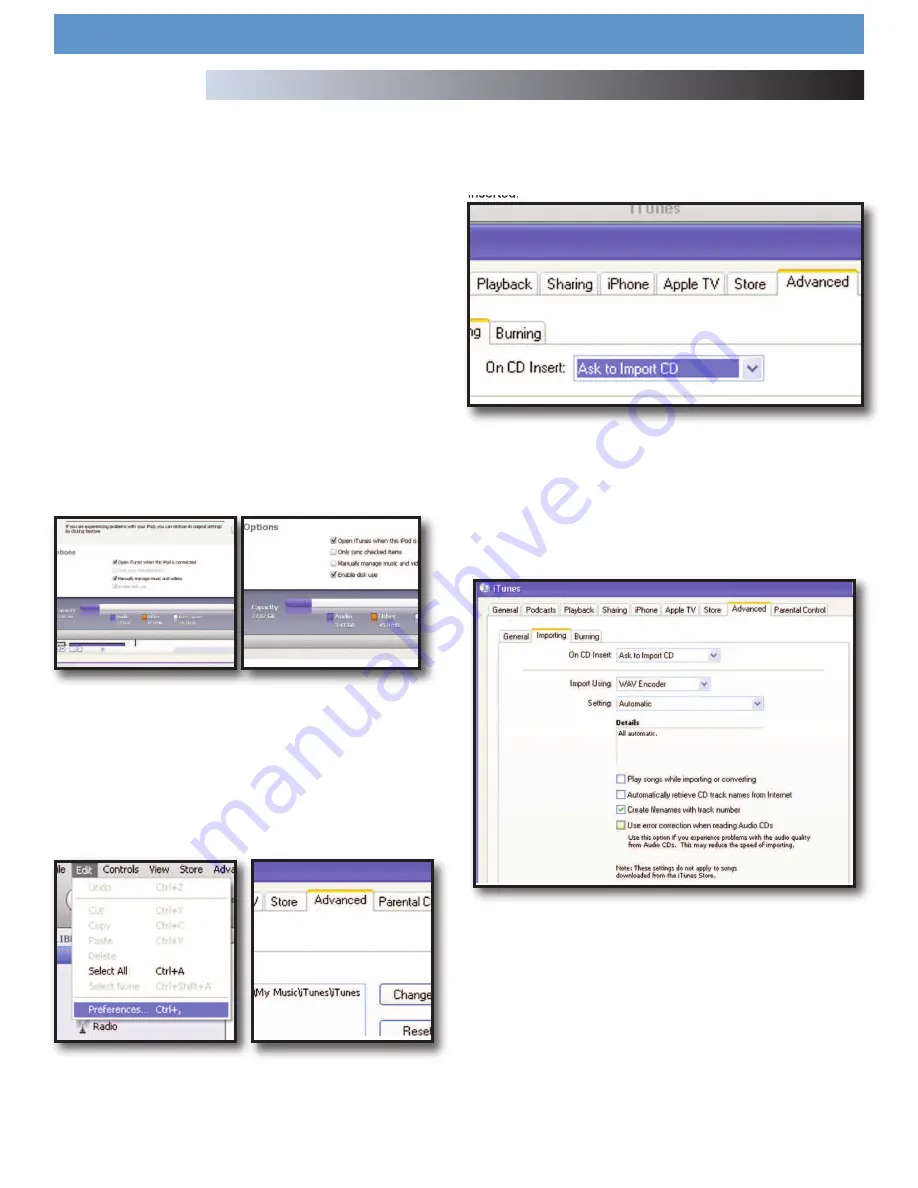
On your Mac or PC open iTunes™, then under the “EDIT” pull
down menu (iTunes™ menu for MAC) go to preferences, when
the preferences box opens choose the “ADVANCED” pane, and
in the “ADVANCED” pane choose the Importing button
First where it says “On CD insert” choose “ Ask to import CD”
option, which will set iTunes™ to prompt you when a disc is
inserted, so iTunes will not automatically start ripping a cd when
inserted.
Then, next to the “Import Using” you can choose one of two for-
mats.
NO COMPRESSION(WAV)
If you wish to keep your music files Full quality (No compression)
you may set the Import Using button to WAV encoder, and set
the “Setting” menu to automatic, The rest of the setting should
stay as they were.
But remember files that were downloaded or ripped to Mp3
will not sound any better by converting them to this format
all you will be doing will be increasing thier size 300%!
Using iTunes
™
to optimize your sound files
Settings for importing as WAV.
Using the DMIX-600
29


