background image


        High Speed Dome Camera Introduction Manual


21


▌▌

System Information 


 Date Time Setup 


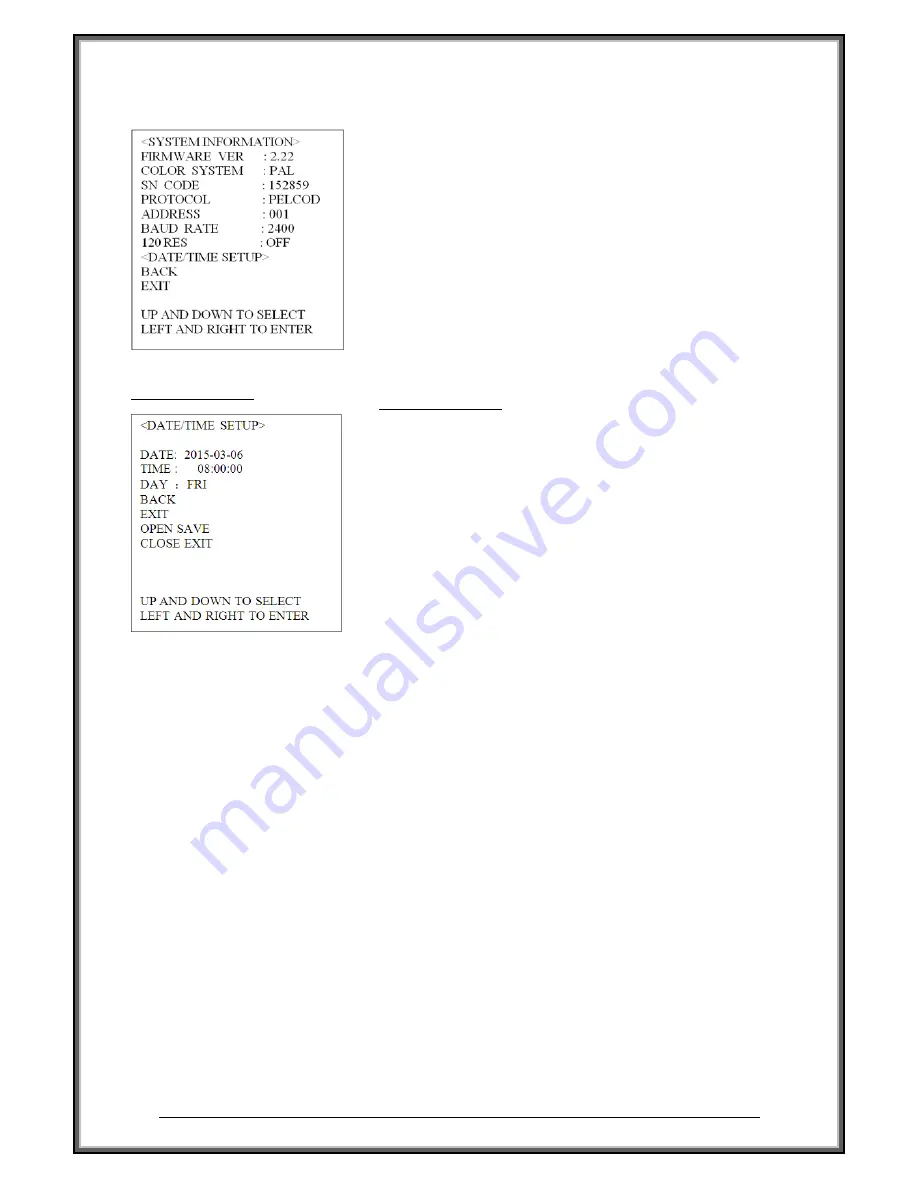
The user can check the dome system information as required. 

The system information includes:


firmware version

color system

Series code

protocol

120ohm end resistor setup

Date/Time 

setup. 


 Date Time Setup 

<SYSTEM INFORMATION>

<DATE/TIME SETUP> 

The dome can display the data and time. And the user could 

enter this CLOCK menu to set up the DATE and TIME. 

z


Date:2015-03-06 


   Move the cursor to "Date", move the joystick up or down to 

select the desired position about the date ,and then move the 

joystick lift or right to select corresponding date. 


z


Time:08:00:00


Move the cursor to "Time", move the joystick up or down to 

select the desired position about the time and then move the 

joystick left or right to select corresponding time. 


z


Day: [MON/TUE/WED/THU/FRI/SAT/SUN]


Move the cursor to "Day", move the joystick to select 

corresponding day.


Содержание 15-CD66WB

Страница 1: ...Installation and Operation Manual for High Speed Dome Camera VER V1 0 15 CD66WIB 15 CD66WB Please read the operation manual carefully before installing and using this unit ...

Страница 2: ...ntended to alert the user to the presence of un insulated dangerous voltage within the product s enclosure that may be of sufficient magnitude to constitute a risk of electric shock to persons This exclamation point symbol is intended to alert the user to the presence of important operating and maintenance servicing instructions in the literature accompanying the appliance WARNING To prevent the r...

Страница 3: ...nded by manufacturer 6 Power source This product should be operated only from the type of power source indicated on the marking label Precautions Operating z Before using make sure power supply and others are properly connected z While operating if any abnormal condition or malfunction is observed stop using the camera immediately and then contact your local dealer Handling z Do not disassemble or...

Страница 4: ...oints before operation Start OSD Menu Reserved Preset OSD Display of Main Screen 14 15 17 18 18 19 4 How to use OSD Menu Main Menu System Information Display Setup IR Setup Dome Setup Camera Setup Preset Setup Swing Setup Pattern Setup Group Setup Auto Scan Setup Zones Setup Timing Action Setup Alarm Input Setup System Initialize 20 21 22 23 24 29 31 32 33 34 35 36 37 38 39 5 Specifications Specif...

Страница 5: ...rotocol through RS485 or coaxial cable z Max 8 set of Group action can be stored This enables to move camera repetitively with combination of Preset A Group is composed of max 16 entities of Preset z Max 4 of Patterns can be recorded and played back This enables to move camera to follow any trajectory operated by joystick as closely as possible z Max 8 set of Swing action can be stored This enable...

Страница 6: ...re practical for manual target tracking z Power Up Action This function enables to resume the last action executed before power down Most of actions such as Preset Pattern Swing Auto scan and Group are available for this function but jog actions are not available to resume z Auto Flip When the camera tilts downward and goes just beyond the vertical position the camera will rotate 180 degrees z Pre...

Страница 7: ...d commands over a long time the dome camera will return to its default functions which include the home place auto pan auto cruise and pattern z Dome Address Setup The dome supports up to 255 addresses and the dome will only response to the instructions given to its own address Please check the ball machine code dialing switch address setting z Manual Object Tracking The use can move the joystick ...

Страница 8: ...is aiming to compensate the brightness of the dark object and adjust the background brightness to get a clear image 5Auto Manual White Balance Auto Manual WB adjust depending on the environment light changes 6 Day and Night Switch Only for Day Nigh Camera Speed dome camera can auto switch according to the environmental illumination changes z I O Functions To reject external electric noise and shoc...

Страница 9: ...High Speed Dome Camera Introduction Manual 8 Product Accessories 15 CD66WIB 15 CD66WB z Accessories User s Manual Anti drop Rope Screw Caution AC24V 3A power for 15 CD66WIB AC24V 2A power for 15 CD66WB ...

Страница 10: ...se contact us for any help during the installation z Installation Space and Density Checkup Please make sure the space is big enough to install our dome And also ensure the density of the ceilings or walls to hold total weight of the dome and its accessories z Cables Preparation Please choose the proper cable according to the transmission distance The min requirement of coaxial BNC cable is listed...

Страница 11: ... Camera Introduction Manual 10 Installation Method The high speed dome could be installed in wall mount and pendant mount Wall Mount Pendant Mount Installation Dimensions Wall Mount 15 CD66WIB 15 CD66WB Drill Drawing ...

Страница 12: ...ome Camera Introduction Manual 11 Pendant Mount 15 CD66WIB 15 CD66WB Drill Drawing Notice The wall and ceiling must be thick enough to install the expansion and can bear 4 times the weight of the dome camera itself ...

Страница 13: ... installation hole positions on the wall referencing to the bottom of bracket 2 Drill the hole and install 4 pieces of M8 expansion bolt into the hole 3 Take out the high speed dome and put the cables through the bracket Use M8 screws to fix the bracket and dome body 4 Use 4 pieces of M8 screw nuts with washer to fix the bracket on the wall ...

Страница 14: ...dome 1 Take out the bracket from the package as shown mark the installation hole positions on the ceiling referencing to the bottom of bracket 2 Drill the hole and install 4 pieces of M8 expansion bolt into the hole 3 Take out the high speed dome and put the cables through the sockets on the bottom of the pendant bracket Use M8 screws to fix the bracket and dome body 4 Use screw nuts with washer t...

Страница 15: ...p switches are under the cover as following picture SW1 Dip switch for the dome address SW2 Dip switch for the dome protocol z Baud Rate Setup SW2 Set the No 5 6 dip switch for the baud rate configuration Baud Rate SW2 5 SW2 6 9600 ON ON 4800 OFF ON 2400 ON OFF Reserved 1 If you want to control using DVR or P T controller their protocol must be identical to camera Otherwise you can not control the...

Страница 16: ...55 Factory default of Camera ID is 1 3 If you want to control a certain camera you must match the camera ID with Cam ID setting of DVR or Controller 4 Speed dome can change the ID address and baud rate via OSD menu Cabling Cabling Terminal Block z Power Connection Please check the voltage and current capacity of rated power carefully Rated power is indicated in the back of main unit Rated Power In...

Страница 17: ...e OSD Menu support the distal 120R resistance of the opening and closing z Video Connection Connect with BNC coaxial cable z Alarm input Signal Description IN COM Common point for alarm IN1 IN2 IN3 IN4 IN5 IN6 IN7 Alarm input signal After open the alarm function Speed dome can detect the status of alarm automatically z Alarm output Speed dome can detect the status of alarm input automatically when...

Страница 18: ... for your controller if camera can not be controlled properly The operation of this manual is based on the standard Pelco Controller Preset and pattern Function Pre Check z Check how to operate preset and pattern function with controller or DVR in advance to operate camera function fully when using controller or DVR z Refer to the following table when using standard Pelco R protocol controller Go ...

Страница 19: ...Function 1 8 Call 151 158 Enter Runs Group Function 1 8 Call 160 Enter Sets Alarm ON Call 161 Enter Sets Alarm OFF Call 170 Enter Sets Camera BLC Mode to OFF Call 171 Enter Sets Camera BLC Mode to ON Call 174 Enter Sets Camera Focus Mode to AUTO Call 175 Enter Sets Camera Focus Mode to Manual Call 176 Enter Sets Camera Focus Mode to SEMI AUTO Call 177 Enter Sets Day Night Mode to AUTO Call 178 Ent...

Страница 20: ...n camera reach to Preset xxx RUN PATTERN x When Pattern x is in action RUN SWG x GROUP xxx When Swing is in action xxxxxx ERR xxx When undefined function is called to run zAction Label The Label stored for specific Preset and Pattern and Group zAlarm Input This information shows current state of Alarm Input zDate Time info Current speed dome time and date zTemperature Show current speed dome inter...

Страница 21: ...g the joystick via left right to modify the parameter of the camera then saving automatically Some of functions have to save the parameter by pressing OPNE key Main Menu z System Information Displays system information configuration and date time setup z Display Setup Enable Disable of OSD display on Main Screen z I R Setup Enter into IR Setup menu z Dome Setup Enter into Dome Setup menu z Camera ...

Страница 22: ...d time And the user could enter this CLOCK menu to set up the DATE and TIME z Date 2015 03 06 Move the cursor to Date move the joystick up or down to select the desired position about the date and then move the joystick lift or right to select corresponding date z Time 08 00 00 Move the cursor to Time move the joystick up or down to select the desired position about the time and then move the joys...

Страница 23: ...display on Main Screen If an item is set to be AUTO the item is displayed only when the value of it is changed z Camera ID ON OFF z IR Information ON OFF z Date Time ON OFF z PTZ Information ON OFF AUTO z Motion ON OFF AUTO z Action Title ON OFF AUTO z Alarm input ON OFF AUTO z Temperature ON OFF AUTO ...

Страница 24: ...Camera Infrared light turned on or off which is synchronized with the camera and transferred from day and night mode 4 NEAR Forced IR light to the near beam mode 5 FAR Forced IR light to the far beam mode 6 ON Infrared light mode forced open 7 OFF Infrared light mode forced close z Output Power 00 09 To select the output power of infrared z Testing Time 01S 08S To select the testing time of infrar...

Страница 25: ...ome of function can be set form user such as wiper soft limit power up action privacy zone parking action north direction and the tilt angle adjustment DOME SETUP WIPER SETUP Enter into Wiper Setup menu z Wiper SINGLE CONTINUE To select the wiper working on single or continue mode z Number 1 10 To select the number of continuing wipe when it was set CONTINUE mode z Reset Reset Wiper z Run wiper Ru...

Страница 26: ...t ON OFF To set soft limit function on off z Left Limit To set left limit of the soft limit function z Right Limit To set right limit of the soft limit function z Limit Delete OK CANCEL To delete soft limit DOME SETUP PWR UP ACTION The user can define the dome action when power on z PWR UP ACTION NOTHING To select activities when power up Including NOTHING A SCAN SWING1 8 GROUP1 8 PATTER1 4 PRESET...

Страница 27: ...Otherwise UNDEFINED will be displayed under Mask No z Display ON OFF Sets if camera makes mask shows or not on images z Clear Mask OK CANCEL Deletes data in the selected mask NO z Edit Mask DOME SETUP PRIVACY ZONE EDIT MASK z Move camera to area to mask Then the menu to adjust mask size will be displayed z Adjust mask size Use joystick or arrow buttons to adjust mask size TILT WIDE Adjusts mask wi...

Страница 28: ...ed z Parking Action NOTHING To select parking action on off including NOTHING AUTO SCAN SWING1 8 GROUP1 8 PATTER1 4 PRESET1 8 z Wait Time 005S 240S To select the waiting time for parking action function Set North Direction DOME SETUP SET NORTH DIRECTION Set North to assign compass direction as criteria Move camera and press OPEN button to save Tilt Angle DOME SETUP TILT ANGLE Set dome tilt angle z...

Страница 29: ...ion availability should be different by models z Auto Flip ON OFF When the camera tilts downward and goes just beyond the vertical position the camera will rotate 180 degrees z Jog Direction INVERSE NORMAL If you set this to Inverse the view in the screen is moving same direction with jog tilting If Normal is selected the view in the screen is moving reversely z Dome Max Speed 10 360 Sets maximum ...

Страница 30: ...s in preset operation and Auto Focus mode activates when jog operation Starts With Manual mode at presets Focus data ismemorized in each preset in advance and camera calls focus data in correspondence with presets as soon as camera arrives at a preset z IRIS Mode AUTO MANUAL SEMIAUTO Sets camera IRIS mode z Mirror V H HV OFF To select the image reverse including vertical horizontal or both z Freez...

Страница 31: ... range WDR balances thebrightest and darkest sections of a scene to produce a picture that is perfectly balanced in light and clarity z Brightness 0 31 Adjusts brightness of images Iris Shutter Speed and Gain are adjusted automatically in correspondence with this value z Shutter ON OFF To select the auto electrical shutter on off z Shutter Value 1 1 1 10000 To select the shutter speed such as 1 1 ...

Страница 32: ...s on monitor z Clear Preset CANCEL OK Delete current Preset data include edit label z Clear all Preset CANCEL OK Delete all current Preset data include edit label z Edit Scene Redefine current Preset scene position Using Joystick move camera to desired position By pressing OPEN to save current PTZ data z Edit Label Edits Label to show on monitor when preset runs MAX 10 alphabets are allowed Enter ...

Страница 33: ...e start point to the preset assigned as the end point in CW Clockwise direction The camera moves from preset assigned as the start point to preset assigned as the end point CCW Counterclockwise direction Then camera moves from the preset assigned as the endpoint to the preset assigned as the start point in CCW Counterclockwise direction z Swing Speed 03 15 Sets Swing speed rating from 03 to 15 z C...

Страница 34: ...the cursor here and then joystick to the right to enter To start pattern recording Move camera with joystick of controller or run preset function to memorize the path mostly curve path in a selected pattern Maximum 500 commands can be stored in a pattern z Edit Label Edits Label to show on monitor when preset runs MAX 10 alphabets are allowed Enter edit label cursor will be displayed on the screen...

Страница 35: ...ursor up down and press OPEN key to set up 3 Set up Action Dwell time and Speed is optional Time value from displayed in reverse Move cursor Left Right to select items and 3 sec To 60 sec Speed value from 30 to 360 Move cursor Left Right to select items and move cursor Up Down to change each value z Edit Label Edits Label to show on monitor when preset runs MAX 10 alphabets are allowed Enter edit ...

Страница 36: ...CAN z Scan Speed 10 50 Sets Pan scan speed rating from 10 to 50 z Tilt Position Sets Auto scan Tilt position Including the ZOOM z Run Scan Run current scan Run Auto SCAN ball machine according to a preset angle of TILT and ZOOM 360º horizontal rotation while running speed rating can be adjusted in 10 50 ...

Страница 37: ... of the need to set number 1 8 z Left Limit Move the joystick to right and enter into menu press OPEN to save press CLOSE to exit z Right Limit Move the joystick to right and enter into menu press OPEN to save press CLOSE to exit z Edit Label Edits Label to show on monitor when preset runs MAX 10 alphabets are allowed Enter edit label cursor will be displayed on the screen using left right of joys...

Страница 38: ...art Time To set up the start time for the defined motion within this time segment Moving the cursor up down to select item and left right setting start time z Stop Time To set up the stop time for the defined motion within this time segment Moving the cursor up down to select item and left right setting stop time z Motion NOTHING To setup the motion that will be operated in this time segment The m...

Страница 39: ... dome alarm function z Alarm No 001 007 Select alarm channel number z Alarm x Action NOTHING PRESET PATTERN SWING GROUP Assign counteraction Preset position to each Alarm input z Release Time 01 60 S Alarm output time is postponed to a certain time adjustable range is 01 sec to 60 sec z Start Fan 20 60ºC Ex If set start fan is 45ºC the dome will start fan when above 45ºC and it will stop to fan wh...

Страница 40: ...tion data such as display camera motion setup and so on z Clear Display Set Initializes Display Configuration z Clear Camera Set Initializes Camera Configuration z Clear Motion Set Initializes Motion Configuration z Clear Edit Data Deletes Preset Date Swing Data Pattern Data and Group Data z Reboot Camera Reboots Zoom Camera module z Reboot System Reboots Speed Dome Camera ...

Страница 41: ...0 TV Line SCM 2273 SAMSUNG 650 TV Line CZ36SCM COP 700 TV Line SCM 2370 SAMSUNG 560 TV Line SCM 2373 SAMSUNG 650 TV Line FCB EX1020 SONY 550 TV Line Zoom SCM 2270 SCM 2273 SAMSUNG x 27 Optical Zoom x 16 Digital Zoom CZ36SCM COP x 36 Optical Zoom x 32 Digital Zoom SCM 2370 SCM 2373 SAMSUNG x 37 Optical Zoom x 16 Digital Zoom FCB EX1020 SONY x 36 Optical Zoom x 12 Digital Zoom Focal length SCM 2270 ...

Страница 42: ...t of Pan scan can be stored This is to keep the ball machine according to the elevation angle of executive level 360 continuous rotation and speed can be adjusted Other Functions Auto flip Parking action Power Up Action etc Schedule Timing actions for 7 days of programmable schedule Communication RS 485 9600 4800 2400 Selectable or change from OSD menu Protocol Pelco D Pelco P Auto identify Privac...

Страница 43: ... Bracket Ceiling Bracket 15 CD03BU1 Inside Corner Bracket 15 CD06BHI 21cm Pendent Bracket 15 CD03BH1 6Feet Pendent Bracket 15 CD03BH6 Pole Bracket 15 CD04BHI Outside Corner Bracket 15 CD05BHI 3Feet Pendent Bracket 15 CD03BH3 Power Box 15 CD10BC V 20150318 ...

Отзывы: