background image

9

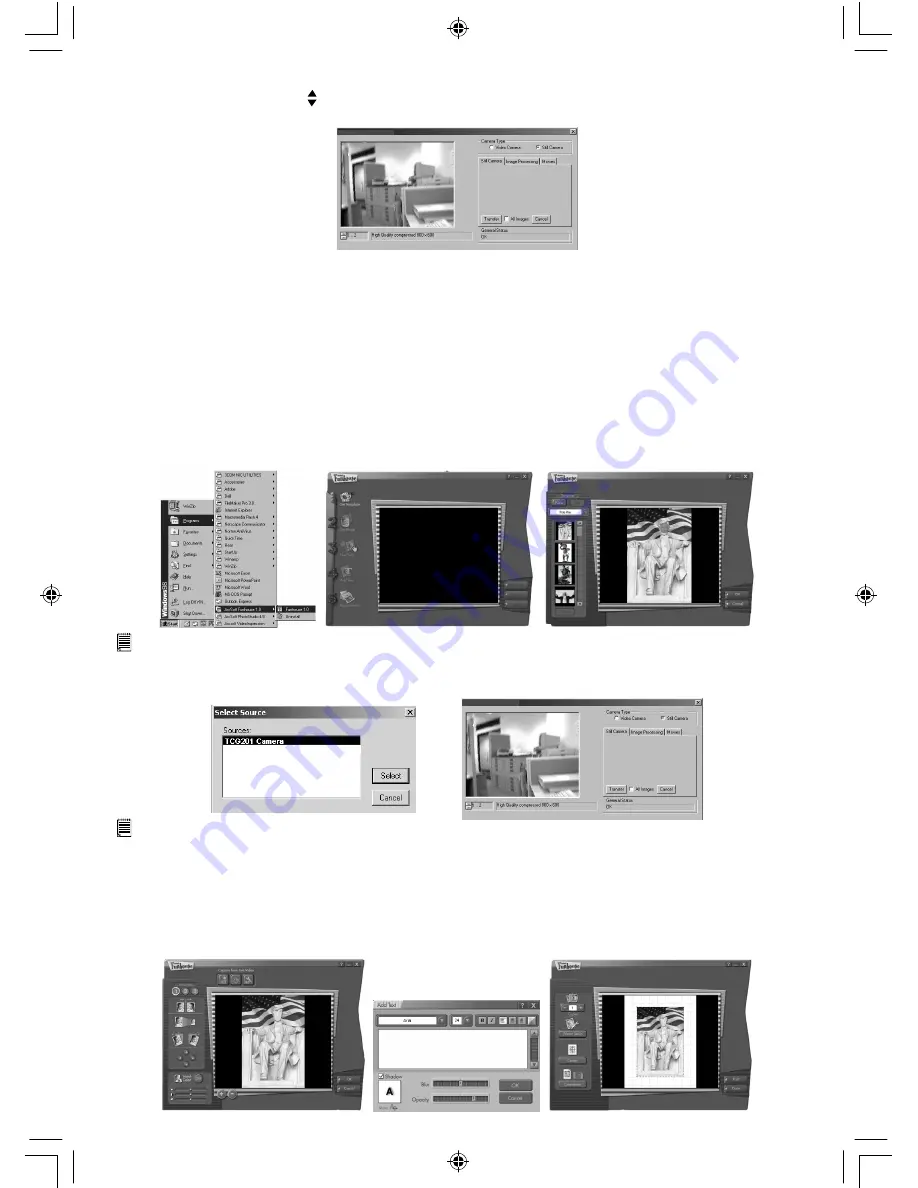
3. Go to “File” and select “Acquire”.  The capture interface will show up.

  To capture image(s), scroll   through the image(s) stored in our camera and click “Transfer”.  When you 

have finish, click on “Cancel” to go back to window.

4. For further help on how to use PhotoStudio® 4.0, go to “Help” to access the Help Topics. 

  Visit  http://www.arcsoft.com  for  all  your  FAQ’s,  tips  and  technical  support.    See  Section  8  for  more 

details.

ArcSoft Funhouse™ 1.0 

Picture Editing Software

ArcSoft Funhouse™ is an image entertainment application that enables users to create “photo fantasies” 

by combining their personal photos with a wide variety of fantasy backgrounds.  Users can get their own 

images  from  digital  cameras,  scanners,  disk  drives  and  Photo  CDs,  and  seamlessly  combine  them  with 

just a few clicks of the mouse.  The fantasy backgrounds include fictional characters, classic works of art, 

Olympic heroes, 50’s funnies, bathing beauties, muscle men and a lot more.


1. Click Start > Programs > ArcSoft Software Suite > Funhouse 1.0.

2. Click “1. Get Template” to select the template in the different type of category and then click “OK” to 

confirm.


 Important! Make sure the “Digital Camera” CD-ROM is in the CD-ROM Drive.

Using the images stored in your Digital Camera:- 


3. Double click on “2. Get Photo” and click “Acquire”.  Select “TCG 201 Camera” as the source. The capture 

interface will show up.


 Important! Make sure your Digital Camera is connected to your computer.

4. The image(s) stored in your Digital Camera will be shown in the window.  To capture image(s), highlight 

the wanted image(s) and click “Capture”.

5. The selected image will shown within the “mask” on the selected template.  You can play with the image 

by  clicking on “3. Fine-Tune” to resize, rotate or reposition the images by reposition the image using your 

mouse and dragging the image.  Press “OK” to confirm. 

6. Click “4. Add Text”.  Type in the text your want to write and then press  “OK” to confirm.

7. Click “5. Print Preview” to print a hardcopy.

MicroMega UM EN.indd

27/06/2002, 07:49 PM

9

Содержание CIC-350

Страница 1: ...TM User s Manual Micro Mega MicroMega UM EN indd 27 06 2002 07 49 PM 1 ...

Страница 2: ...trap Holder 2 1 3 7 5 6 4 1 Viewfinder 2 Power Status LED 3 Strap Holder 4 Previous Button 5 Next Button 6 Function Switch 7 Monitor ON OFF button 8 Monitor LCD 9 Delete Button Back View 1 2 3 4 5 6 7 8 9 1 Battery Compartment 2 USB Cable Port Side View USB 1 2 MicroMega UM EN indd 27 06 2002 07 49 PM 2 ...

Страница 3: ...ting all Video Clips from the camera 7 4 Installing the Software onto a Computer 8 Window 98SE Users 8 Install the software 8 Software included with your camera 8 Computer system requirements 12 5 Transferring Pictures and Video Clips Audio To Your Computer 12 Before you transfer pictures 12 Connecting to your computer 12 Transferring viewing the Pictures on a computer 12 Transferring playing Vide...

Страница 4: ...Quick Guide TM Micro Mega Quick Start Guide Product Overview 1 Lens 2 Microphone 3 Power LED 4 Viewfinder open position 5 LCD Display 6 Mode Button 7 Delete Button 8 Flash Button 1 Viewfinder closed position 2 USB SmartMedia Card Door 3 Battery Door 4 Shutter Button 5 SmartMedia Card Release Button 6 Hand Strap 2 1 3 4 F 3 0 f 5 6mm C O O L I C A M 1 3 MEGA PIXEL CA M E R A 5 6 MONITOR 1 2 3 4 5 6...

Страница 5: ... that appears on the camera monitor LCD Batteries have adequate power The battery icon is blinking at 2 times second which indicates the battery power is low but there is enough power left to take a few pictures The batteries should be replaced The battery icon blinks for 5 seconds and then the camera beeps twice and powers off then the batteries are dead and must be replaced for the camera to fun...

Страница 6: ...he Mode Button M until the 2X icon is blinking Pressing the Select Button allows you to toggle 2X digital zoom ON and OFF 3 You can frame the subject through either the optical viewfinder or the video viewfinder The optical viewfinder has special index marks that show the digital zoom framing When the camera is in 2X digital zoom mode the video viewfinder show the zoomed image on the monitor LCD f...

Страница 7: ...ng the length of the video clip in seconds 6 Note that when the video clip capture is started with the video viewfinder on the video viewfinder frame rate will slow down This does not affect the frame rate of the captured video clip 7 Press the shutter button a second time to stop the video clip capture REMARK The captured video clip cannot playback on a the Monitor LCD Deleting Video Clip from th...

Страница 8: ...the mouse click on each software interface button in turn following the on screen prompts NOTE When prompted to do so register your name and the other details requested for further on line support You must be connected to your internet service provider to register on line electronically Software included with your camera The Micro Mega software CD contains the following software Cool iCam My Camer...

Страница 9: ...s bathing beauties muscle men and a lot more 1 Click Start Programs ArcSoft Software Suite Funhouse 1 0 2 Click 1 Get Template to select the template in the different type of category and then click OK to confirm Important Make sure the Digital Camera CD ROM is in the CD ROM Drive Using the images stored in your Digital Camera 3 Double click on 2 Get Photo and click Acquire Select TCG 201 Camera a...

Страница 10: ...tion of printing templates including Kodak Digital Science Inkjet Photo Paper Templates and Avery brand paper products It also includes commonly used image editing tools and a wide selection of templates for frames edges and backgrounds for enhancing images Acquire OK Print 1 Go to Start Programs ArcSoft Software Suite PhotoPrinter 2000 2 Choose the Page Layout The selected page layout will on sho...

Страница 11: ...ar just like other video templates in the storyboard Now go to step 10 Alternatively you can produce a live video Ensure your Micro Mega is connected to the computer via the USB cable Click on the capture icon Step 7 And press the record icon Wait for the video link to go live and now you re recording press the ESC key on your keyboard to end the video Step 8 Press the Save icon and name your file...

Страница 12: ...otoStudio 4 0 4 Select or create a new album to transfer your pictures to File Open Album New Album and type in a new album name 5 Select File Select Source TCG 201 Camera Select Select File Acquire 6 Select All images or the image s you wish to transfer and select the Transfer button Viewing the pictures 1 All the pictures selected have now been transferred into the PhotoStudio Album you have cho...

Страница 13: ...e on one end 2 Connect your USB cable to an available USB port on your PC on the other end 3 Put your Micro Mega on top of your PC monitor or another flat surface 4 Connect your microphone not included to your audio card s external microphone connector Making a call 1 Double click the NetMeeting icon on the desktop or select the NetMeeting icon from the Windows Start Menu 2 Type in the IP address ...

Страница 14: ...y Computer Click Properties Select Device Manager Double click on CD_ ROM double click on CD R normally the manufacturer s name click on Settings Ensure Auto insert notification is ticked and the disconnect is ticked If you change the settings the computer will ask you to restart your PC Click Yes Upload all images to your PC and replace batteries My CD Installation wizard does not work I cannot a...

Страница 15: ...com Customer Support 9 Appendix Technical Specifications Memory Internal memory 16MB NAND Flash Image Performance for Video on Web cam Up to 24fps approx for 320 x 240 pixel Still Image Resolution High Resolution 1280 x 1024 pixel with 3 1 compression Normal Resolution 1280 x 1024 pixel with 6 1 compression Low Resolution 640 x 512 pixel with 6 1 compression Storable Images base on 16MB NAND Flash...

Страница 16: ...remove dust or stains with a soft cloth dampened with water or neutral detergent NEVER place hot items on the surface of the Camera NEVER attempt to open or disassemble Camera as this will affect any warranty claim Regulatory Information FCC Notice This device complies with Part 15 of FCC Rules Operation is subject to the following two conditions 1 This device may not cause harmful interference an...

Отзывы: