fm
G
enie
fm
G
enie
65
7
64
fm
G
enie
fm
G
enie
7
Appendix 1 – Channel settings
Appendix 2 – Transmitter settings
If the equipment is used in a ‘one off’ situation
simply leave the channel 38 factory setting.
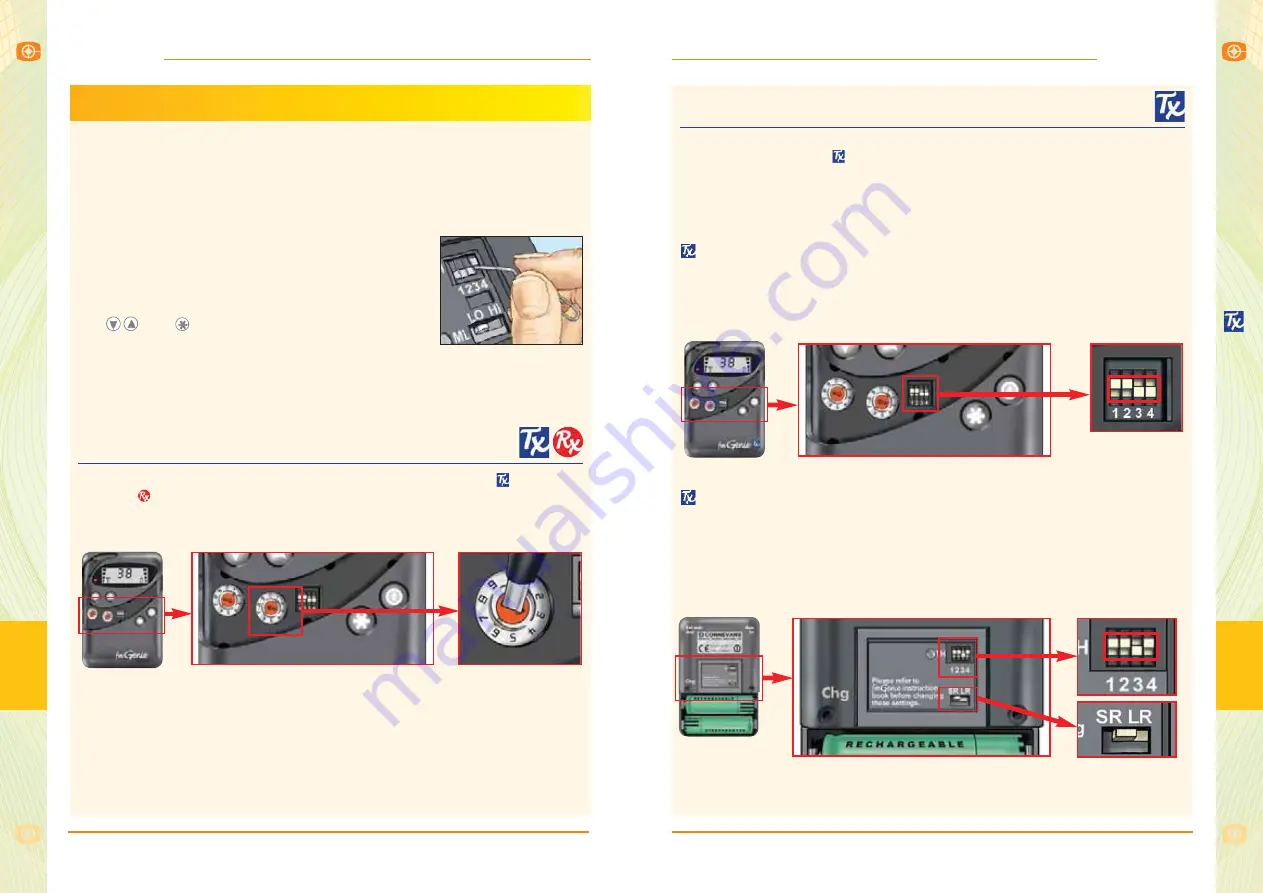
The rotary switches are numbered around the outside and if you look
carefully you will see that the red slot has an indicator arrow at one end.
If there are other radio system users on site, choose a channel that is not
already in use – appendix 8, page 81, has the full list.
This appendix explains the various switch settings required to activate the
wide range of fmGenie
features. These settings rarely need changing
once set.
Please refer to page 23 for standard setting illustrations for use with
Cochlear Implants or MicroMLxS/MLxi receivers.
These appendices take you through setting up the wide range of fmGenie
features.
Should you require any features explaining, please contact your audiological
adviser or Connevans.
To activate new switch settings it is usually necessary to turn the fmGenie
OFF
and then
ON
again. Management settings rarely need changing once set.
To help you information is indicated as follows:
= Basic information – for all users.
= Further information for more experienced users – can be safely
ignored if the feature is not required.
Using the ‘twiddling
stick’ to change settings
Setting the default channel is the same for both transmitter
and
receiver
. Under the front flash there are two rotary
switches; the left sets the ‘tens’ and the right sets the ‘units’.
If an invalid channel is set, the display will show error message ‘E1’.
Transmitter – under flash default settings
Switch 1
UP
50 KHz frequency grid
Switch 2
UP
50 KHz frequency grid
Switch 3
DOWN
Always DOWN
Switch 4
DOWN
Channel UP/DOWN disabled
Transmitter – battery compartment default settings
Switch 1
UP
Always UP
Switch 2
UP
Slow AGC (for conference mic use,
set to FAST AGC ie DOWN)
Switch 3
DOWN
Microphone manual mute enabled
Switch 4
UP
Test tone disabled
SR/LR
SR
Standard range (for use with MicroMLxS set LR)
Appendix 1: fmGenie default channel
Technical Appendices
Appendix 2: Transmitter settings
If you get in a muddle – don’t worry, just put all the settings back to these
defaults before starting again.
Altering settings
The easiest way to change switches is to use the
straightened out end of an ordinary paperclip!
To carry out an fmGenie software reset press
the and
buttons
simultaneously.


