background image

35

RECORDING

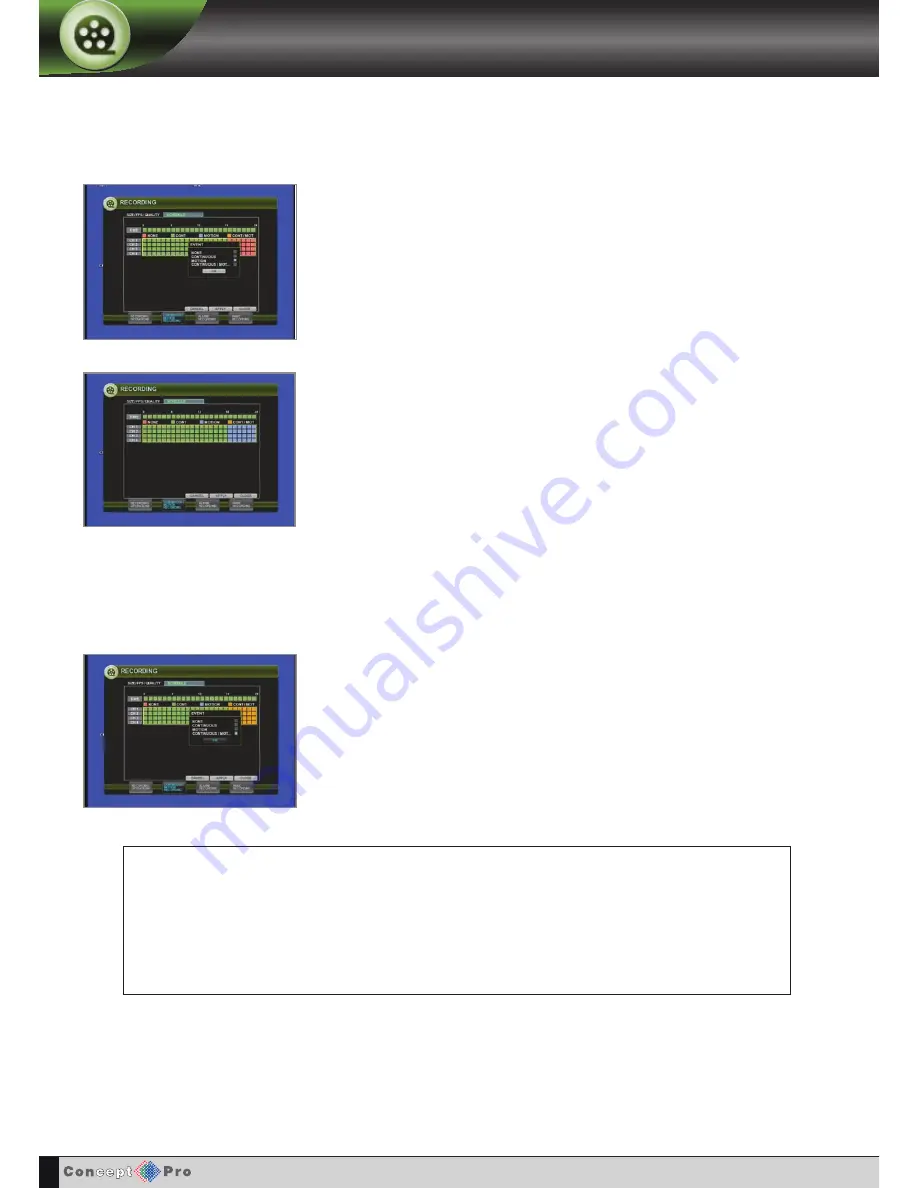
The schedule screen has 4 coloured blocks to show the different recording modes.

Pink blocks: No scheduled or motion recording

Green blocks: The VXH264 will record continuously

Blue block: The VXH264 will only record when motion is detected

Orange block: The VXH264 is in intensive recording mode (Continuous and motion)

CONTINUOUS / MOTION SETUP

If  intensive  recording  is  defined,  CONTINUOUS  /  MOTION  must  be  enabled  in  the
SCHEDULE setup to for it to work. Mixed continuous and motion recording is displayed
on the SCHEDULE screen as an orange block.

Press 

ENTER

.  

Using the 

CURSOR KEYS

, highlight MOTION and press 

ENTER

again.

The small box next to motion will turn blue.

Then press OK.

The selected area now displays a blue block for motion recording.

Repeat the above procedure to set different recording schedules for individual channels and time
periods.

SCHEDULE 

continued

Содержание VXH264-4

Страница 1: ...H 264 4 Channel Digital Recording System User Manual V X H264 4...

Страница 2: ...rch 11 Archiving 13 Telemetry Control 15 Panic recording 15 Sequence mode 15 Shutdown 15 Quick Menu 16 Configuring the VXH264 System Setup 17 Camera 17 Audio 18 Colour Setup 18 PTZ Setup 18 Motion Sen...

Страница 3: ...e client 40 Live display modes 40 Audio monitoring 40 Audio talkback 40 Saving to AVI file 41 Status 41 Log 41 PTZ 42 Remote client playback controls 43 Controlling playback 44 Audio monitoring 44 Bac...

Страница 4: ...e air vents on the DVR Adequate protection against lightning strikes and power surges must be installed to prevent damage to the DVR Any safety warnings on the DVR and in these instructions must be ad...

Страница 5: ...type of recording frame rates image quality and audio recording properties can be adjusted per hour per day and for each individual channel The VXH264 also has a panic recording feature from the front...

Страница 6: ...search menu page 9 SCR MODE Selects various display modes in live display and playback page 7 page 9 PTZ FOCUS Selects PTZ mode in live display page 15 CHANNEL SELECTION BUTTONS Used to display indiv...

Страница 7: ...MONITOR OUTPUT AUDIO INPUTS OUTPUTS Up to 4 audio inputs and one audio output can be connected as necessary ALARM INPUTS RELAY OUT and RS 485 See page 53 for full connection details LAN LAN connectio...

Страница 8: ...tting KEYLOCK Lock the keys Remote Front SEQUENCE Change to sequence screen ZOOM Go to zoom mode ARCHIVE Go to back up menu If there are multiple DVRs used in a system each DVR can be set with a diffe...

Страница 9: ...control along with the Log A title for each channel is shown The red square and letter C in the top right of each channel display shows that the channel is recording in Timer Schedule mode If audio r...

Страница 10: ...hannel is shown in full screen for a set period of time default 5 seconds before switching to the next channel The sequence runs indefinitely until a different display mode is chosen To view a particu...

Страница 11: ...DISPLAY After selecting the symbol the event log is shown on the display By selecting a particular event the recorded footage from this event is played in the playback window Please note There is no...

Страница 12: ...NTER to select the calendar and use the CURSOR KEYS to move to the required day As different days are selected the timeline display also changes to show recorded footage on that day Press ENTER to cho...

Страница 13: ...ion is held even if the wheel is released When playback is paused the JOG RING can be used to accurately move the footage forward or backwards frame by frame The playback speed and direction can also...

Страница 14: ...To display the event log screen press the right CURSOR KEY to select SEARCH BY EVENT and press ENTER Various filters can be used to limit the number of events displayed Using the CURSOR KEYS and ENTER...

Страница 15: ...earch contains the following selectable entries n ALL Select all of the above n SET UP All set up changes are shown n mOTION All motion detection events are displayed for the chosen date range n HDD D...

Страница 16: ...the event log for the particular archive time period is included To archive recorded footage to USB memory stick or CD press the CURSOR KEYS to highlight the ARCH button Press ENTER To protect unautho...

Страница 17: ...extracted the footage is copied to DVD or USB Note that depending on the amount of footage selected for archive the extracting and burning process may take some time during which the VXH264 cannot be...

Страница 18: ...cord settings are configured in the recording set up Page 36 Press the CURSOR KEYS to hightlight the REC button on the status bar then press ENTER Press the PANIC button The top right of the display s...

Страница 19: ...BACK will allow the user to view instant playback of the selected camera from 10 20 30 seconds or 1 minute ago If GO TO is selected the user can select the time they wish to view When a time is select...

Страница 20: ...any items in the setup menu use the CURSOR KEYS and the ENTER and RETURN buttons In general the ENTER button is used to select and change a particular item and the RETURN button is used to cancel a ch...

Страница 21: ...el Press RETURN when all changes are complete CAMERA PTZ SETUP ADDRESS The unique ID of the PTZ device PROTOCOL The protocol of the PTZ device BAUD RATE The baud rate of the PTZ device PTZ properties...

Страница 22: ...Between 1 Lowest and 10 Highest determines the degree of motion required before recording is activated AREA SETUP Choosing this option allows the operator to define which areas of the image are monito...

Страница 23: ...f or include other areas of the image Once the detection area has been defined press RETURN and choose SAVE EXIT to save the area and return to the motion setup menu Please note a motion detection rec...

Страница 24: ...ELL The time that each screen is displayed in a sequence operation SPOT SEQUENCE DWELL The time that each screen is displayed on the spot monitor outputs DE INTERLACE MODE When recording any channels...

Страница 25: ...ve around the virtual keyboard using the CURSOR KEYS and ENTER to select a character To delete a character use To change keyboard case and use the A a located on the bottom right of the virtual keyboa...

Страница 26: ...viour of the spot monitor outputs first choose the spot CHANNEL to modify and then use the CURSOR KEYS and ENTER To bring up the EDIT menu use the CURSOR KEYS to modify the TITLE SCHEDULE ON OFF Press...

Страница 27: ...ich one of the 4 AUDIO INPUTS is routed to the AUDIO OUTPUT when the VXH264 is in quad screen mode NETWORK AUDIO TRANSMIT When set to ON live and playback audio is transmitted to a remote PC connectio...

Страница 28: ...MANAGEMENT Select INFO to display F W VERSION Shows the firmware version of the VXH264 H W VERSION Shows the hardware version of the VXH264 VIDEO SIGNAL TYPE The VXH264 can be selected between PAL and...

Страница 29: ...ntified F W UPGRADE Firmware updates may be released periodically to enhance system performance and add extra features The operator can upgrade the firmware using a USB memory stick FACTORY DEFAULT If...

Страница 30: ...dit the user ID using the virtual keyboard Max 10 characters PASSWORD Change the password using the virtual keyboard Max 8 characters Please note To delete the existing password use the on the virtual...

Страница 31: ...unctions you want and the MANAGER and USER groups to have Blue square On Press APPLY to save settings PLEASE NOTE Any user can be deleted except the default ADMIN user AUTO LOGOUT Selects if auto log...

Страница 32: ...note for further information on network settings and remote connections please refer to pages 50 52 NETWORK E MAIL DEFAULT SERVER Selects On or OFF Default server is used if you do not have an outgoin...

Страница 33: ...and actions that will trigger the relay output Behaviour settings OPERATION The selected alarm output can be enabled or disabled MODE Can be either TRANSPARENT the output is active only when the trigg...

Страница 34: ...s ALARM Determines whether alarm inputs will send an email VIDEO LOSS Determines whether video loss on any of the selected channels will send an email MOTION Determines whether motion detection on any...

Страница 35: ...recording mode this setting determines the amount of footage that is always recorded before an event occurs motion detection alarm input etc POST EVENT RECORDING TIME When the VXH264 is not in continu...

Страница 36: ...CURSOR KEYS to stretch the orange cursor across to the 18 00 position Press ENTER Recording settings for the selected time period are displayed This setup screen allows the operator to configure sche...

Страница 37: ...HIGHEST quality Note The VXH264 supports a maximum recording rate across all channels of 100 frames per second at 2CIF 704 x 288 resolution As settings are adjusted the frames available at bottom rig...

Страница 38: ...S MOTION SETUP If intensive recording is defined CONTINUOUS MOTION must be enabled in the SCHEDULE setup to for it to work Mixed continuous and motion recording is displayed on the SCHEDULE screen as...

Страница 39: ...VXH264 will monitor the alarm inputs and activate recording Please refer to Timer motion setup on page 33 for details on setting up SIZE FPS QUALITY and SCHEDULE Alarm activated recording can be used...

Страница 40: ...Internet Explorer The remote browser allows full live viewing of the VXH264 including telemetry control of PTZ cameras In addition playback remote setup audio talkback local and backup BEFORE CONNECT...

Страница 41: ...ly unless a different computer is used In case you are unable to install active X you will need to check the security options regarding activeX on Internet Explorer security menu To check security opt...

Страница 42: ...39 REmOTE CLIENT CONTROLS REMOTE CLIENT CONTROLS LIVE VIEW TAB SEARCH TAB REMOTE SETUP TAB INFORMATION TAB...

Страница 43: ...licking the FULL SCREEN button the live display is shown in full screen without any of the remote client controls To return to normal viewing press the ESC key or double click the right mouse click on...

Страница 44: ...rchive setting such as the location The archive footage snapshots will be stored to a local PC STATUS LOG Internet explorer allows the user to quickly see the current status of all the cameras on the...

Страница 45: ...TS Presets can be programmed and called remotely using the SET and RUN buttons Example To start pattern tour 1 running on a VHSD 770EXT speed dome select preset 131 from the drop down list and click R...

Страница 46: ...URPLE Alarm BLUE Motion CYAN PRE DATE Choose the required date by selection drop down box and select the date required TIME Either use the same method again to select the time or drag the blue time ba...

Страница 47: ...an be played in reverse by clicking Then to return playing back the footage normally click Fast Forward and Rewind can be clicked to speed up playback CONTROLLING PLAYBACK AUDIO MONITORING During play...

Страница 48: ...be printed on the local PC printer by clicking the PRINT button The printed image is in the same style as the currently selected screen display for example quad screen BACKUP Pre recorded footage on a...

Страница 49: ...can be changed ENTERING SETUP Click the SETUP tab to switch to the setup menu The remote setup screen is displayed and the VXH264 settings can be changed as necessary using the main menu selection on...

Страница 50: ...he web browser address bar Example http 192 168 2 19 8080 Or http 1234 dvrlink net 8080 Please replace 1234 with the default MAC address of the DVR and press ENTER GO depending on type of phone used i...

Страница 51: ...up from a VXH264 double click the Backupplayer application located in the PLAYER folder Click to choose which archive file to playback Playback of the archive file begins The controls under the displ...

Страница 52: ...F ARCHIVE FOOTAGE TIME OF ARCHIVE FOOTAGE PLAYBACK SPEED TOTAL DURATION FILE NAME OPEN FILE PRINT CURRENT SCREEN BACKUP PLAYER During playback a still image can be save to the local PC hard disk by cl...

Страница 53: ...Vista 7 users START Type in CMD Press Enter b At the command prompt type PING 192 168 0 3 If you see 4 lines saying reply from 192 168 0 3 then the VXH264 is recognised on the local network If not wo...

Страница 54: ...IP address of your router and the port number in this case will be 6200 The username and password must match those set up on the VXH264 SETTING UP MULTIPLE VXH264s ON ONE ROUTER The setup steps in th...

Страница 55: ...IP address of the ISP s 2nd DNS server DDNS server leave set as DDNS DVRLINK NET Note if the ISP s DNS servers are not known they can be identified as follows A To open a command prompt using Windows...

Страница 56: ...telemetry devices or VA KBDPRO keyboard Connect RS485D to the or B terminals ALARM INPUTS Connect voltage free contacts from PIRs beam break detectors etc to the GND terminal and INX terminals of choi...

Страница 57: ...unbalanced auto termination 4 RCA line level unbalanced 1 0Vpp composite 75ohm unbalanced 25PIN DVI Socket 1028 x 768 DVI to VGA adaptor included 1 4 Adjustable dwell Time 1 BNC 1 0Vpp composite 75ohm...

Страница 58: ...55 Notes...

Страница 59: ...56 Notes...

Страница 60: ...AUDIO IN PAL NTSC DVI USB CH 1 CH 2 CH 1 CH 2 CH 3 CH 4 CH 3 CH 4 CH 1 CH 2 CH 3 CH 4 A1 A2 G A3 A4...

Отзывы: