background image

 Connecting Serial Devices

DeviceMaster UP User Guide

: 2000451 Rev. C

 - 29

RJ45 Serial Cables and Loopback Plugs

RJ45 Serial Cables and Loopback Plugs

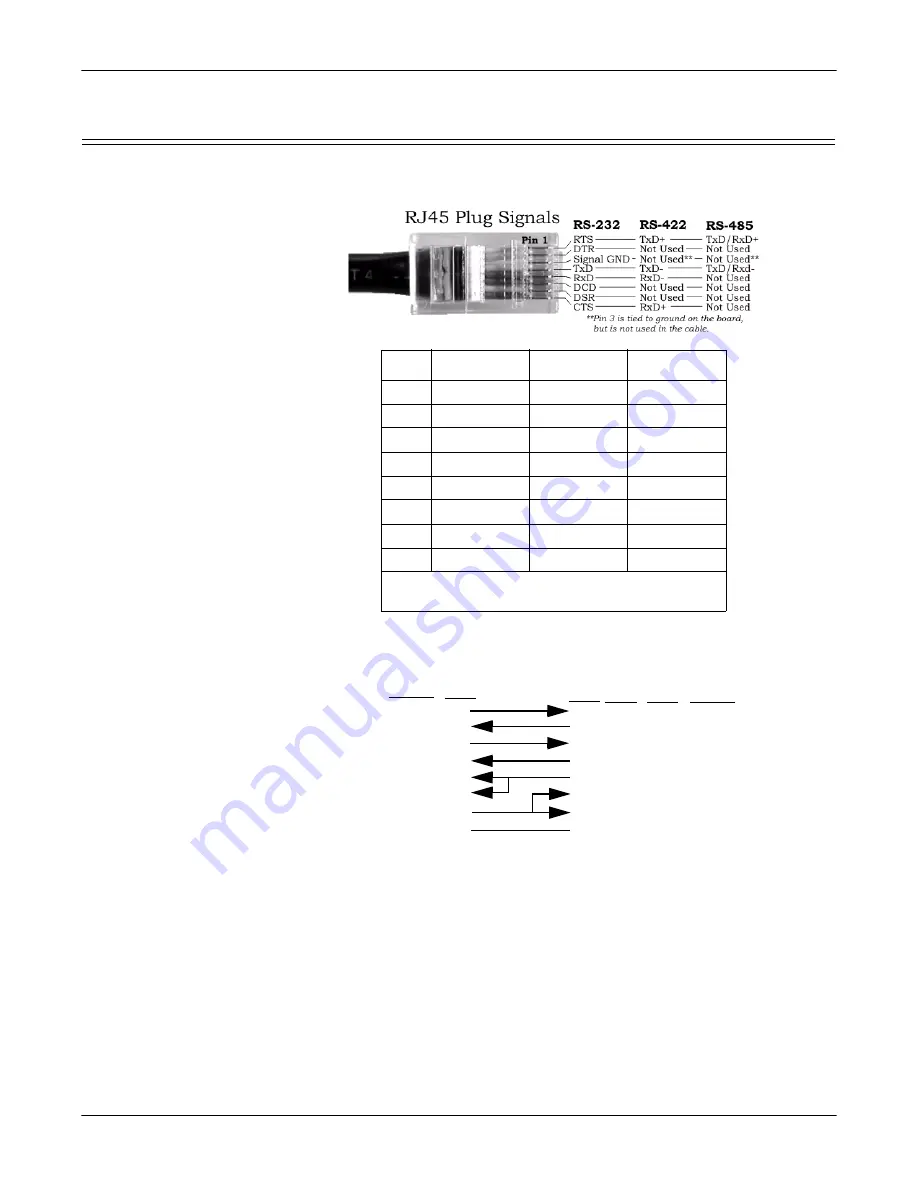
You can build your own null-modem or straight-through RJ45 serial cables using 
the following subsections.

RJ45 Null-Modem 
Cables (RS-232)

Use the following figure if you need to build an RS-232 null-modem cable. A null-
modem cable is required for connecting DTE devices.

Note:

You may want to purchase or build a straight-through cable and purchase a 
null-modem adapter. For example, a null-modem cable can be used to 
connect COM2 of one PC to COM2 of another PC.

Pin

RS-232

RS-422

RS-485

1

RTS

TxD+

TxD/RxD+

2

DTR

Not used

Not used

3

Signal GND

Not used*

Not used*

4

TxD

TxD-

TxD/RxD-

5

RxD

RxD-

Not  used

6

DCD

Not used

Not used

7

DSR

Not used

Not used

8

CTS

RxD+

Not  used

*

Pin 3 is tied to ground on the board, but is not 

used in the cable.

De

vic

eMaster 

TxD
RxD
RTS
CTS
DSR

GND

DCD
DTR

Signal

RxD
TxD
CTS
RTS
DTR

GND

DCD

DSR

Signal

DB9

2
3
8
7
4

5

1
6

Pins

DB25

3
2

4

7

8
6

Pins

 RJ45

4
5
1
8
7

3

6
2

 Pins

20

5

Fe

m

a

le


RJ45

5
4

1

3

6
7

Pins

2

8

Содержание DeviceMaster Up

Страница 1: ...Hardware Installation Guide ...

Страница 2: ...ens AG Portions of SocketServer are copyrighted by GoAhead Software Inc Copyright 2001 GoAhead Software Inc All Rights Reserved Other product names mentioned herein may be trademarks and or registered trademarks of their respective owners Third Edition November 20 2006 Copyright 2005 2006 Comtrol Corporation All Rights Reserved Comtrol Corporation makes no representations or warranties with regard...

Страница 3: ...tallation 17 Replacing Hardware 17 Configuring the DeviceMaster UP 19 Installing and Upgrading PortVision Plus 19 Installing PortVision Plus 19 Upgrading PortVision Plus 19 Configuring the DeviceMaster UP Network Settings 20 Uploading Protocol Specific Firmware on the DeviceMaster UP 22 Connecting Serial Devices 25 Connecting Devices 25 DB9 Serial Cables and Loopback Plugs 27 DB9 Loopback Plugs 27...

Страница 4: ...irements FCC 15 19 37 Modifications FCC 15 21 37 Serial Cables FCC 15 27 37 Underwriters Laboratory 37 Important Safety Information 37 RedBoot Procedures 39 Establishing a Serial Connection 39 Establishing a Telnet Connection 40 Determining the Network Settings 41 Configuring the Network Settings 41 Determining the Bootloader Version 42 Resetting the DeviceMaster UP 42 Uploading Firmware 43 Serial...

Страница 5: ... the following protocols EtherNet IP Modbus TCP PROFINET CbA Note This guide does not discuss configuring the port characteristics or protocol specific programming information See Locating Software and Documentation on Page 6 to locate the firmware and the appropriate documentation for your environment Quick Start Installation and configuration follows these steps 1 Install the hardware Page 9 2 I...

Страница 6: ... firmware V2 x platform you may want refer to the DeviceMaster UP Modbus TCP User Guide for architecture information before upgrading PROFINET CbA msi contains the firmware and supporting files The firmware provides embedded configuration web pages Bootloader bin is the operating system that runs on the DeviceMaster UP hardware during the power on phase which then starts SocketServer The bootloade...

Страница 7: ...iate documents PROFINET CbA User Guide contains protocol specific information about configuring the DeviceMaster UP DeviceMaster UP Filtering and Data Extraction Reference Guide describes the data extraction and filtering processes provided by the DeviceMaster UP with EtherNet IP or Modbus TCP 3 x firmware or higher DeviceMaster UP Hardware Installation Guide this guide contains hardware installat...

Страница 8: ...8 DeviceMaster UP User Guide 2000451 Rev C Getting Started Locating Software and Documentation ...

Страница 9: ...s Ports Model Description Installation Procedure 1 DB9 serial port with one Ethernet port 1 Port Installation on Page 10 1 Embedded system 1 Port Embedded Installation on Page 12 4 DB9 serial ports with two Ethernet ports 4 Port Installation on Page 16 The DeviceMaster UP 4 port models also include DB9 to RJ45 adapters One of the Ethernet ports on the DeviceMaster UP 4 port is a built in downstrea...

Страница 10: ...pply power to the DeviceMaster UP using the following procedure Note See Power Supply for the 1 Port on Page 32 if you want to provide your own power supply a Pick up the DeviceMaster UP so that the front of the device is facing you b Pick up a DIN rail clip The three tines should be on top and the M4 label should face you c Slide the DIN rail clip behind the DeviceMaster UP and line it up with on...

Страница 11: ... to lock the wires into place c Plug the screw terminal power connector into the DeviceMaster UP Note Align the plug properly The scalloped side of the screw terminal power connector should be aligned with the scalloped side of the power jack on the unit d Connect the power supply to a power source e Go to Step 5 to verify that the DeviceMaster UP is functioning properly LED Description Status The...

Страница 12: ...ables on Page 14 Connecting the Power and Verifying Installation on Page 14 Building the Serial Ribbon Cable Use the following information to build a DB9 serial ribbon cable to connect to the DeviceMaster UP 1 Port Embedded IDC10 connector J2 J2 Header RS 232 RS 422 RS 485 1 CD Not used Not used 2 DSR Not used Not used 3 RxD RxD Not used 4 RTS TxD TRX 5 TxD TxD TRX 6 CTS RxD Not used 7 DTR Not use...

Страница 13: ...n the power cable using plastic or metal stand offs Through the chassis using metal stand offs If plastic stand offs are used to mount the board then you must ground the DeviceMaster UP using the power cable Note The maximum diameter of the metal stand offs should be 0 175 with a 4 40 machine screw Metal stand offs are not provided with the DeviceMaster UP Caution Non plated non grounded mounting ...

Страница 14: ...port setting on the DeviceMaster UP is RS 232 Do not connect the serial device until you have configured the serial port settings You must configure network settings and upload firmware before configuring the serial port settings Use the next subsection to wire the power terminal connector and verify the hardware installation Connecting the Power and Verifying Installation Use the following proced...

Страница 15: ...o install PortVision configure the network settings and upload the appropriate protocol firmware on the DeviceMaster UP LED Description Status When lit the amber Status LED D1 on the DeviceMaster UP indicates the devices is fully powered and has completed the boot cycle Note The Status LED flashes for approximately 15 seconds while booting When the bootloader completes the cycle the LED has a soli...

Страница 16: ...thernet hub or switch 10 100Base T Connect to the port labeled UP on the DeviceMaster UP using a standard Ethernet cable Server NIC 10 100Base T Connect to the port labeled DOWN on the DeviceMaster UP using a standard Ethernet cable Daisy chaining DeviceMaster UP units Connect the port labeled DOWN on the first DeviceMaster UP to the port labeled UP on the second DeviceMaster UP or other device us...

Страница 17: ...Configure the DeviceMaster UP ports to support the serial devices Replacing Hardware Use this procedure to replace hardware 1 Configure the IP address in the new DeviceMaster UP 2 Remove the old unit and attach a new or spare DeviceMaster UP 3 Connect the new DeviceMaster UP to the network hub or server NIC 4 Apply power to the new DeviceMaster UP and verify that it passes the power on self test 5...

Страница 18: ...18 DeviceMaster UP User Guide 2000451 Rev C Hardware Installation Replacing Hardware ...

Страница 19: ... that is on the same local network segment as the system on which PortVision Plus is installed You cannot apply changes through PortVision Plus to a DeviceMaster UP that is not on the same local network segment Use PortVision Plus to monitor any DeviceMaster UP on the network The DeviceMaster UP does not have to be on the same local network segment as PortVision Plus for monitoring purposes You ca...

Страница 20: ...rtVision Plus icon or select Start Programs Comtrol PortVision Plus 3 If this is the first time PortVision Plus has been opened select the Scan button to locate DeviceMaster UP units on the network 4 Highlight the DeviceMaster UP for which you want to program network information and select the Config button Optionally you can double click on the DeviceMaster UP or right click on the DeviceMaster U...

Страница 21: ...ne of the following options Disable IP Select this option if you want to run the device using the MAC addressing scheme EtherNet IP Users The DeviceMaster UP does not support Disable IP DHCP IP Select this option if you want to use the device with DHCP Make sure that you provide the MAC address of the device to the network administrator Static IP Select this option to program a static IP address a...

Страница 22: ...s the required firmware and support files in a self installing msi file or you can download the latest from the Internet Use the following procedure to update the firmware on your DeviceMaster UP for the appropriate protocol See Locating Software and Documentation on Page 6 if you need to download the msi file 1 If you have not done so open the msi file and follow the installation wizard to copy t...

Страница 23: ...Master UP is on line and in the next minute the DeviceMaster UP unit or units should display ON LINE in the Status field 7 Go to the appropriate DeviceMaster UP User Guide for your protocol for information about configuring the serial port or ports and programming your PLCs 8 After configuring the serial port characteristics and preparing your PLC programs you can use the next section in this guid...

Страница 24: ...24 DeviceMaster UP User Guide 2000451 Rev C Configuring the DeviceMaster UP Uploading Protocol Specific Firmware on the DeviceMaster UP ...

Страница 25: ...pback Plugs on Page 27 RJ45 Serial Cables and Loopback Plugs on Page 29 Note Refer to the hardware manufacturer s installation documentation if you need help with connector pinouts or cabling for the peripheral device 2 Verify that the devices are communicating properly The DeviceMaster UP 1 port has four LEDs on the top of the unit that provide information about the network connection of the seri...

Страница 26: ...nsmitting LED Description PWR LED on the front panel of the DeviceMaster UP is lit indicating you have power and it has completed the boot cycle Note The PWR LED flashes while booting and it takes approximately 15 seconds for the bootloader to complete the cycle LNK ACT The red LNK ACT LED is lit indicating that you have a working Ethernet connection COL If the red COL LED is lit there is a networ...

Страница 27: ...ace a missing RS 232 loopback plug Pins 1 to 4 to 6 Pins 2 to 3 Pins 7 to 8 to 9 Wire the following pins together for an RS 422 loopback plug Pins 2 to 3 Pins 7 to 8 DB9 Connector Pinouts Pin RS 232 RS 422 RS 485 1 DCD Not used Not used 2 RxD RxD Not used 3 TxD TxD TxD RxD 4 DTR Not used Not used 5 GND Not used Not used 6 DSR Not used Not used 7 RTS TxD TxD RxD 8 CTS RxD Not used 9 RI Not used Not...

Страница 28: ...e peripheral to determine the pinouts for the signals above DB9 Straight Through Cables RS 232 485 Use the following figure if you need to build an RS 232 or RS 485 straight through cable Straight through cables are used to connect modems and other DCE devices For example a straight through cable can be used to connect COM2 of one PC to COM2 to a modem DeviceMaster TxD RxD RTS CTS DSR GND DCD DTR ...

Страница 29: ...urchase or build a straight through cable and purchase a null modem adapter For example a null modem cable can be used to connect COM2 of one PC to COM2 of another PC Pin RS 232 RS 422 RS 485 1 RTS TxD TxD RxD 2 DTR Not used Not used 3 Signal GND Not used Not used 4 TxD TxD TxD RxD 5 RxD RxD Not used 6 DCD Not used Not used 7 DSR Not used Not used 8 CTS RxD Not used Pin 3 is tied to ground on the ...

Страница 30: ...t plugs with pins wired together as shown that are used in conjunction with application software Test Terminal or Minicom to test serial ports The DeviceMaster UP is shipped with a a single loopback plug RS 232 422 Pins 4 to 5 Pins 1 to 8 Pins 2 to 6 to 7 RS 485 Test Cable You can use a straight through cable as illustrated previously or build your own cable Note RS 422 pinouts are not standardize...

Страница 31: ...ctures on Page 35 Notices on Page 36 Electromagnetic Compliances This table lists electromagnetic compliances for the DeviceMaster UP family Electromagnetic Compliances Emission Canadian EMC requirements ICES 003 CISPR 22 AS NZS 3548 European Standard EN55022 Amendment A1 FCC Part15 Subpart B Class A limit Immunity EN55024 IEC 1000 4 2 EN61000 4 2 ESD IEC 1000 4 3 EN61000 4 3 RF IEC 1000 4 4 EN610...

Страница 32: ...Comtrol Power Supply 5 30VDC Specifications Input line frequency Input line voltage Output voltage Output current 50 60 Hz 90 260 VAC 24VDC 500 mA 24VDC Table 2 5 30VDC Requirements for External Power Supply External Power Supply 5 30VDC Specifications Output voltage Current Power 5 30VDC 100 mA Min 24VDC 2 5 W Any power supply that meets current consumption voltage power and connector pinouts req...

Страница 33: ...hernet host interface 10 100Base T 1 Port models single port 4 Port model dual ports Upstream and Downstream 10 100 Mbps RJ45 Serial interface RS 232 RS 422 and RS 485 Serial connector types 1 Port 1 Port Embedded System 4 Port model DB9 Male Header IDC10 DB9 and DB9 to RJ45 adapter Network default values IP address Subnet mask Gateway 192 168 250 250 255 255 0 0 192 168 250 1 Network protocols TC...

Страница 34: ...o 10 000 feet Heat output 1 Port models 4 Port 7 16 BTU Hr 16 4 BTU Hr Operating humidity non condensing 5 to 95 Mean time between failures MTBF 1 Port 1 Port Embedded System 4 Port 48 4 years 48 2 years 25 0 years Surge protection on all serial ports Provides ESD surge protection minimum of 15KV 200A for a duration of 1 ns If this product is stacked the environmental air flow must insure that the...

Страница 35: ...Product Pictures This subsections provides you with detailed pictures of the different DeviceMaster UP models 1 Port Embedded on Page 36 4 Port DB9 on Page 36 See the appropriate discussion in the Hardware Installation section Page 9 for information about the LEDs 1 Port DB9 This illustrates the DeviceMaster UP 1 Port ...

Страница 36: ...t generates uses and can radiate radio frequency energy and if not installed and used in accordance with the instruction manual may cause harmful interference to radio communications However there is no guarantee that interference will not occur in a particular installation If this equipment does cause harmful interference to radio or television reception which can be determined by turning the equ...

Страница 37: ...s to this equipment not expressly approved by Comtrol Corporation may void the user s authority to operate this equipment Serial Cables FCC 15 27 This equipment is certified for Class A operation when used with unshielded cables on models with the RJ45 connectors and with shielded cables on all models with DB9 connectors Underwriters Laboratory This equipment is Underwriters Laboratory UL listed I...

Страница 38: ...38 DeviceMaster UP User Guide 2000451 Rev C Hardware Specifications Important Safety Information ...

Страница 39: ...ollowing procedure to set up serial connection with a terminal server program for example HyperTerminal or Minicom and the DeviceMaster UP 1 Connect the null modem cable shipped with your device from an available COM port on your PC to Port 1 on the DeviceMaster UP Note If you cannot locate the cable shipped with the DeviceMaster UP see 2 Configure a terminal server program such as HyperTerminal o...

Страница 40: ...iceMaster UP does not come preprogrammed with a password 2 Type reset and close the session 3 Open a new telnet session enter the DeviceMaster UP IP address and the password 4 Type dis to disable the bootloader 5 Verify that the system responds with a Loading disabled message 6 Go to the appropriate task Determining the Network Settings on Page 41 Configuring the Network Settings on Page 41 Determ...

Страница 41: ...s must also be valid for the network to which it is attached For example The network segment must be 192 168 250 x to telnet to the DeviceMaster UP default IP Use the following procedure to program the IP address using Redboot 1 Establish communications with the DeviceMaster UP using the serial Page 39 or telnet Page 40 method 2 Enter ip addr mask gateway and press the Enter key to configure the I...

Страница 42: ...d see Updating Firmware on Page 43 4 Type reset to reset the DeviceMaster UP if you do not have any other related Redboot tasks Resetting the DeviceMaster UP When you have completed your tasks in Redboot you must enter a reset command at the RedBoot prompt for the DeviceMaster UP to begin operation Note The LEDs on the DeviceMaster UP will go through the power up sequence The unit has completed it...

Страница 43: ...Data bits 8 Parity None Stop bits 1 Flow control None 4 Reset the DeviceMaster UP disconnect and reconnect the power cable 5 Immediately type DM and press Enter in your terminal program 6 At the RedBoot prompt type dis and press Enter Note If you are unsuccessful in disabling the Bootloader within ten seconds type reset DM and dis again The DM command is the only case sensitive command and must be...

Страница 44: ...Boot prompt Note In a few seconds the ethernet and PWR LEDs cycle through a light sequence once and the update is complete 13 Start your internet browser and enter the IP address of the DeviceMaster UP to verify that the new version of SocketServer loads The file name in this screen shows the Bootloader RedBoot go Erase from 0x05030000 0x050c0000 Program from 0x00000000 0x00084801 at 0x05060000 Er...

Страница 45: ...e_Name Note The default IP address is 192 168 250 250 8 When the RedBoot prompt appears after approximately one minute if you are uploading the Bootloader and approximately three minutes if you ware uploading SocketServer type go If uploading Bootloader In a few seconds the ethernet and PWR LEDs cycle through a light sequence once and the update is complete telnet 192 168 250 250 Trying 192 168 25...

Страница 46: ...tem for information about email notification Use the following procedure to establish the DeviceMaster UP password for the Web and telnet server Establishing a password prevents unauthorized changes to the DeviceMaster UP configuration 1 Establish communications with the DeviceMaster UP using the serial Page 43 or telnet method Page 40 2 Type password your_password and press Enter Note If you forg...

Страница 47: ...ev Displays board revision cache ON OFF Manages machine caches disable Disables automatic load of the default application dump b location l length Displays hex dump of a range of memory fis cmds Manages flash images See the Redboot User s Guide located at this address on the CD or ftp site Dev_Mstr Software RedBoot User_Guide for cmds information go w timeout entry Executes code at a location help...

Страница 48: ...48 DeviceMaster UP User Guide 2000451 Rev C RedBoot Procedures Redboot Command Overview ...

Страница 49: ...he device directly to a NIC in a host system Verify that the Ethernet hub and any other network devices between the system and the Comtrol device are powered up and operating Reset the power on the Comtrol device and watch the PWR or Status light activity If the device has a power switch turn the device s power switch off and on while watching the LED diagnostics If the unit does not have a power ...

Страница 50: ...e that you have downloaded the most current firmware for your protocol http support comtrol com download asp Note If the PWR or Status LED is still flashing contact Technical Support PWR or Status LED not lit Indicates that power has not been applied or there is a hardware failure Contact Technical Support Cannot ping the device through Ethernet hub Isolate the unit from the network Connect the de...

Страница 51: ...an use Category 3 or 5 twisted pair 10BASE T cables The maximum length of each cable is 100m 328ft Note Category 3 or 5 twisted pair cables look the same as telephone cables but they are not the same The network will not work if telephone cables are used to connect the equipment Fast Ethernet 100BASE TX rules The maximum number of repeater hops is two for a Class II hub A Class II hub can be conne...

Страница 52: ...you perform some or all of the procedures before they will be able to help you diagnose your problem If you need technical support contact Comtrol using one of the following methods Contact Method Corporate Headquarters Comtrol Europe Customer support http support comtrol com online Downloads http support comtrol com download asp Web site http www comtrol com http www comtrol co uk Fax 763 494 419...

Страница 53: ...able 30 straight through cables DB9 28 RJ45 30 C cable RS 485 test 30 cables building null modem DB9 28 RJ45 29 straight through DB9 28 RJ45 30 embedded ribbon cable 12 cache command 47 changing IP address 20 network settings 20 COL LED 4 port 17 command terse response mode 47 compliance electromagnetic 31 configuration DeviceMaster 19 network information 41 network settings 20 overview 5 serial m...

Страница 54: ... electromagnetic compliances 31 embedded installation 12 LEDs 15 emission compliance 31 environmental specifications 34 Ethernet host interface 33 EtherNet IP uploading firmware 22 execute code at location 47 F fax Technical Support 52 firmware downloading latest 6 uploading 22 fis command see Redboot User s Guide 47 G gateway address default 9 20 41 getting started 5 go command 47 H hardware conf...

Страница 55: ...d administrator Redboot 47 password command 47 phone Technical Support 52 PortVision Plus changing network settings 20 configuring network settings 20 installation 19 uploading firmware 22 power consumption 33 power supply connecting 1 port 5 30VDC 11 embedded 14 specification 1 port 5 30VDC 32 specifications 4 port 32 processor type 33 PROFINET CbA uploading firmware 22 PWR LED 4 port 17 R real t...

Страница 56: ...Status LED 1 port embedded 15 standard 11 stop bits 33 straight through cables DB9 28 RJ45 30 subnet mask configuration 41 default 9 20 33 41 surge protection 34 T Technical Support 49 52 telnet command 47 telnet method configuration 40 updating firmware 45 terse command 47 TFTP load command 47 timeout command 47 troubleshooting 49 Tx LED 25 U UL 60950 compliance 31 UP port 4 port 16 8 port 16 upg...

Отзывы: