


13
WPS Button
Press the WPS button less than 2 seconds to enable WPS which will allow 2 minutes
for WiFi connection.
DSL
Connect to the DSL port with the DSL RJ11 cable. The VR-3071 supports the
following DSL profiles -
ADSL : ADSL, ADSL 2, ADSL 2+.
VDSL : 8a, 8b, 8c, 8d, 12a, 12b, 17a, 30a and 35b.
USB Port
This port can be used to connect the router to a storage device. It can only be used
for SAMBA(storage) and for a Printer Server. Support for other devices may be
added in future firmware upgrades.
LAN (Ethernet) Ports
You can connect the router to up to four LAN devices using RJ45 cables. The ports
are auto-sensing MDI/X and either straight-through or crossover cable can be used.
ETH WAN PORT
This port is designated to be used for Ethernet WAN functionality only. Use
1000-BASE-T RJ-45 cables to connect to Gigabit WAN server, or 10/100BASE-T
RJ-45 cables for standard network usage. This ports is auto-sensing MDI/X; so
either straight-through or crossover cable can be used.
Power ON
Press the power button to the OFF position (OUT). Connect the power adapter to the
power port. Attach the power adapter to a wall outlet or other AC source. Press the
power button to the ON position (IN). If the Power LED displays as expected then
the device is ready for setup (see section – LED Indicators).
Caution 1:
If the device fails to power up, or it malfunctions, first verify that the
power cords are connected securely and then power it on again. If the
problem persists, contact technical support.
Caution 2:
Before servicing or disassembling this equipment, disconnect all power
cords and telephone lines from their outlets.
Содержание VR-3071 Series
Страница 1: ...261099 055 VR 3071 Series Home Gateway User Manual Version A1 0 January 10 2020...
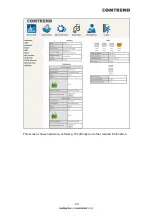
Страница 24: ...23 This screen shows hardware software IP settings and other related information...
Страница 31: ...30 ADSL2 Click the Reset Statistics button to refresh this screen...
Страница 42: ...41 4 9 Network Map The network map is a graphical representation of router s wan status and LAN devices...
Страница 46: ...45 5GHz...
Страница 49: ...48 5 GHz Shows the bandwidth that is available for use in each channel Shows interference level in each channel...
Страница 52: ...51 List the associated station to the wireless interface...
Страница 57: ...56 NOTE Up to 16 PVC profiles can be configured and saved in flash memory...
Страница 68: ...67 5 3 3 UPnP Select the checkbox provided and click Apply Save to enable UPnP protocol...
Страница 71: ...70 A maximum of 100 entries can be added to the URL Filter list...
Страница 86: ...85...
Страница 106: ...105...
Страница 130: ...129 2 Both devices need to have the same fixed channel See section 6 12 6 Advanced for details...
Страница 131: ...130 3 Both devices need to have a different fixed access SSID Network Name See section 6 12 1 SSID for details...
Страница 134: ...133 6 12 6 Advanced This page allows you to configure the Physical Wireless interfaces 2 4GHz...
Страница 136: ...135...
Страница 152: ...151 Note Passwords may be as long as 16 characters but must not contain a space Click Save Apply to continue...
Страница 168: ...167 STEP 2 Click the Windows start button Then select Control Panel...
Страница 169: ...168 STEP 3 Select Devices and Printers STEP 4 Select Add a printer...
Страница 189: ...188 F2 2 IP over ETHERNET IPoE IPv4 STEP 1 Select the IP over Ethernet radio button and click Next...
Страница 197: ...196 F2 4 PPP over ATM PPPoA IPv4 STEP 1 Click Next to continue...
Страница 200: ...199 Click Next to continue or click Back to return to the previous step...
Страница 208: ...207 Click Next to continue or click Back to return to the previous step The settings shown above are described below...
Страница 213: ...212 After clicking Apply Save the new service should appear on the main screen...


