11
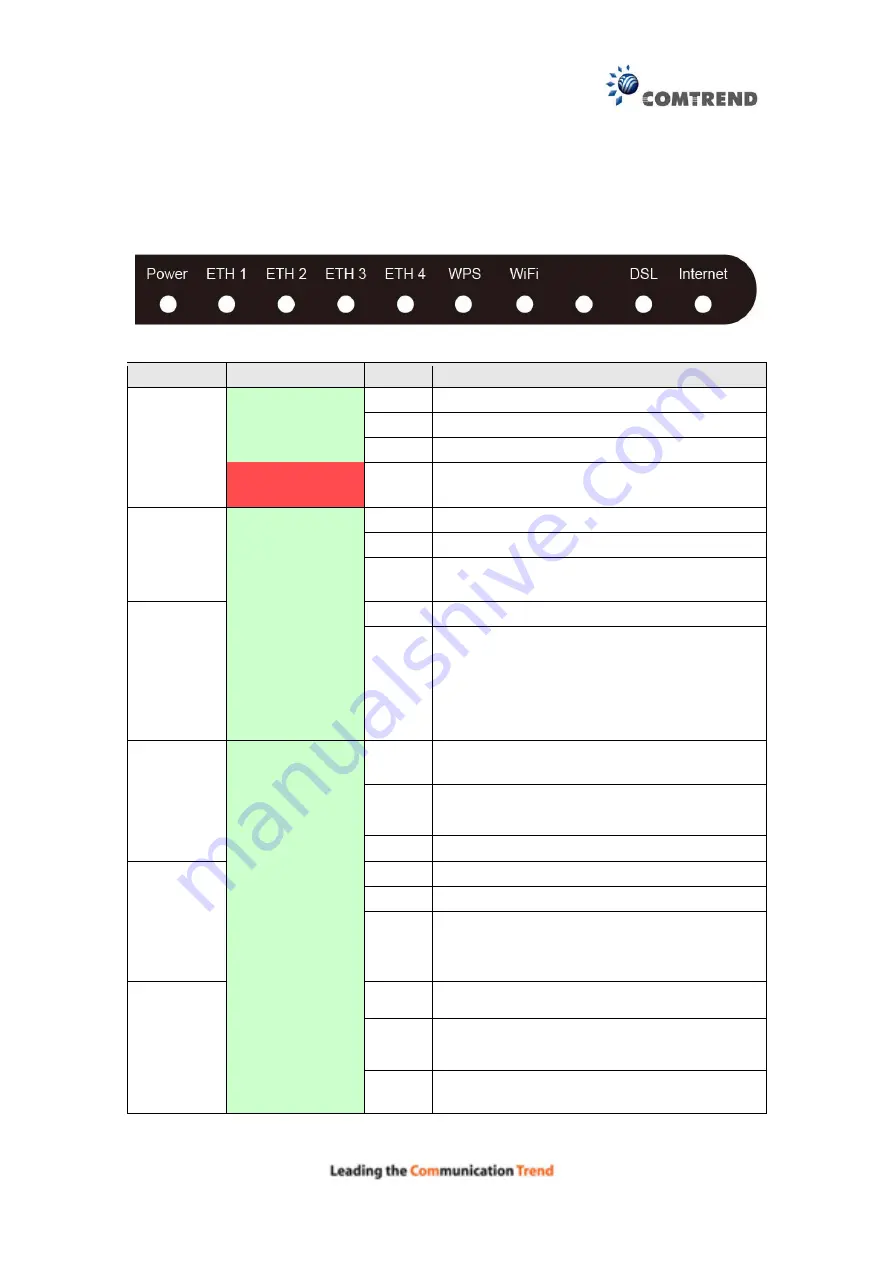
2.2 LED Indicators
The front panel LED indicators are shown below and explained in the following table.
This information can be used to check the status of the device and its connections.
LED
Color
Mode
Function
POWER
Green
On
The device is powered up.
Off
The device is powered down.
Blink
Upgrade is in process.
Red
On
POST (Power On Self Test) failure or other
malfunction
1
.
ETH 1 to 4
Green
On
An Ethernet Link is established.
Off
An Ethernet Link is not established.
Blink
Data transmitting or receiving over
Ethernet.
WPS
Green
On
WPS enabled and PC connected to WLAN
Off
WPS disenabled when WPS
configured
After clients connected to router
about 5 minutes, LED is off
Wi-Fi
Green
On
The wireless module is ready.
(i.e. installed and enabled).
Off
The wireless module is not ready.
(i.e. either not installed or disabled).
Blink
Data transmitting or receiving over WLAN.
DSL
Green
On
The DSL Link is established.
Off
Modem is powered off.
Blink
fast: xDSL Link is training or data
transmitting.
slow: xDSL training failed.
INTERNET
Green
On
IP connected and no traffic detected
2
.
Off
Modem power off or modem in bridged
mode.
Blink
IP connected and IP Traffic is passing
through the device (either direction).
Содержание AR-5381u
Страница 1: ...AR 5381u ADSL2 WLAN Router User Manual 261056 074 Version A2 3 May 9 2016...
Страница 8: ...7 APPENDIX D CONNECTION SETUP 149 APPENDIX E PRINTER SERVER 199...
Страница 18: ...17 STEP 3 After successfully logging in for the first time you will reach this screen...
Страница 24: ...23 4 2 4 xDSL Statistics The xDSL Statistics screen displays information corresponding to the xDSL type ADSL...
Страница 33: ...32 4 7 IGMP Proxy Displays a list of IGMP Proxy entries...
Страница 106: ...105 Enter a certificate name and click Apply to import the CA certificate...
Страница 122: ...121 6 6 Site Survey The graph displays wireless APs found in your neighborhood by channel...
Страница 123: ...122...
Страница 125: ...124 6 8 WiFi Button This page allows you to enable or disable the WiFi Button...
Страница 138: ...137 NOTE Passwords can be up to 16 characters in length...
Страница 159: ...158 The settings shown above are described below...
Страница 179: ...178 Click Next to continue or click Back to return to the previous step...
Страница 184: ...183 Click Next to continue or click Back to return to the previous step...
Страница 201: ...200 STEP 2 Click the Windows start button Then select Control Panel...
Страница 202: ...201 STEP 3 Select Devices and Printers STEP 4 Select Add a printer...


