


SPECIAL NOTES ON LCD MONITORS
The following are normal with LCD monitors and do not indicate a problem.
!
When first turning on the LCD monitor, if the picture does not fit in the display area, it is
because of the type of computer that is used. In such case, adjust the picture position to its
correct position. (See
Operating the Monitor
.)
!
The screen may flicker during initial use. Turn off the power switch and then turn it on again the
flickering should disappear.
!
Users may notice a little uneven brightness on the screen depending on the desktop pattern
they use. It is normal for LCD monitors to show such uneven brightness.
!
Due to the nature of the LCD screen, switching of images after a prolonged period of time of
displaying the same image, the image from the previous screen may remain. In such case,
the screen is recovered slowly by changing the image or turning off the power switch for hours.
!
If the screen becomes dark, flickers, or does not light-up, contact your dealer or the nearest
service center for a backlight replacement. Do not attempt to replace it yourself.
!
If you need to return your unit for service and the original packaging was discarded, please
contact your dealer or the nearest service center for advice or replacement of packaging.
Cleaning
W
ARNING
!
If you dropped any material or liquid such as water onto the monitor when cleaning, unplug the
power cable immediately and contact your dealer or the nearest service center. Always make
sure your hands are dry when unplugging the power cable.
C
AUTION
!
For safety reasons, turn-off the power switch and unplug the monitor before cleaning.
!
Do not scratch or rub the screen with a hard object.
!
Never use any of the following solvents on the LCD monitor. Such harsh chemicals may cause
damage to the cabinet and the LCD screen.
Thinner Spray-type cleaner Benzene Wax Abrasive cleaner Acid or Alkaline solvent
!
Rubbing the cabinet with products made of rubber or plastic for a long period of time may cause
degeneration or loss of paint on the cabinet.
Cabinet
!
Remove dirt with a lightly moistened cloth and a mild solvent detergent. Then wipe the cabinet
with a soft dry cloth.
LCD
!
Periodic cleaning with a soft dry cloth is recommended.
!
Do not use tissue to clean the screen. It may damage the LCD screen.
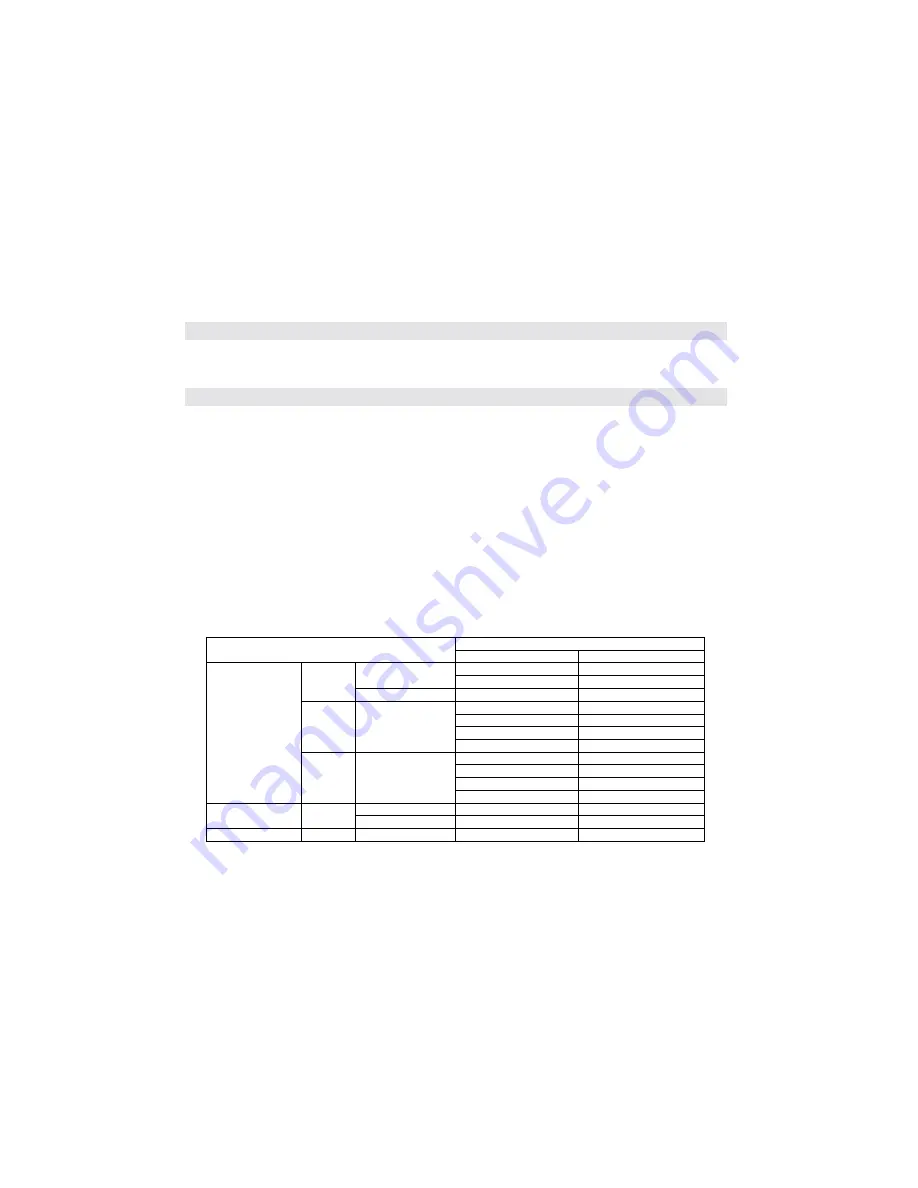
Supported Timing
Analog
Display Mode
Horizontal Frequency
Vertical Frequency
31.5 KHz
60.0 Hz
640 x 480
37.5 KHz
75.0 Hz
VGA
720 x 400
31.5 KHz
70.1 Hz
35.1 KHz
56.3 Hz
37.9 KHz
60.3 Hz
46.9 KHz
75.0 Hz
SVGA
800 x 600
48.1 KHz
72.0 Hz
48.4 KHz
60.0 Hz
56.5 KHz
70.0 Hz
58.1 KHz
72.0 Hz
VESA
XGA
1024 x 768
60.0 KHz
75.0 Hz
640 x 480
35.0 KHz
66.7 Hz
Macintosh
VGA
832 x 624
49.7 KHz
74.6 Hz
MS-DOS
640 x 350
31.5 KHz
70.1 Hz


