Comelit 49808 Скачать руководство пользователя страница 33

Digital Video Recorder art. 49808-49816 


23 


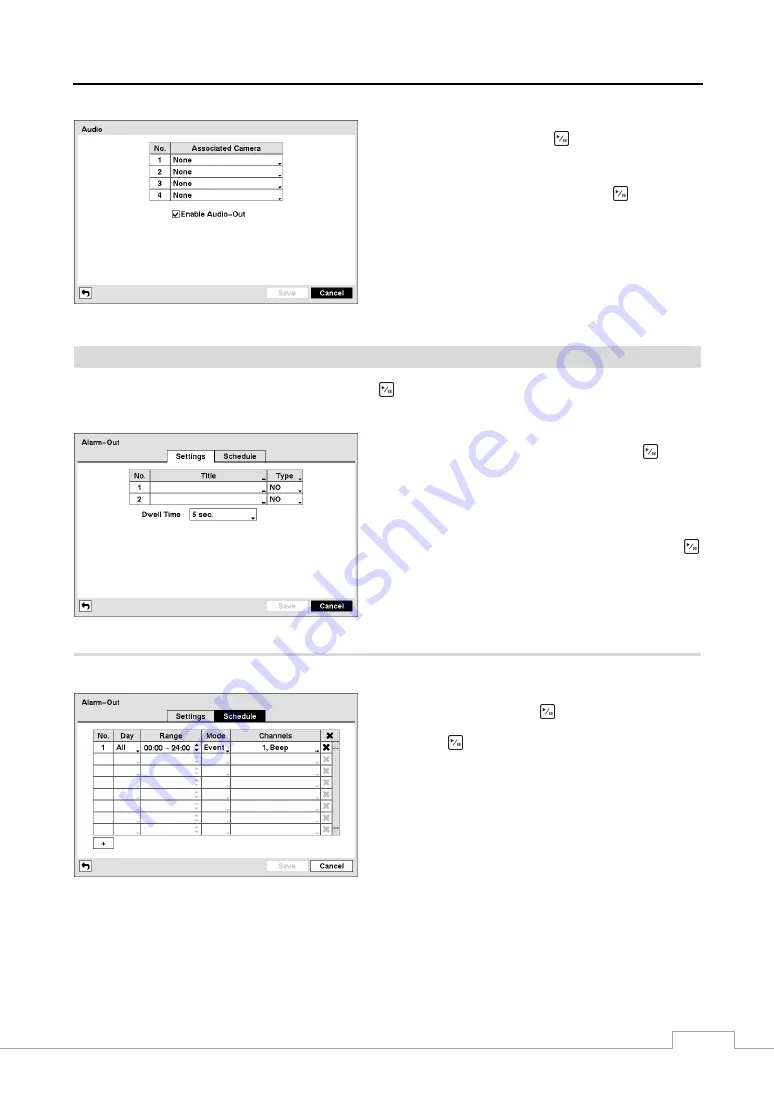
The DVR can record up to four audio inputs.  Highlight the 
box beside the input and press the 

 button.  A list of cameras 

appears, and you can select which camera you want associated 
with that audio input. 


Highlight 

Enable Audio-Out 

and press the 

 button.  This 

toggles between enabling and disabling audio out. 

 
Figure 27 — Audio setup screen. 


Alarm-Out


Screen 

 
Highlight 

Alarm-Out

 in the Devices menu and press the 

 button.  The 

Alarm-Out 

screen allows you to change the 

settings and establish a schedule for each alarm output from the DVR. 


Each alarm output can be given its own title by highlighting 
the box under the 

Title

 heading and pressing the 

 button.  

A virtual keyboard appears allowing you to enter the title. 


Highlighting the box under the 

Type

 heading allows to set 

the alarm output for NO or NC (normally open or normally 
closed). 


Highlighting the box beside 

Dwell Time 

and pressing the 


button allows you to set the dwell time of the alarm output.  
Dwell times range from 5 seconds to 30 minutes. 


Figure 28 — Alarm-Out Settings screen. 


Highlighting the 

Schedule 

tab causes the Schedule screen to display. 


You can add and edit alarm output schedules on this screen.  
Highlight the 

+

 and press the 

 button to add a schedule.  

Highlighting the boxes under the 

Column

 heading and 

pressing the 

 button allows you to edit the information in 

those boxes. 


The 

Day

 box allows you to select the days that the alarm 

schedule will be active.  The choices are: Sun, Mon, Tue, 
Wed, Thu, Fri, Sat, M~F, Hol and All. 


The 

Range 

box allows you to set the time that the alarm 

schedule will be active in 15-minute increments from 00:00 
to 24:00. 


Figure 29 — Alarm-Out Schedule screen. 


The 

Mode

 box allows you to set how the alarm reacts during the scheduled time.  When set to 

On

, the Alarm-Out is 

active during the scheduled time.  When set to 

Event

, the Alarm-Out is only active when there is an Event during the 

scheduled time. 


The 

Channels

 box allows you to set which alarm outputs will be active.  You can also select the DVR’s internal buzzer. 


Содержание 49808

Страница 1: ...E DIGITAL VIDEO RECORDER ART 49808 49816 Please read this manual thoroughly before use and keep it for future reference Via Don Arrigoni 5 24020 Rovetta S Lorenzo Bergamo http www comelit eu e mail ex...

Страница 2: ......

Страница 3: ...e of uninsulated dangerous voltage within the product s enclosure that may be of sufficient magnitude to constitute a risk of electric shock The exclamation point within an equilateral triangle is int...

Страница 4: ...O RADIO COMMUNICATIONS HOWEVER THERE IS NO GUARANTEE THAT INTERFERENCE WILL NOT OCCUR IN A PARTICULAR INSTALLATION IF THIS EQUIPMENT DOES CAUSE HARMFUL INTERFERENCE TO RADIO OR TELEVISION RECEPTION TH...

Страница 5: ...he following conditions A When the power supply cord or the plug has been damaged B If liquid is spilled or objects have fallen into the equipment C If the equipment has been exposed to rain or water...

Страница 6: ...tor 5 Chapter 3 Configuration 6 Front Panel Controls 6 Power LED 7 HDD LED 7 Alarm Out LED 7 Network LED 7 Clip Copy LED 7 Camera Buttons 1 to 16 8 PLAY PAUSE Button 8 Arrow Buttons 8 MENU CAMEO Butto...

Страница 7: ...ive Monitoring 42 Live Monitoring Menu 43 Active Cameo Mode 44 Zoom Mode 44 PTZ Mode 44 Event Monitoring 46 Covert Camera 46 Spot Monitoring 46 Using a Mouse 46 Recording Video 47 Panic Recording 48 R...

Страница 8: ...e 10 Date Time setup screen 13 Figure 11 Holiday setup screen 14 Figure 12 Time Sync screen 14 Figure 13 Storage Information screen 14 Figure 14 Storage Status screen 15 Figure 15 User setup screen 16...

Страница 9: ...Actions 2 screen 35 Figure 51 Video Blind Settings screen 35 Figure 52 Video Blind Actions 1 screen 36 Figure 53 Video Blind Actions 2 screen 36 Figure 54 Text In Settings screen 37 Figure 55 Text In...

Страница 10: ......

Страница 11: ...hard disk drive S M A R T protocol Technical Overview In addition to replacing both a time lapse VCR and a multiplexer in a security installation your DVR has many features that make it much more powe...

Страница 12: ...he 8 and 16 channel digital video recorders The DVRs are identical except for the number of cameras and alarms that can be connected and the number of cameras that can be displayed For simplicity the...

Страница 13: ...nstall the DVR Refer to the installation manuals for the other items that make up part of your system Figure 2 16 Channel DVR rear panel Video Input Video Loop Through RS485 Port Alarm Input Output Ne...

Страница 14: ...the C Common and NC Normally Closed or C and NO Normally Open connectors NC NO is a relay output which sinks 2A 125VAC and 1A 30VDC See Chapter 3 Configuration for configuring alarm output ARI Alarm...

Страница 15: ...switch until all the LEDs on the front panel are lit NOTE When the DVR successfully resets to factory defaults all the LEDs on the front panel flash five times 5 Release the reset switch All of the D...

Страница 16: ...perates much like a VCR combined with a multiplexer Many of the buttons have multiple functions The buttons on the infrared remote control while laid out differently perform the same functions as thos...

Страница 17: ...Power LED is lit when the unit is On HDD LED The HDD LED flickers when the DVR is recording or searching video on the hard disk drive Alarm Out LED The Alarm Out LED is lit when alarm output or inter...

Страница 18: ...at high speed Pressing the button again toggles the playback speed from and The screen displays and respectively When in the pause mode pressing the button moves to the next image and pressing the but...

Страница 19: ...essing the CLIP COPY button allows you to copy video clips ALARM Button The ALARM button has two functions First it will reset the DVR s outputs including the internal buzzer during an alarm Second it...

Страница 20: ...e opportunity to reset that screen to its default settings After you are finished with any setup screen you can highlight Save and press the button to save the changes and exit the screen If you do no...

Страница 21: ...the name or title and press the button That character appears in the title bar and the cursor moves to the next position Pressing toggles between the upper and lower case keyboards backspaces and dele...

Страница 22: ...pears The screen displays the upgrade package file names that are available The rui indicates that the file is for software upgrades and ofi indicates that the file is for optical drive firmware upgra...

Страница 23: ...ses the video data Clear All Data will not clear the System Log Date Time Highlight Date Time in the System menu and press the button The Date Time setup screen appears Figure 10 Date Time setup scree...

Страница 24: ...P address or domain name of the time server NOTE You can use the domain name instead of IP address if you already set up the DNS Server when setting up the LAN Highlight the box beside Interval and pr...

Страница 25: ...device CAUTION Do NOT disconnect the USB cable or the power from the device while copying video clips If the USB cable is disconnected while copying video clips archived data might be lost Highlight t...

Страница 26: ...e individual authority level boxes and pressing the button will toggle between that authority level being turned On and Off The authority levels that can be turned On and Off are Shutdown The user can...

Страница 27: ...power Figure 16 Shutdown screen Network Setup Figure 17 Network menu Network Highlight Network in the Network menu and press the button The Network setup screen displays You will be able to change th...

Страница 28: ...p LAN parameters manually Change the numbers by highlighting them and using the Up and Down arrow buttons to increase or decrease the number The factory default LAN settings are IP Address 192 168 1 1...

Страница 29: ...utton to toggle between On and Off NOTE The DVRNS DVR Name Service allows the DVR to use Dynamic IP addresses for remote connection When this feature is On you can access your DVR remotely using the D...

Страница 30: ...numbers Figure 21 WebGuard setup screen Notification The DVR can be set up to send an email or to contact a computer running RAS Remote Administration System when an event occurs Highlight Notificati...

Страница 31: ...s e mail address Use the virtual keyboard to enter the e mail address Highlight the Callback tab and the Callback screen displays Highlight LAN and press the button to toggle between On and Off When...

Страница 32: ...able to set up PTZ devices if the PTZ port is set to RS232 or RS485 Figure 26 Camera PTZ setup screen Highlight the box in the Product column for the PTZ camera you wish to configure and press the but...

Страница 33: ...sing the button allows you to set the dwell time of the alarm output Dwell times range from 5 seconds to 30 minutes Figure 28 Alarm Out Settings screen Highlighting the Schedule tab causes the Schedul...

Страница 34: ...rent user logged in displays Camera No The camera number displays at the top left corner of each camera screen Camera Title The camera title displays at the top left corner of each camera screen Recor...

Страница 35: ...m 1 second to 1 minute Highlight Event Monitoring On and press the button Pressing the button toggles between On and Off When it is On the DVR will display the camera associated with the event when an...

Страница 36: ...gs for a remote keyboard Highlight the box beside Port and select from None RS232 and RS485 If the RS232 port and RS485 port are in use for PTZ control networking or text input the remote keyboard can...

Страница 37: ...ined period under three conditions at midnight whenever the system reboots or whenever the user changes the Auto Deletion settings Selecting Never will disable the Auto Deletion function Highlight the...

Страница 38: ...hlight Schedule in the Record menu and press the button and the Schedule setup screen appears Simple Mode Advanced Mode Figure 38 Schedule setup screen You can program the DVR to record only during ce...

Страница 39: ...ing and press the button to define the recording settings You can set the ips Quality and Resolution ips Quality Resolution and Dwell for Advanced Mode setup of the recording for any modes you set up...

Страница 40: ...w and image resolution can be selectable from Very High D1 High Half D1 and Standard CIF You can set the amount of time to record prior to the event by adjusting the Dwell You can set the Dwell from 5...

Страница 41: ...t connectors that you would like to activate whenever the DVR detects an input on the associated alarm input You can also set the DVR s internal buzzer to sound NOTE For the Alarm Out action the alarm...

Страница 42: ...ollowing functions Select Activates highlighted blocks to detect motion Clear Deactivates highlighted blocks so that they will not detect motion Reverse Activates inactive highlighted blocks and deact...

Страница 43: ...rm Out heading and press the button A list of Alarm Outputs appears You can associate as many Alarm Outs with that camera as you wish When the DVR detects motion on the selected camera s input it trig...

Страница 44: ...a SPOT monitor Highlight the box under the Record heading and press the button A list of cameras appears You can associate as many cameras with that camera as you wish If the DVR detects video loss on...

Страница 45: ...ox under the Sensitivity heading allows you to adjust the DVR s sensitivity to video blind for Black and White independently from 0 Never and 1 least sensitive to 15 most sensitive NOTE Video blind mi...

Страница 46: ...d on the selected camera NOTE For the Alarm Out action the alarm output and beep you select should be set to the Event mode in the Alarm Out setup screen Schedule tab Highlight the box under the Notif...

Страница 47: ...documentation for the text string that the device first sends when a transaction starts If you want the DVR to react to any character sent from the text input device you will want to turn On Any Char...

Страница 48: ...wish When the DVR detects text input it triggers output signals on all the associated Alarm Out connectors You can also have the DVR s internal buzzer sound if text input is detected NOTE For the Alar...

Страница 49: ...want the DVR to run self diagnostics on Alarm Inputs You can select from 1 hr to 30 days or Never Highlight the Storage tab and the Storage screen displays Figure 59 Storage screen Highlight the box...

Страница 50: ...t For the Notify action to work the DVR should be registered in the RAS Remote Administration System Event Status Highlight Event Status in the Event menu and press the button The Event Status screen...

Страница 51: ...Digital Video Recorder art 49808 49816 41...

Страница 52: ...ion Turning on the Power Once you have installed the DVR following the instructions in Chapter 2 Installation it is ready to record Live Monitoring As soon as the DVR completes its initialization proc...

Страница 53: ...he Cameo Sequence for the cameo sequence monitoring should be selected in the Display setup screen Main Monitor tab Camera Menu Selecting Camera Menu in the Live Monitoring menu displays the following...

Страница 54: ...ameo menu displayed when pressing the CAMEO button also exits the Active Cameo mode The active cameo mode will remains in effect for 15 seconds if there is no further operation In active cameo mode pr...

Страница 55: ...box will appear Select the desired preset and press the button to load the preset Set Preset Move to Preset Figure 64 PTZ Preset menu While in the PTZ mode pressing the MENU button and selecting Adva...

Страница 56: ...b that camera appears to be Off unless a user with Covert Camera View authority logs into the system The camera title will be grayed out and status icons will not be displayed on the monitor NOTE When...

Страница 57: ...u moves to the previous or next page It is the same as pressing the GROUP button OSD Selecting OSD in the Mouse Display menu toggles OSD On and Off Recording Video Once you have installed the DVR foll...

Страница 58: ...selected camera When in the single screen display format the camera currently displayed on the screen will be selected and when in the PIP display format the camera displayed on the PIP screen will b...

Страница 59: ...Pressing the ZOOM button zooms in the current image on the screen DISPLAY SPOT Button Pressing the DISPLAY SPOT button toggles different display formats The available formats are 2x2 3x3 and 4x4 Pres...

Страница 60: ...isplay If no video was recorded during the selected time a message appears alerting you that no image was recorded at that time The button and arrow buttons can now be used to review the surrounding v...

Страница 61: ...BACK returns to live monitoring NOTE It is possible that no recorded image displays on the current screen Press the DISPLAY button and change the screen mode to 4x4 You will be able to easily see the...

Страница 62: ...iagnostic System Events as part of your search The choices are Panic Record Check Recording Check Alarm In Disk Almost Full Disk Bad Disk Temperature Disk S M A R T Fan Error Once you set your desired...

Страница 63: ...previous Searching Video Go To section of this chapter for more details Clip Copy Clips a video segment and saves it see the following Clip Copy section for more details Print Prints the current play...

Страница 64: ...age Highlight the box beside Type and press the button You can select between Motion Search and Museum Search Motion Search detects motion in the defined area Museum Search detects if a defined object...

Страница 65: ...be from the first recorded image Highlight the box beside To and press the button to toggle between On and Off When set to Off you can enter a specific Date and Time When set to On the search will be...

Страница 66: ...e from the first recorded image Highlight the box beside To and press the button to toggle between On and Off When set to Off you can enter a specific Date and Time When set to On the search will be f...

Страница 67: ...GB For example 3 individual 2GB files will be created when saving a 6GB video clip However the file size for the One Touch Clip Copy is limited to 2GB You can use other functions on the DVR while vide...

Страница 68: ...ive in Windows 98 NOTE Preparing a USB hard disk drive under Windows ME is almost identical to Windows 98 1 Connect the USB hard disk drive to your computer using the USB Cable 2 Turn on your computer...

Страница 69: ...ple if you want to search for Coke with a Qty Quantity of more than 1 and Hotdog with an amount totaling over 8 the following search condition can be set Search Example II 1 2 3 4 5 6 1234567890123456...

Страница 70: ...screen WebGuard tab Or http DVRNS server address DVR name The DVRNS server address and the DVR name registered on the DVRNS server Or http www dvronline net Entering the DVR IP address or the DVR name...

Страница 71: ...on and select the Run as administrator option from the context menu Otherwise some functions of the WebGuard might be limited to use There might be a problem with screen display or screen update due t...

Страница 72: ...udio control panel displays click the to send audio to the connected remote site and click the button again to stop sending audio Click the to monitor live audio from the connected remote site through...

Страница 73: ...ck images found within the time parameters The Timetable window located at the bottom displays the time information for the image of the date selected on the calendar If more than one video stream in...

Страница 74: ...this case you can search overlapping video streams individually by selecting a specific segment For example when the DVR has recorded video from one to five o clock and the user changes the time back...

Страница 75: ...Digital Video Recorder art 49808 49816 65 Map of Screens...

Страница 76: ...camera video cable and connections Check monitor video cable and connections Confirm that the camera has power Check camera lens settings Live Video Very Bright If a cable is attached to the Loop con...

Страница 77: ...Failure Print End Setup Export Cancel Print Cancel Schedule On Schedule Off Error Code Notices System Upgrade Related Clip Copy Related No Description No Description 0 Unknown error 0 Unknown error 1...

Страница 78: ...em is busy clip copying Specifications VIDEO Signal Format NTSC or PAL Auto Detect Video Input Composite 8 or 16 looping inputs 1 Vp p auto terminating 75 Ohms Monitor Outputs Composite 1 BNC 1 Vp p 7...

Страница 79: ...B hard disk drive or flash drive When installing an internal DVD RW drive connect the SATA I O cable to the SATA3 socket GENERAL Dimensions W x H x D 16 9 x 3 5 x 15 9 430mm x 88mm x 405mm Unit Weight...

Страница 80: ...isposal please separate this from other types of wastes and recycle it responsibly to promote the sustainable reuse of material resources Household users should contact either the retailer where they...

Отзывы: