19
S
ection
5 — S
ervice
4.
Position the hose back over the deck and press the hose
back into place on the deck.
5.
Refill the engine with new oil. Refer to the Engine
Operator’s Manual for information regarding the volume
and weight of engine oil.
Deck Wash
Your mower’s deck is equipped with a water port on its surface as
part of its deck wash system.
Use the Smart Jet to rinse grass clippings from the deck’s
underside and prevent the buildup of corrosive chemicals.
Complete the following steps AFTER EACH MOWING:
WARNING!
Before using the deck wash system,
always disengage the blade control, stop engine and
remove key to prevent unintended starting.
1.
Position the mower on a level, clear location on your lawn,
near enough for your garden hose to reach.
CAUTION:
Make certain the mower’s discharge
chute is directed AWAY from your house, garage,
parked cars, etc.
2.
Remove the fast attach deck wash nozzle from the mower
deck and thread it onto the end of your garden hose.
3.
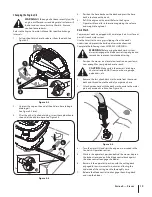
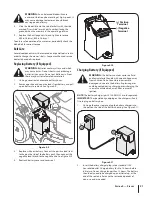
Attach garden hose with the deck wash nozzle to the water
port on your deck’s surface. See Figure 5-5.
Figure 5-5
4.
Turn the water ON and start the engine as described in the
Controls & Operation section.
5.
While in the operator’s position behind the mower, depress
the lockout lever and pull the blade control back against
the drive control to engage the blades.
6.
Remain in the operator’s position with the cutting deck
engaged for a minimum of two minutes, allowing the
underside of the cutting deck to thoroughly rinse.
7.
Release the blade control to disengage the cutting deck
and stop the blades.
Changing the Engine Oil
WARNING!
If the engine has been recently run, the
engine, muffler and surrounding metal surfaces will
be hot and can cause burns to the skin. Exercise
caution to avoid burns.
Refer to the Engine Operator’s Manual for specific oil change
intervals.
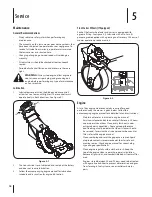
1.
Pull up the oil drain hose to release it from the deck. See
Figure 5-3.
3
Figure 5-3
2.
Unscrew the cap on the end of the oil drain hose to begin
draining oil.
See Figure 5-3 inset.
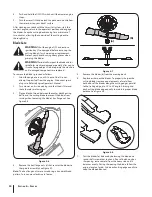
3.
After the oil has finished draining, screw the cap back onto
the end of the oil drain hose. See Figure 5-4.
4
5
Figure 5-4
Содержание 12ABW32G897
Страница 28: ...28 Notes ...


