background image


OPERATION 


PRIMING THE PUMP 


NOTE:


The pump is shipped 

WITHOUT

 oil. Before starting, pour 

in oil provided in the pump through the oil nozzle. The 
break-in oil should be changed after 8 hours of 
operation. To reduce maintenance and repair problems, 
use only premium compressor oil. SAE 10W-30 all 
weather air compressor oil is recommended for 
general use. 


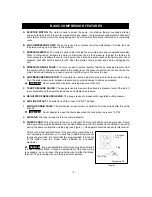
1.  Check the oil level in the pump through the oil sight glass. 

The pump oil level must be between A1 and A2. Do not 
overfill or underfill. (See A) 

2.  Turn the pressure switch to the OFF position (See B) 
3.  Open the tank drain valve (See C). Turn counterclockwise. 
4.  Plug in the power cord 
5.  Turn the pressure switch to the ON position (See D). The 

unit will start. Allow the unit to run for half an hour to break 
in the internal parts. After half an hour, if the unit does not 
operate properly, shut down immediately and contact 
GreatNeck Service Center at 1-855-900-2653. 

6.  After half an hour, turn the pressure switch to the OFF 

position.  

7.  Close the tank drain valve. Turn clockwise. 
8.  Turn the pressure switch to the ON position. The unit will 

start and fill the tank to the cut-out pressure and stop. 


NOTE: 

The pressure switch will restart the motor automatically 

as compressed air is used. 


STARTUP 


1.  Before starting, check the oil sight glass to ensure that oil 

level in the pump is at the required level. 

2.  Turn the pressure switch to the OFF position. 
3.  Close the tank drain valve.   
4.  Plug in the power cord. 
5.  Turn the pressure switch to the ON position. 
6.  Adjust the pressure regulator to the working pressure of 

the tool. 
When adjusting from a higher to a lower pressure, turn the 
knob counterclockwise past the desired setting, then turn 
clockwise to reach the desired pressure. DO NOT exceed 
operating pressure of the tool or accessory being used. 


SHUTDOWN 


1.  Turn the pressure switch to the OFF position. 
2.  Unplug the power cord. 
3.  Reduce pressure in the tank through the outlet hose. You 

can also pull the relief valve ring and keep it open to relieve 
pressure in the tank. (See E) 


CAUTION


Escaping air and moisture can propel debris that 

may cause eye injury. Wear safety goggles when opening 
drain valve. 


CLOSE 

OPEN 

- 7- 


ON

OFF

Содержание CM01213-15

Страница 1: ...Industry Ltd Group All Rights Reserved Coleman R and are registered trademarks of The Coleman Company Inc used under license 2010 The Coleman Company Inc 15GAL AIR COMPRESSOR 3 5HP 15 GALLON IMPORTANT...

Страница 2: ...LESHOOTING CHART 9 PARTS DRAWING PRATS LIST 10 WARRANTY 11 SPECIFICATION ITEM NO CM 01213 15 PUMP OIL LUBE DIRECT DRIVE MOTOR 2 5 Continuous HP VOLTAGE AMPS PHASE 120 15 1 AIR TANK CAPACITY 15 GALLON...

Страница 3: ...ntact with moving parts could cause serious injury 5 RISK OF BURSTING Check the maximum pressure rating in the manual or the serial tag label Compressor outlet pressure must be regulated so as to neve...

Страница 4: ...G J 4 A ELECTRIC MOTOR B AIR COMPRESSOR PUMP C PRESSURE SWITCH D PRESSURE RELIEF VALVE E AIR PRESSURE REGULATOR F TANK PRESSURE GAUGE G REGULATED PRESSURE GAUGE H AIR LINE OUTLET I AIR TANK DRAIN VALV...

Страница 5: ...essure WARNING Never exceed the maximum working pressure of the tool F TANK PRESSURE GAUGE The gauge is used to measure the stored air pressure level of the tank It is not adjustable by the operator a...

Страница 6: ...ressor according to the following guidelines a Set the compressor in a position near a grounded electrical outlet b The compressor must be at least 12 inches away from any wall or obstruction and in a...

Страница 7: ...e tank drain valve Turn clockwise 8 Turn the pressure switch to the ON position The unit will start and fill the tank to the cut out pressure and stop NOTE The pressure switch will restart the motor a...

Страница 8: ...y and to clear the valve of any possible obstructions Daily Clean the air filter A dirty filter will reduce the unit s performance and life To avoid any contamination of the inside pump the filter sho...

Страница 9: ...e the pressure switch to the OFF position If the motor does not shut off unplug the air compressor If the electrical contacts are welded together replace the pressure switch Air compressor not large e...

Страница 10: ...Filter 9 1 Oil fill plug 10 1 Pump Motor Assembly 11 1 Elbow 12 1 Shroud 13 2 Washer 14 2 Screw 15 1 Power cord ITEM QTY DESCRIPTION 16 2 Screw 17 4 Bolt 18 4 Washer 19 4 Spring washer 20 4 Nut 21 1...

Страница 11: ...f you feel you have a defective product please submit a copy of your receipt to the address below and call 1 855 900 2653 for instructions prior returning this item to the store or sending back to Gre...

Отзывы: