background image

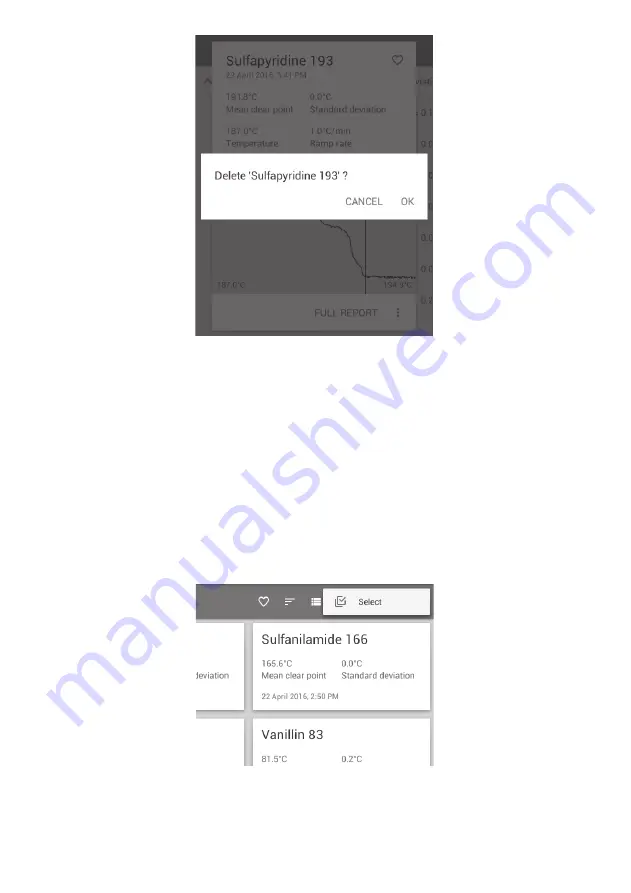
Warning check before a file is deleted

To permanently delete the file, touch ‘OK’.

To abort the deletion, touch ‘CANCEL’.

15.4.2 Copying or deleting multiple files

To select multiple files for copy or deletion, touch the ‘Overflow’ action button on the top right of
the screen.

Touch ‘Select. This will open selection buttons next to each result file.

Note:

 Touch the ‘Back’ button at any time to escape.

Activating the Select buttons

44

Содержание Melting Point S MP-800 Series

Страница 1: ...Cole Parmer MP 800D Series Melting Point S Instruction Manual Version 1 7...

Страница 2: ...emperature Settings 8 6 3 Sample Preparation 9 7 Operation 9 7 1 Power up 9 7 2 Main menu screen 10 7 3 Navigation bar 11 8 Settings 11 8 1 Changing the settings 12 9 Creating a user account 13 10 Set...

Страница 3: ...d deleting measurement files 14 5 Editing measurements 15 Managing results files 15 1 File display 15 2 Searching results files 15 3 Favourites 15 4 Copying and deleting results files 15 5 Viewing res...

Страница 4: ...e category II IEC 60364 4 443 Pollution degree 2 General safety advice Never move or carry the unit when in use or connected to the mains electricity supply The unit should be carried using both hands...

Страница 5: ...s fitted with an IEC socket at the rear of the instrument for connection of the mains lead Caution Fuses are fitted in both live and neutral lines The unit is supplied with two mains leads fitted with...

Страница 6: ...nstrument to cool before moving IF IN DOUBT CONSULT A QUALIFIED ELECTRICIAN 4 3 Warning High temperatures are dangerous and can cause serious burns to the operator and ignite combustible materials Gre...

Страница 7: ...s to the sample block which is capable of holding up to three capillary sample tubes Capillary tubes must be a minimum of 5 0cm in length to ensure that they can be retrieved from the sample block Thr...

Страница 8: ...nt the point at which the sample is a clear liquid and no solid particles remain as the melting point of a substance Other changes in the physical appearance of the substance are sometimes observed su...

Страница 9: ...4 mm in height The powder is then forced to the bottom of the tube by repeatedly tapping the bottom of the capillary against a hard surface Excessive amounts of sample in the capillary tubes will res...

Страница 10: ...The Program status card allows the user access to the program in progress Block temperature Displays the current temperature of the heating block Last calibrated Displays either Factory calibrated or...

Страница 11: ...time applications 8 Settings Prior to using the MP 800D it is advised to set up the unit to your own preferences and geographical location For accurate record keeping set the date and local time befo...

Страница 12: ...ompleted Calibration reminder can be set to Never default Weekly Monthly Bi annually or Annually Date time Check USB for an update Protect settings About Display formats Temperature units Time format...

Страница 13: ...visions of the regulation are met such as security auditing validation and the maintenance of records in an electronic format along with their submission to the US FDA 9 Creating a user account The MP...

Страница 14: ...Once you are signed in to your user account you can edit the settings to your own preferences These settings will be saved to your user account To exit a user account touch the Sign Out card to retur...

Страница 15: ...ramp rate Touch the Measurements card on the main menu screen to open the Measurements folder Create a new measurement by touching the icon on the action bar at the top of the screen Measurements fold...

Страница 16: ...this function off and enter an end temperature using the More options card More options Touch the selector to turn OFF automatic detection of the melt end Using the keypad type in an end temperature T...

Страница 17: ...the measurement while it is running Delete the measurement To add measurement protection touch the card and type in a password Touch to select the required option s you wish to protect against follow...

Страница 18: ...he powdered sample into a small pile Press the open end of the capillary into the sample to a depth of around 2mm 5 Invert the capillary and tap the tube to pack the sample down in the sealed end Repe...

Страница 19: ...and touch to open If the measurement has not yet been defined please follow section 10 Setting up a new Measurement Note If there are many measurements saved on the instrument the search function may...

Страница 20: ...heating block is heating rapidly to the start temperature 2 Stabilising the heating block is stabilising at the start temperature This continues for two minutes 3 Ramping the heating block is heating...

Страница 21: ...sample status for each capillary will be indicated on the display The status of each sample will be indicated as one of four possible states Solid No changes have been detected in the sample s physic...

Страница 22: ...and Finished will be displayed on the screen The unit will automatically start to cool When the melting point determination has finished touch OK to save the result Note It is also possible to stop an...

Страница 23: ...re The Rapid ramp measurement will begin a melting point determination from 50 C and ramp at a rate of 20 C per minute until the approximate melting point is detected From the main menu screen touch R...

Страница 24: ...ear point for the samples under test together with the details of the measurement protocol and the light intensity graphs Select TUBE 1 TUBE 2 or TUBE 3 to view the light intensity graphs for each cap...

Страница 25: ...be added for any of the following events Start of melt Droplets of liquid are clearly visible for the first time Collapse point The substance collapses from the sides of the tube and begins to liquef...

Страница 26: ...anually tagged value will be displayed under the appropriate tube heading Up to 8 manually tagged values can be added for each capillary Melt video screen showing a manually tagged event Continue addi...

Страница 27: ...Melt reports Melt reports saved on the MP 800D can be viewed from the Results folder card From the main menu screen touch the Results card Select and touch the required Results file to open a preview...

Страница 28: ...the options for deleting or copying to USB Note A USB flash drive must be inserted into the MP 800D for the Copy to USB option to be active Melt report delete and copy options Touch Copy to USB to co...

Страница 29: ...avourites change the display search copy and delete Action buttons in the Measurements screen Plus Touch this icon to create a new measurement See section 10 Heart Touch this icon to view the measurem...

Страница 30: ...icons Detail view When in Detail view touching the header allows Measurement files to be listed in order as follows Measurement name A Z or Z A Start temperature low to high or high to low Ramp rate...

Страница 31: ...he Sort icon Grid view with Sort icon highlighted Touch the Sort icon to change the display order when in grid view You will have the option to order files by measurement name start temperature ramp r...

Страница 32: ...surement file you require quickly and easily Touch the Search icon Measurements folder with the Search icon highlighted Using the keypad begin typing the name of the file Both measurements and results...

Страница 33: ...lected measurement file The following options are available from the measurement card Touch RUN to start the measurement Touch EDIT to make changes to the measurement Touch the Overflow icon to copy o...

Страница 34: ...Heart icon on the measurement card so that it becomes filled The filled heart icon indicates that the measurement is included in the favourites list Exit by touching the Back button on the navigation...

Страница 35: ...e duplicate options Delete or duplicate a single measurement Touch Duplicate to copy the file or Delete to delete the file When a file is copied it will be named Copy of followed by the original file...

Страница 36: ...to each measurement file Note Touch the Back button at any time to escape Activating the Select buttons Touch the selection button next to each Measurement file to be copied or deleted Selecting Measu...

Страница 37: ...asurement the instrument will display a warning as a check to ensure you wish to continue with the deletion To permanently delete the selected files touch OK To abort the deletion touch CANCEL Warning...

Страница 38: ...e required measurement file and touch to open Note If there are many measurements saved on the instrument the search function may help to find the required file more quickly Please see section 14 2 fo...

Страница 39: ...he results in your favourites list See section 15 3 Grid detail Touch this icon to change the format of the file display Choose either grid view or detail display See section 15 1 Sort grid view only...

Страница 40: ...or oldest first Results folder header in detail view Touch the header to change the display order When in Grid view the file order can be changed by touching the Sort icon Grid view with Sort icon hig...

Страница 41: ...easily Touch the Search icon Results folder with the Search icon highlighted Using the keypad begin typing the name of the file Both measurements and results files containing the search term will be...

Страница 42: ...list so they can be located quickly To add a result to your favourites list first open a result card from the files stored on the instrument Touch the Heart icon so that it becomes filled The filled h...

Страница 43: ...copied to a USB flash drive for transfer to a computer or deleted when no longer required 15 4 1 Copying or deleting single files Touch a results file to open the preview card Touch the Overflow icon...

Страница 44: ...NCEL 15 4 2 Copying or deleting multiple files To select multiple files for copy or deletion touch the Overflow action button on the top right of the screen Touch Select This will open selection butto...

Страница 45: ...h COPY TO USB to copy the selected files or DELETE to delete the selected files While multiple files are being copied progress will be displayed on screen Progress indicator while copying multiple fil...

Страница 46: ...in XML format CSV file containing block temperature and light intensity for each tube can be exported to a spreadsheet e g Excel Note Unencrypted files can be exported and changed freely 15 6 Viewing...

Страница 47: ...each capillary Touch the Overflow icon at the top right of a Melt report screen This will open the option for printing the report Note The accessory printer must be connected to the MP 800D for the P...

Страница 48: ...Delete or print a Melt report Touch Print to print the Melt report 48...

Страница 49: ...ed using suitable certified melting point standards which bracket the expected range of your test samples This will ensure the highest level of confidence is maintained in the results generated with t...

Страница 50: ...Displays the date of the previous user calibration Next calibration required Displays the date when the next user calibration is due depending on the frequency reminder in the Settings Touch RECALIBRA...

Страница 51: ...libration standard Choose the result file for calibration by selecting and touching on it Choose a result for calibration The mean clear point of the selected result will automatically populate the di...

Страница 52: ...then touch Next on the keypad First calibration point If a single point calibration is all that is required touch APPLY CALIBRATION If another point is to be used touch ADD A SECOND POINT Repeat the p...

Страница 53: ...ated with the latest calibration details Note Touching RESET will return the unit to factory calibration and remove the correction factor Updated calibration summary screen Reset factory calibration T...

Страница 54: ...near curve through the two points specified not forced through zero y a x b Triple point calibration quadratic regression curve not forced through zero y a x2 b x c The temperature measured by the tem...

Страница 55: ...rive Insert the USB flash drive into the MP 800D USB port and open the Settings menu Touch Check USB stick for an update The new software version will be presented on screen against the currently inst...

Страница 56: ...em before attempting to replace any of the fuses 3 The fuse holders are built into the mains input socket With the power cable removed open the fuse drawer using a suitable tool such as a small flat b...

Страница 57: ...iately sized Phillips screwdriver to undo the retaining screw located within the sample compartment Note The screw is self retaining and will remain within the protective cover even when fully loosene...

Страница 58: ...ely 300 results with video 100V 230V 50 60Hz 150W Temperature range Temperature resolution Ramp rate Cooling down time 350 C to 50 C Heating up time 50 C to 350 C Number of samples Display Sensor Memo...

Страница 59: ...ments for laboratory equipment for the heating of materials Electrical equipment for measurement control and laboratory use EMC requirements Part 1 General requirements Class A IEC EN 61010 2 010 2003...

Страница 60: ...oleparmer in China T 1 847 549 7600 E sales antylia com W coleparmer com USA T 1 847 549 7600 E sales antylia com W coleparmer com Canada T 514 355 6100 E info antylia ca W coleparmer it Other T 1 847...

Отзывы: