


Standby Mode
Reviewing Messages
Intro
Operation
Customer
Assistance
Warranty
Notice
Main Icons
Secondary Icons
Caution
Warning
Installation
Customer
Assistance
Intro
Operation
Customer
Assistance
Warranty
Notice
condary Icons
Caution
Warning
Installation
Customer
Assistance
Intro
Operation
Customer
Assistance
Warranty
Notice
Main Icons
Secondary Icons
Caution
Warning
Installation
Customer
Assistance
DSC Operation
64 English
Nothing
comes close to a Cobra
®
65
Intro
Operation
Customer
Assistance
Warranty
Notice
Secondary Icons
Caution
Warning
Installation
Customer
Assistance
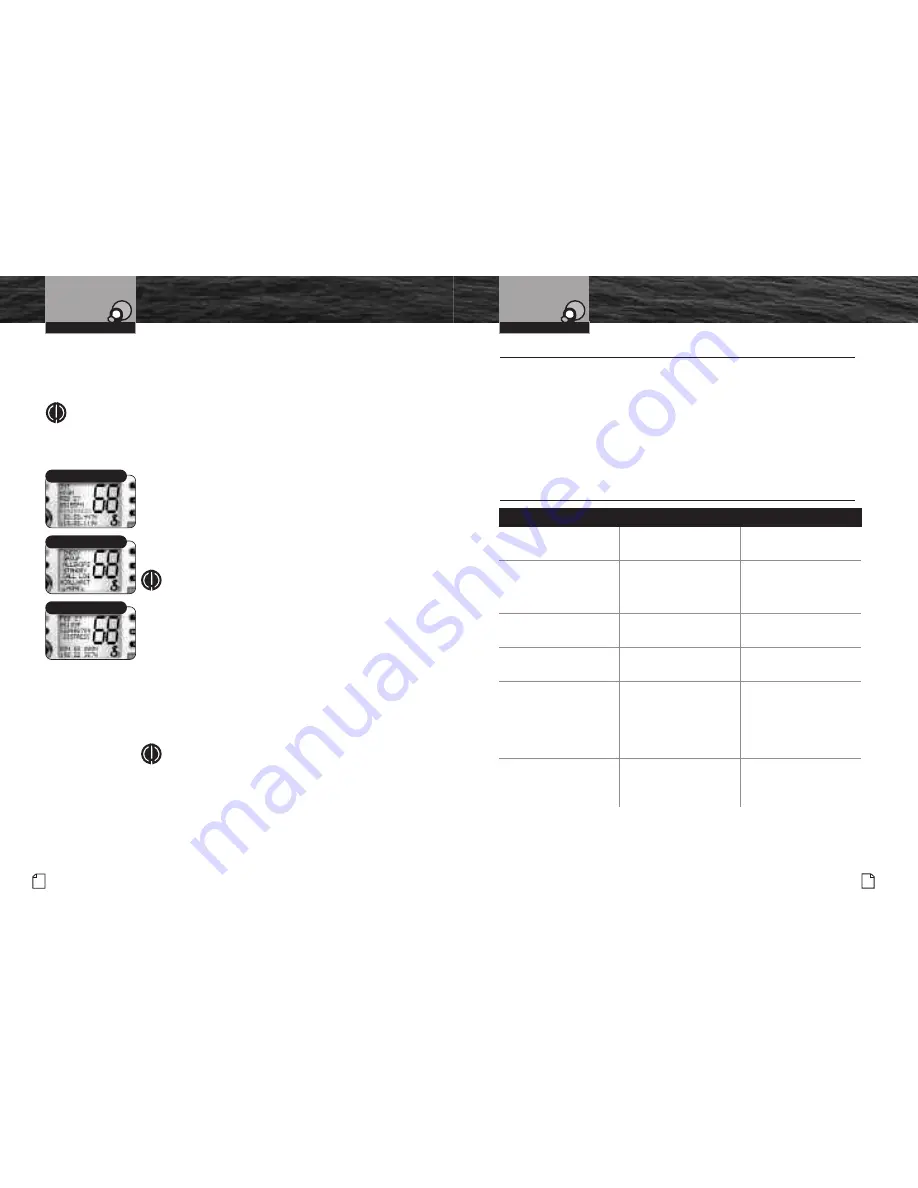
Operating Your Radio
Call Waiting
Call Waiting functions similarly to the caller ID function on your telephone.
It will capture the caller’s MMSI identification number and any other data
included in a DSC message.
NOTE
The call waiting memory can hold up to twenty messages.
Once the memory becomes full, each new call will erase the
oldest call information on a first-in first-out basis.
To review call waiting messages received
while in DSC Standby mode:
1. From Standby mode, press the Call/Set button
to enter the Call Send menu.
2. Use the Up/Down buttons to scroll to
CALLWAIT
(call waiting.)
3. Press the Call/Set button to enter the Call Waiting mode.
NOTE
The fourth line will show the type of message.
4. Use the Up/Down buttons to move from message
to message in the call waiting memory.
5. Press the Call/Set button to return to Standby mode.
To clear messages from the call waiting memory:
1. From Standby mode, press the Call/Set button
to enter the Call Send menu.
2. Use the Up/Down buttons to scroll to
CALLWAIT
(call waiting.)
3. Press the Call/Set button to enter the Call Waiting mode.
NOTE
The fourth line will show the type of message.
4. Use the Up/Down buttons to select the message
you want to delete.
5. Press and hold the Memory Scan/Memory Clear
button for one second or more.
Repeat steps 4 – 5 to delete additional messages.
6. Press the Call/Set button to return to Standby mode.
No display on LCD when
radio is turned on
Improper power
connection
Ensure power connections
are proper and secure
Will transmit at
1 watt, but not
at 25 watts
Selected channel is
limited to 1 watt
Insufficient power supply
Switch to
another channel
Recharge battery
Will not transmit
Selected channel is
limited to receive only
Switch to
another channel
No sound from speaker
Volume level is too low or
squelch level is too deep
Readjust volume
and squelch
No answer to calls
Out of range of
other station
Signal is blocked
by terrain
Switch to high power
(25 watts) or move closer
Move until you have
a “line-of-sight” to
the other station
DSC distress
cannot be sent
MMSI
(DSC self-identification)
number is not entered
Enter your MMSI number
Maintenance and
Troubleshooting
Problem
Possible Cause(s)
Solution(s)
Intro
Operation
Customer
Assistance
Warranty
Notice
Secondary Icons
Caution
Warning
Installation
Customer
Assistance
Operating Your Radio
Maintenance
•
Very little maintenance is required to keep your CobraMarine
™
VHF radio in good
operating condition.
■
Keep the radio clean by wiping with a soft cloth and mild detergent.
Rinse with fresh water. Do not use solvents or harsh or abrasive cleaners,
which could damage the case or scratch the LCD screen.
■
If the radio is exposed to salt water, rinse it in fresh water at least once
a day to prevent build-up of salt deposits, which could interfere with
button operation.
Troubleshooting
•
Call Waiting


