background image

13

Nothing 

Comes Close to a Cobra

®

English

12

Operation

Intro

Operation

Customer
Assistance

Warranty

Notice

Secondary Icons

Caution

Warning

Installation

Customer
Assistance

Operating Your  Handset

Operation

Intro

Operation

Customer
Assistance

Warranty

Notice

Secondary Icons

Caution

Warning

Installation

Customer
Assistance

Operating Your  Handset

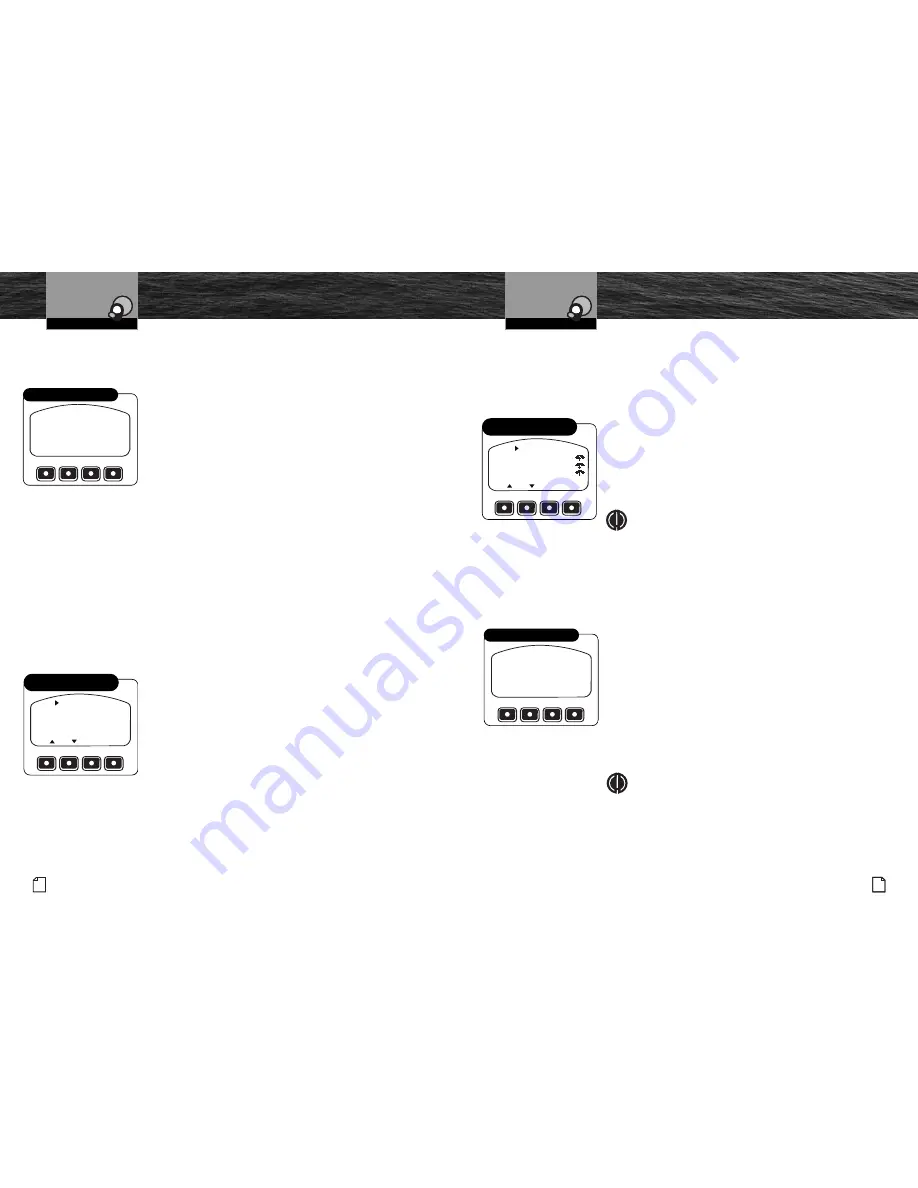
Call Waiting

When a second call rings during an active call, it will be announced on the 

handset screen. 

To Answer the Waiting Call:

1. Press the Answer Function button. The waiting call 

will become active, the first call will be put on hold.

Outgoing Call

Outgoing calls can be initiated in three ways:

By selecting a Phonebook entry.

By selecting a Call Log entry.

By dialing the number using handset Function buttons.

Phonebook

After adding a number to your Phonebook, you can go to the Phonebook and select

it from the available numbers to be dialed.

To access a number in the Phonebook, press the Menu Function button in Standby

mode, then select the Phonebook mode to arrive at the screen shown.

To Select and Dial a Number:

1. Use the Page Up and Page Down buttons to shift up and

down the list of entries.

2. Use the Up and Down Arrow buttons to scroll the pointer

at the left of the screen to the desired entry.

3. Press the Green Phone button to call the number.

Call Log

The most recent incoming and outgoing calls are recorded in the handset Call Log.

These can be used to select and dial a number.

To access a number in the Call Log, press the Menu Function button in Standby

mode, then select the Call Log mode to arrive at the screen shown. 

To Select and Dial a Number:

1. Use the Page Up and Page Down buttons to shift up 

and down the list of entries.

2. Use the Up and Down Arrow buttons to scroll the pointer

at the left of the screen to the desired entry.

3. Press the Green Phone button to call the number.

NOTE

While in Call Log mode, you can see details of the

selected entry by pressing the View Function button

or Enter button.

Dial Number

To enter a number you want to dial, press the Menu Function button in Standby

mode, then select the Dial By Number mode to arrive at the screen shown.

To Enter a Number to be Dialed:

1. Press and release the Function button under the first digit

of the phone number until the correct number appears

above the flashing cursor.

2. Wait for the cursor to shift to the right or press the Enter

button to shift the cursor.

3. Enter the second digit of the phone number as in step 1.

4. Repeat steps 1 and 2 until the complete number has 

been entered.

5. Press the Green Phone button to call the number.

NOTE

The number will appear on the screen without 

dashes or other separators.

BILL ANDERSON

1 555 588 2300

JANE DOE

VIEW

PG

1

3

PG

1

2

1 555 600 4300

4

5

6

MARY WILLIAMS

1 555 250 4343

Call Log
Select and Dial a Number

BILL

CELL

NATALIE

NAT CELL

EDIT

PG

PG

1

2

3

BILL DESK

4

ADD NEW

EXIT

NEW

Phonebook 
Select and Dial a Number

Intro

Operation

Customer
Assistance

Warranty

Notice

Main Icons

Secondary Icons

Caution

Warning

Installation

Customer
Assistance

INCOMING CALL

+1 555 566 1234

ANSWER

IGNORE

Call Waiting Display

ENTER NUMBER

1 2 3

4 5 6

7 8 9

0+ 

*

#

Dialing a Number

Intro

Operation

Customer
Assistance

Warranty

Notice

Main Icons

Secondary Icons

Caution

Warning

Installation

Customer
Assistance

Содержание MARINE MR F300BT

Страница 1: ...or in the cabin of your boat Customer Assistance Should you encounter any problems with this product or not understand its many features please refer to this owner s manual If you require further assi...

Страница 2: ...duces effect of environmental noise when speaking External Audio Output Allows connection of the F300 to your stereo s AUX input Key Lock Prevents accidental operation or setting changes when key lock...

Страница 3: ...ndset Getting Started 6 Common MR F300 Functions 7 Operation 11 Customizing the MR F300 16 Warranty Warranty 23 Product Service Maintenance 24 Product Service 24 Intro Operation Customer Assistance Wa...

Страница 4: ...NING and NOTICE statements in this manual WARNING Statements identify conditions that could result in personal injury or loss of life NOTICE Statements identify conditions that could cause damage to t...

Страница 5: ...llation Installation Before using your Bluetooth handset the bulkhead connector cord must be installed on your vessel and connected to a 12 volt DC power source Installing the Bulkhead Connector Cord...

Страница 6: ...owing procedures define common operating functions of the handset Power On Off Press the Power button at the top of the handset for two seconds to turn it On or Off The first time you turn On the Cobr...

Страница 7: ...00 Functions VOX The VOX function converts the handset microphone s pickup of your voice from being controlled by the PTT button to being activated by your voice When VOX is On the PTT button does not...

Страница 8: ...tton from the left will display the Menu Operation Once the CobraMarine Bluetooth handset has been paired with a cell phone incoming calls can be answered and outgoing calls can be made Standby While...

Страница 9: ...he Call Log mode to arrive at the screen shown To Select and Dial a Number 1 Use the Page Up and Page Down buttons to shift up and down the list of entries 2 Use the Up and Down Arrow buttons to scrol...

Страница 10: ...ect Delete on the Phone Setup screen to advance to the screen shown 2 Use the Page Up and Page Down buttons to shift up and down the list of entries three items at a time 3 Use the Up and Down Arrow b...

Страница 11: ...to the first character of the Number 7 Enter the phone number in the same fashion as the name 8 Press the Save Function button to save the entry and go back to the Phonebook function Intro Operation...

Страница 12: ...Edit Function button to arrive at the screen shown 2 Use the Right and Left Arrow Function buttons to move the cursor to the character s to be changed and proceed as described for making corrections...

Страница 13: ...e is from a minimum at 0 to a maximum at 16 3 At the desired setting press the Enter or Save Function button to save the setting and return to Display function SAVE BRIGHTNESS ADJUST HIGH DOWN UP Adju...

Страница 14: ...n Intro Operation Customer Assistance Warranty Notice Secondary Icons Caution Warning Installation Customer Assistance Operating Your Handset Customizing the MR F300 Limited 3 Year Warranty For Produc...

Страница 15: ...FIRST do not return this product to the store If this product should require factory service please call Cobra first before sending the product This will ensure the fastest turnaround time on any repa...

Отзывы: