HSGW Series
IP Alarm System
User Manual
June 2020
Страница 1: ...HSGW Series IP Alarm System User Manual June 2020...
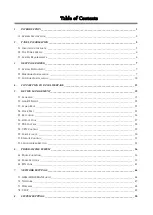
Страница 2: ...______________________________________________________ 25 5 5 EXCLUSION _____________________________________________________________________________ 26 5 6 Z WAVE TOOL _______________________________...
Страница 3: ...__________________________________________________ 71 8 15 FACTORY RESET_________________________________________________________________________ 72 8 16 BACKUP RESTORE _______________________________...
Страница 4: ...to later chapters for information on setting up and configuring the system over the Web Page in more detail The advanced IP Security System with fully integrated TCP IP technology and Ethernet connec...
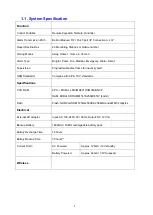
Страница 5: ...grammable time frame for inactivity alert GSM Standards Compiles with CE FCC standards Specifications CPU RAM CPU i MX 6ULL MCIMX6Y1DVM05AB NXP RAM DDR3L SDRAM MT41K256M16TW 4Gbit Flash Flash NOR FLAS...
Страница 6: ...on FSK Antenna type Monopole antenna Antenna gain 1 75dBi Protocol Climax Encryption Private Encryption Method Frequency 920MHz Modulation FSK Antenna type Monopole antenna Antenna gain 1 75dBi Protoc...
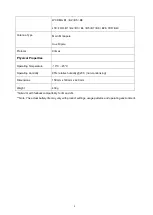
Страница 7: ...x Physical Properties Operating Temperature 10 C 45 C Operating Humidity 85 relative humidity 23 C non condensing Dimensions 150mm x 140mm x 42 3mm Weight 430g Note 4G with fallback compatibility to 3...
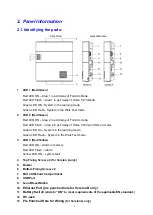
Страница 8: ...delay of Home 1 Home 2 Home 3 mode Green LED On System in the learning mode Green LED Flash System in the Walk Test mode 3 LED 3 Red Yellow Red LED ON Alarm in memory Red LED Flash Alarm Yellow LED O...
Страница 9: ...re During normal operation the AC power adapter is used to supply power to the Control Panel and at the same time recharge the battery Slide the Battery Switch to ON to activate and charge the battery...
Страница 10: ...nsor When using ZigBee routers to improve ZigBee network coverage remember to use only ZigBee Router with backup batteries for security sensors If you use a Router without backup battery for security...
Страница 11: ...PIN Code must be disabled first III Slide Battery Switch to ON position IV Plug in AC adaptor to power on the panel 5 Wire the Ethernet and AC power cable close the cover and choose to install the pan...
Страница 12: ...Break through the 4 Wall Mounting Knockouts II Use the knockouts as template mark mounting locations on the wall III Replace the panel onto the back cover and tighten the 4 fixing screws to complete...
Страница 13: ...on the LAN Step 1 To download Finder software open your browser and type below URL in the address bar http www climax com tw climax download finder html Step 2 After download install the software and...
Страница 14: ...for control panel on the LAN and display its information If available the panel s LAN IP address Firmware version and MAC address will be displayed Step 6 If the panel information is not displayed che...
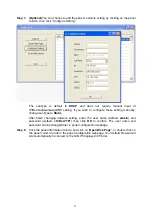
Страница 15: ...change LanType to Static After finish changing network setting enter the user name default admin and password default cX HsA 7F1 then click OK to confirm The user name and password can be changed late...
Страница 16: ...ction and proceed Step 2 Enter the User name Password to proceed Default user name admin Default password cX HsA 7F1 If wrong user name and password are entered for 5 times the local webpage login wil...
Страница 17: ...sion information according to different panel model and MAC address IMPORTANT NOTE If the default login password is not changed webpage access will be disabled 1 hour after power on Reboot the panel a...
Страница 18: ...e supports up to 40 ZigBee devices by itself If you wish to include more than 40 ZigBee devices into the Control Panel you must add extra ZigBee Routers into the Control Panel s ZigBee network to incr...
Страница 19: ...sts in the system the sensor information will be displayed in the Learned Device section If not the sensor information will be displayed in the Detected Device section NOTE For VST 862 F1 devices pres...
Страница 20: ...l from device it will emit 2 beeps to confirm The device will be included in the panel automatically Step 4 After finish learning all devices press and holde the Learn button for 1 second The Control...
Страница 21: ...o default values or click Reset to re enter all the information Name Enter a name for the device Area Select the area which the device belongs to Zone Select the Device zone number Attribute List The...
Страница 22: ...ibutes determines system behavior under particular arming mode when the sensor is triggered No Response When a sensor with No Response is triggered the Control Panel will not respond Start Entry Delay...
Страница 23: ...glar Outdoor is triggered the Control Panel will report a burglar outdoor event immediately Cross Zone See 12 2 Appendix Cross Zone Verification for detail Apply Scene This function is only avaiable f...
Страница 24: ...ly 5 1 5 Identify ZigBee Device The Identify function is available for ZigBee device only it can be used to locate ZigBee devices after learning For battery powered ZigBee devices the identify fuction...
Страница 25: ...Step 2 Select Area and Zone number for the device you wish to add into system Step 3 Enter the device RF code and preferred device name up to 31 characters Step 4 Press OK to save Step 5 If the RF cod...
Страница 26: ...Step 2 You will see the Add Learn Rule menu Step 3 Select Area and Zone number for this device Step 4 Select RF or ZigBee Step 5 Key in the RF code or ZigBee MAC info Step 6 For ZigBee device select a...
Страница 27: ...need to follow the instruction in 5 1 1 Add Sensor to complete the learning process Backup Device List to Learn Rule You can choose to import learn rule from current learnt in ZigBee devices Step 1 Cl...
Страница 28: ...me time informaiton Area operation area Zone device zone Type device type Name device name Rssi the RF signal strength between Control Panel and sensor The Rssi value here must be higher than the Rssi...
Страница 29: ...Z Wave device only Step 1 Click on Exclusion and click on Start to start the procedure Then the Panel will enter the removing mode Step 2 Refer to the Z Wave device manual to transmit signal Step 3 Se...
Страница 30: ...actory default and all Z Wave devices will be removed automatically The Control Panel Home ID will also be changed automatically for a newly added Z Wave device to recognize Step 2 The list of Z Wave...
Страница 31: ...Click Edit to edit attributes of power switches Click Delete to remove power switch from panel Click Switch On Switch Off to turn on off power switches Or click Switch Toggle to toggle between on off...
Страница 32: ...he 5 surrounding LEDs can be selected to activate upon IR signal transmission to increase the IR signal coverage Step 1 Refer to the diagram on the webpage and UPIC5 manual to determine which LED shou...
Страница 33: ...h setting Please refer to IP Camera manual for detail For PIR Camera Video Camera you can choose to take the picture video without activating the camera s flash Picture and video captured by PIR Camer...
Страница 34: ...turn on or off one group of power switches 5 10 2 Device Edit Delete Step 1 Check on the groups you wish to assign the Power Switch This is a multiple choice field and you can assign one Power Switch...
Страница 35: ...ing page includes setting Siren configuration function 5 11 1 Device Edit Delete Click Edit to edit the Siren s attribute volume and voice settings or Delete to delete the Siren After clicking Edit yo...
Страница 36: ...he Siren belongs to Zone Select the Siren zone number Attribute Permanently Bypass If checked the Control Panel will completely ignore all signal received from the Siren A bypassed Siren will not be a...
Страница 37: ...t beep set the volume of the voice played when system is force armed under fault conditions Pre alarm outdoor IR warning beeps set the volume of the voice played when an outdoor burglar sensor Door Co...
Страница 38: ...isable all RF Sirens tamper protection with this function Select to turn on or off the sirens tamper function NOTE When turned off if siren tamper will be enabled again automatically after one hour if...
Страница 39: ...ow the current status you must reload the screen to refresh the display Battery When battery is running low a low battery message will be displayed to inform you to recharge the battery Tamper reserve...
Страница 40: ...rm You can check the Clear box in the setting column then click OK to ignore the fault event Cleared fault event will not cause the Fault LED to light up nor prohibit arming Device List 1 The Control...
Страница 41: ...The function is designed for installer to make a note for each control panel The note you make here can be delivered to a server over XMPP or polling protocol 38...
Страница 42: ...Your Control Panel will start to use its battery power instead of the mains power until the fault even is cleared AC Fail Suspend After an AC power failure event is reported the Control Panel will co...
Страница 43: ...Outdoor PIR Camera should be taken in greyscale instead of color pictures Options available are Disable Color Picture and Enable Greyscale picture Bypass Ethernet Select to enable or disable Bypass Et...
Страница 44: ...when the timer expires The user must leave area protected by sensors before the timer expires otherwise an alarm will be activated with the sensor is triggered Entry Delay 1 for Home Arm Set Entry De...
Страница 45: ...und for Home Arm this is for you to decide whether the Control Panel sounds count down beeps and volume of beep during the entry delay time in the home arm mode Exit Delay Sound for Home Arm this is f...
Страница 46: ...pplying a tag to the tag sensor zone of Remote Keypad and clicking the Load button the corresponding tag number will be loaded Area Select the area for setting User PIN Code User Name Enter a user nam...
Страница 47: ...k if the SIM card is inserted or not and it will not display the GSM fault by LED flashing GPRS In order to allow GPRS to serve as a back up IP Reporting method this section will need to be programmed...
Страница 48: ...re provided by your telecom service provider URL Enter the MMS APN URL provided by your telecom service provider Proxy Address Enter the MMS Proxy Address provided by your telecom service provider Pro...
Страница 49: ...this web configuration page Step 1 Click Send SMS Step 2 Enter a desired phone number and text message Reset GSM This feature is designed for you to reset GSM module Step 1 Click GSM Reset Step 2 A p...
Страница 50: ...o enter the Network information manually for IP Address Subnet Mask Default Gateway Default DNS 1 and Default DNS 2 Please make sure that you have obtained all required values according to your Networ...
Страница 51: ...twork 1 Search for WiFi AP Click Scan WiFi AP to search for available wireless network Select the available Wireless APs from the list by clicking Set after AP info column and enter the required infor...
Страница 52: ...edirect The device will try to find an UPnP supported router and set up the port to redirect to the router Port Forwarding Port forwarding function allows you to configure specific communication ports...
Страница 53: ...Administrator Log in Name and Password Please note both User Name and Password are case sensitive Step 1 Enter the preferred User Name Step 2 Enter the preferred Password in the New Password field an...
Страница 54: ...dition determines under which circumstances the rule should be activated Empty When set as Empty the system will follow the schedule time and execution rule to respond accordingly Trigger Alarm When s...
Страница 55: ...exceeds set threshold the rule will be activated according to rule schedule and execution setting Temperature Between When set as Temperature Between if the temperature detected by specified temperatu...
Страница 56: ...e Once When set as Schedule Once the system will follow the rule condition and execute rule according to the exact date and time specifed Schedule Every Month When set as Schedule Every Month the syst...
Страница 57: ...er Switches assigned to specified group Group Switch On Turn on all Power Switches assigned to specified group Group Switch On For Turn on all Power Switches assigned to specified group for a set dura...
Страница 58: ...The UPIC and specified zone will transmit Off Heat Cool command to the air conditioner as programmed Hue Control Adjust the hue and saturation of the Philips Hue at sepecified zone as programmed Trig...
Страница 59: ...a Home Automation Rule is excecuted See 8 2 Home Automation For example you can set a scene to control multiple lightings then set your Remote Controller to activate the scene when the button is pres...
Страница 60: ...Step 5 Repeat Step 2 3 to setup the execution you wanted As many as 5 executions can be included in one scene Step 6 Click Done Step 7 Click OK at bottom of webpage to confirm the new scene setting 57...
Страница 61: ...mber server ip port SIA Example ip 1234 54 183 182 247 8080 SIA 3 SIA DC 09 protocol via IP with AES encryption Format ip Account Number server ip port SIA KEY 128 196 or 256 bits Key Example ip 1234...
Страница 62: ...destinations in a group is successful the system will consider reporting to this group successful and stop reporting to rest of the destinations in the group It will then move on to report to the next...
Страница 63: ...s registered into Climax s Home Portal Server URL1 will be filled in with Home Portal Server report information Do not change the information once registration is complete or reporting to Home Portal...
Страница 64: ...u can also choose to have Latch Option On Off for Temporary Code by tick the Latch Option box and press OK to confirm the settings Installer Code The Installer Code is used for SMS Remote Programming...
Страница 65: ...d to arm disarm the system but it is for a temporary user The temporary Code is ONLY valid for one access per arming and disarming Afterwards the Temporary Code will be automatically erased and needs...
Страница 66: ...s User set the mail account name max 30 digits alphabets Password set the password corresponding to the mail account name max 30 digits alphabets From set the email address according to your mail seve...
Страница 67: ...ransmitting an alarm image over Ethernet Manitou manitou user server port MMS via Telephone mms telephone number MMS via GPRS mms user mail server transmitting an alarm image over MMS NOTE If Deleted...
Страница 68: ...g The polling function enables the Control Panel to query the destiation you set URL1 or URL2 in turn as to whether it has any data to transmit URL URL2 ip server port path Interval interval time of p...
Страница 69: ...ted from the server it will retry connection every 3 minutes Server server address dependent upon default firmware US server us vestasmarthome com EU server eu vestasmarthome com Taiwan server tw vest...
Страница 70: ...time Time Zone choose your time zone and then the system will calculate the daylight saving time automatically if necessary Internet Time the system will automatically synchronize with an internet ti...
Страница 71: ...8 11 Dynamic DNS This page is used to provide you the Control Panel s current public IP address Dynamic DNS Server http checkip dyndns org 68...
Страница 72: ...for you to test the Control Panel internet connection Step 1 Enter the URL destination you want to test connection to Step 2 Enter the test interval Step 3 Click OK You can check the test connect res...
Страница 73: ...e and locate the latest firmware file unzipped image bin file in your PC Step 2 Press Apply to upload the latest firmware to Control Panel Step 3 Wait for 1 min and do NOT power off during this time S...
Страница 74: ...ck on Browse and locate the latest firmware file unzipped image bin file in your PC Step 2 Press Apply to upload the latest firmware to Control Panel Step 3 Wait for 1 min and do NOT power off during...
Страница 75: ...n Remote Reset Step 1 Tick the Kept current network setting or Kept current device list box to keep the current Network settings Otherwise the system will reset its value back to factory default Tick...
Страница 76: ...the reset button and connect the AC adaptor to the Control Panel DO NOT release the button yet Step 3 Keep holding the reset button for about 45 seconds then release until you hear one long beep The 3...
Страница 77: ...programmed settings 8 16 1 Backup Data Yan can backup all programmed data and save these programmed values into a file Step 1 Click Download configuration file Step 2 Click Download configuration file...
Страница 78: ...8 17 System Log The sytem log webpage logs the control panel s detail system operation history System Log File Download Click to download a detail log files into your computer for more information 75...
Страница 79: ...will take a 10 second video clip You can also request the PIR Camera to take a picture and PIR Video Camera to take a 10 second video clip manually Caputred events will be displayed in this page with...
Страница 80: ...ered events by the control panel by recording the events CID event code and report status Reload Click to refresh the page content Limit of Items Click the drop down menu on the pageto select the numb...
Страница 81: ...records specific actions performed by the Control Panel and accessory devices Reload Click to refresh the page content Limit of Items Click the drop down menu on the pageto select the numbers of captu...
Страница 82: ...erature Sensor the update history power consumption or temperature ireading will be displayed under this page the current info is also displayed under Panel and PSS Control Reload Click to refresh the...
Страница 83: ...event is generated Panel Tamper The tamper switch on back of the panel is not compressed against the back cover This means the panel s cover is opened and not properly sealed Battery Dead Missing The...
Страница 84: ...or Chime Door Chime Door Chime Instant Burglar Alarm No Response Door Chime Burglar Follow Instant Burglar Alarm Instant Burglar Alarm Instant Burglar Alarm Instant Burglar Alarm No Response Delayed B...
Страница 85: ...Silent Panic Alarm Instant Silent Panic Alarm Instant Silent Panic Alarm 24H Panic Instant Panic Alarm Instant Panic Alarm Instant Panic Alarm Instant Panic Alarm Instant Panic Alarm Instant Panic Ala...
Страница 86: ...l also report Burglar Verified CID 139 for this sensor The Cross Zone Timer is reset and extended When the Cross Zone Timer expires the panel reports Cross Zone Timeout CID 694 10 4 Fire Verification...
Страница 87: ...t code 3 Hex digits 0 9 B F GG Group Partition number 00H or Area Number 00 panel 01 area 1 xx area xx C1C2C3 1 For devices zone C1C2C3 Zone number 001 Zone 1 002 Zone 2 XXX Zone XXX 2 For Panel code...
Страница 88: ...ver a device set as Burglar Instant is triggered under Disarm Full Arm or Home Arm mode 131 Burglar Perimeter When a device set as Entry is triggered in Full Arm mode When a device set as Burglar Foll...
Страница 89: ...ry Battery Normal When the battery voltage of the Panel is low When the panel battery restores voltage 311 Battery Disconnection Battery Reconnected 344 Interference Interference problem solved 358 Ne...
Страница 90: ...is out of order after the preset exit delay time is reached When arm fault type is set as Direct Arm Door Contact is not closed after the preset exit delay time is reached 602 Periodic test report Whe...
Страница 91: ...connected Consult the dealer or an experienced radio TV technician for help FCC Caution To assure continued compliance any changes or modifications not expressly approved by the party responsible for...