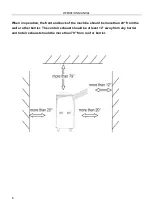
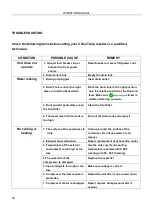
ClimaTemp Portables CPTH-12 Скачать руководство пользователя страница 18

OPERATION MANUAL


18


TROUBLESHOOTING 


Check the following items before calling your ClimaTemp reseller or a qualified 
technician. 


CONDITION 

POSSIBLE CAUSE 

REMEDY 

Unit does not 

operate 

1. Ground fault breaker trip or 

breaker trip from power 
source. 

Reset breaker or reset LCDI power cord. 

2. Drain tank is full. 

Empty the drain tank. 

Water leaking 

1. Drain port plugged 

Clear drain outlet. 

2. Drain Tank is not in the right 

place or inserted backwards. 

Place the drain tank in the right position, 

note the relative position of the float and 
lever. Make sure                            sticker is 
visible and facing outward. 

3. Dust and dirt particulate are on 
the front filter. 

Clean the front filter. 

4. The water level of drain tank is 
too high. 

Pull out the drain tank and empty it. 

No cooling or 

heating. 

1. The surface of the condenser is 

dirty. 

Clean (vacuum) the surface of the                       

condenser. Do not use water or coil 
cleaner. 

2. Exhaust fan malfunction. 

Repair, replacement of exhaust fan motor. 

3. Temperature of the external 

environment is too high or too 
low. 

Use the unit only if surrounding 
temperature is between 65F- 95F 
(cooling) or 40F - 80F (heating). 

4.The capacitor of the 
compressor is damaged. 

Replace the capacitor 

5. Input voltage is too high or too 

low. 

Make sure voltage is correct. 

6. Compressor thermal overload 

protection 

Restart the unit after it has cooled down. 

7. Compressor motor is damaged.  Repair, replace Compressor motor if 

needed. 


Содержание CPTH-12

Страница 1: ...OPERATION MANUAL 1 OPERATION MANUAL CPTH 12 READ THIS MANUAL CAREFULLY FOR INSTRUCTIONS ON CORRECT INSTALLATION AND USAGE AND READ ALL SAFEGUARDS PORTABLE HEAT PUMP...

Страница 2: ...OPERATION MANUAL 2 SERIAL NUMBER LOCATION AND IDENTIFICATION The serial number and name plate can be located near the lower right side of the unit Nameplate Label Nameplate Location...

Страница 3: ...jams and rough terrain Cord pocket to keep the units power cord organized and out of the way Stylish and functional side bump guards to protect the unit from dents and scratches Features Provides 10 3...

Страница 4: ...e Heat Pump 2 Operation Manual 3 Kick Plate Foot Pedal located under the unit Please attach to bottom rear of unit 4 Metal Cord Wrap Holder located under the unit Please attach to back of unit Note If...

Страница 5: ...power cable Damage to power cord can cause electric shock or injury Do not place anything on the top of the machine Do not stand or place hands or fingers inside of the unit while in operation Install...

Страница 6: ...operation the front and back of the machine should be more than 20 from the wall or other barrier The cold air exhaust should be at least 12 away from any barrier and hot air exhaust should be more th...

Страница 7: ...OPERATION MANUAL 7 INSTALLATION cont Moving the Unit Unlock the casters and push the Portable Heat Pump unit using the side handles to a flat level surface and set the casters to the LOCKED position...

Страница 8: ...Device The CPTH 12 is equipped with a LCDI power cord This device is non serviceable and opening the device may cause electric shock or void the warranties of the product 1 Plug into grounded appropr...

Страница 9: ...ATION MANUAL 9 OPERATION Control Panel Before operating the unit it is important to familiarize yourself with the basic controls located on the control panel Power Run Fan Speed CTHP 12 Portable Heat...

Страница 10: ...Power button is on and then press the heating button Press the temperature button the temperature button will start to blink Press the up and down adjustment button on the display to set the temperat...

Страница 11: ...protection there will be a 90 second delay when switching from Heat mode to Cool mode while compressor is engaged Note This unit is equipped with state of the art Cold Plasma Needlepoint Bipolar Ioniz...

Страница 12: ...ator Unit error When the unit s condensate bucket is full of water or an overcurrent overheat or other trouble is detected by the unit the alarm indicator will turn on When the unit stops working LED...

Страница 13: ...P Pressure too high in refrigerant system Surrounding Temperature too high in cooling mode Air exhaust is obstructed Surrounding Temperature to low in heat mode Check and clean filters tc Evaporator...

Страница 14: ...to empty the drain tank please wait after the unit stops 1 Open the drain tank door 2 Carefully remove the water tank and do not damage the top components on the top of water tank 3 Empty the drain ta...

Страница 15: ...et 2 Mount the condensate pump with the provided screws to the back wall of the rear inside panel Holes are pre drilled and ready for easy installation 3 Attach the pumps wiring harness by aligning th...

Страница 16: ...rease in the cooling capacity and damage to the compressor and components Filter Removal Method 1 Turn the unit off by pressing the Power button 2 Remove the two air filters Note To remove the front e...

Страница 17: ...gent 2 After the element has been cleaned rinse with clean running water allow to dry then reinstall filters into unit End of Season Maintenance 1 Wrap power cord on rear cord wrap holder 2 Remove all...

Страница 18: ...irt particulate are on the front filter Clean the front filter 4 The water level of drain tank is too high Pull out the drain tank and empty it No cooling or heating 1 The surface of the condenser is...

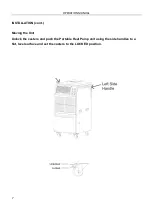
Страница 19: ...OPERATION MANUAL 19 Parts List Breakdown...

Страница 20: ...ty All other products are covered by a full 1 year warranty where applicable DISCLAIMER OF WARRNTY EXCEPT AS EXPRESSLY PROVIDED IN THIS STANDARD WARRANTY POLICY STATEMENT CLIMATEMP PORTABLES HEREBY EX...

Страница 21: ...OPERATION MANUAL 21...

Отзывы: