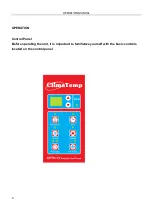
ClimaTemp Portables CPTH-12 Скачать руководство пользователя страница 10

OPERATION MANUAL


10


OPERATION (cont.) 


Operating Method 
1. Power Switch: 

After plugging into power, the power switch LED indicator will illuminate, press the 
POWER button to turn on and turn off the unit. 


2.    Air volume selection: 

  Press Fan Speed to select the high or low air volume.   
     

3. Fahrenheit and Celsius Temperature setting:   


Procedure: Press and hold the Fan Speed button while plugging the unit into the 

power supply; once the digital display shows CF, release the Fan Speed button. If the 
current setting is in Celsius, the indicator will display 

. If the current setting is in 

Fahrenheit, the indicator will display 

. Press the temperature button to change to C 

or press the timer button to change to F. Store the settings by pressing the Fan 
Speed button. 


4. To operate in Heating mode. 

Make sure Power button is on and then press the heating button.         
Press the temperature button, the temperature button will start to blink. Press the up 
and down adjustment button on the display to set the temperature you desire. Set 
point in heat mode is (55°F-80°F). Once selected wait 15 seconds and your preferred 
temperature will be set. The display will show the temperature of the environment (as 
default). The operating range is (40

~80

). When the environment temperature is 

lower than the setting temperature, the compressor will engage, producing warm air. 
When the environment temperature is higher than the setting temperature, the 
compressor will disengage and shut off. 

Note: For component and compressor protection there will be a 90 second delay when switching 

from Cool mode to Heat mode while compressor is engaged. 

Note: This unit is equipped with state-of-the-art Cold Plasma Needlepoint Bipolar Ionization 

Technology. The ionizer is engaged and operating in Cool mode, Heat mode and Fan modes. 
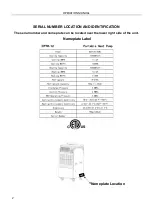


Содержание CPTH-12

Страница 1: ...OPERATION MANUAL 1 OPERATION MANUAL CPTH 12 READ THIS MANUAL CAREFULLY FOR INSTRUCTIONS ON CORRECT INSTALLATION AND USAGE AND READ ALL SAFEGUARDS PORTABLE HEAT PUMP...

Страница 2: ...OPERATION MANUAL 2 SERIAL NUMBER LOCATION AND IDENTIFICATION The serial number and name plate can be located near the lower right side of the unit Nameplate Label Nameplate Location...

Страница 3: ...jams and rough terrain Cord pocket to keep the units power cord organized and out of the way Stylish and functional side bump guards to protect the unit from dents and scratches Features Provides 10 3...

Страница 4: ...e Heat Pump 2 Operation Manual 3 Kick Plate Foot Pedal located under the unit Please attach to bottom rear of unit 4 Metal Cord Wrap Holder located under the unit Please attach to back of unit Note If...

Страница 5: ...power cable Damage to power cord can cause electric shock or injury Do not place anything on the top of the machine Do not stand or place hands or fingers inside of the unit while in operation Install...

Страница 6: ...operation the front and back of the machine should be more than 20 from the wall or other barrier The cold air exhaust should be at least 12 away from any barrier and hot air exhaust should be more th...

Страница 7: ...OPERATION MANUAL 7 INSTALLATION cont Moving the Unit Unlock the casters and push the Portable Heat Pump unit using the side handles to a flat level surface and set the casters to the LOCKED position...

Страница 8: ...Device The CPTH 12 is equipped with a LCDI power cord This device is non serviceable and opening the device may cause electric shock or void the warranties of the product 1 Plug into grounded appropr...

Страница 9: ...ATION MANUAL 9 OPERATION Control Panel Before operating the unit it is important to familiarize yourself with the basic controls located on the control panel Power Run Fan Speed CTHP 12 Portable Heat...

Страница 10: ...Power button is on and then press the heating button Press the temperature button the temperature button will start to blink Press the up and down adjustment button on the display to set the temperat...

Страница 11: ...protection there will be a 90 second delay when switching from Heat mode to Cool mode while compressor is engaged Note This unit is equipped with state of the art Cold Plasma Needlepoint Bipolar Ioniz...

Страница 12: ...ator Unit error When the unit s condensate bucket is full of water or an overcurrent overheat or other trouble is detected by the unit the alarm indicator will turn on When the unit stops working LED...

Страница 13: ...P Pressure too high in refrigerant system Surrounding Temperature too high in cooling mode Air exhaust is obstructed Surrounding Temperature to low in heat mode Check and clean filters tc Evaporator...

Страница 14: ...to empty the drain tank please wait after the unit stops 1 Open the drain tank door 2 Carefully remove the water tank and do not damage the top components on the top of water tank 3 Empty the drain ta...

Страница 15: ...et 2 Mount the condensate pump with the provided screws to the back wall of the rear inside panel Holes are pre drilled and ready for easy installation 3 Attach the pumps wiring harness by aligning th...

Страница 16: ...rease in the cooling capacity and damage to the compressor and components Filter Removal Method 1 Turn the unit off by pressing the Power button 2 Remove the two air filters Note To remove the front e...

Страница 17: ...gent 2 After the element has been cleaned rinse with clean running water allow to dry then reinstall filters into unit End of Season Maintenance 1 Wrap power cord on rear cord wrap holder 2 Remove all...

Страница 18: ...irt particulate are on the front filter Clean the front filter 4 The water level of drain tank is too high Pull out the drain tank and empty it No cooling or heating 1 The surface of the condenser is...

Страница 19: ...OPERATION MANUAL 19 Parts List Breakdown...

Страница 20: ...ty All other products are covered by a full 1 year warranty where applicable DISCLAIMER OF WARRNTY EXCEPT AS EXPRESSLY PROVIDED IN THIS STANDARD WARRANTY POLICY STATEMENT CLIMATEMP PORTABLES HEREBY EX...

Страница 21: ...OPERATION MANUAL 21...

Отзывы: