


OPERATION MANUAL
13
LED Display Error Codes:
Code
Description
Reason
CO
Compressor Over-current
Protection
Surrounding Temperature too high
or to low.
Hot or cold air exhaust is
obstructed.
Input voltage is too high or too low.
Compressor problem.
Relay problem.
Check and clean filters.
P
Pressure too high in refrigerant
system
Surrounding Temperature too high
in cooling mode.
Air exhaust is obstructed.
Surrounding Temperature to low in
heat mode.
Check and clean filters.
tc
Evaporator Frost Protection
Cold air or warm air exhaust
system is obstructed.
Check and clean evaporator filter.
FL
Water level warning
Water Tank Full
t1
Inlet air sensor problem
Connector problem or sensor
damaged
t3
Evaporator temperature sensor
problem
Connector problem or sensor
damaged
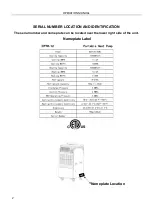
Содержание CPTH-12
Страница 19: ...OPERATION MANUAL 19 Parts List Breakdown...
Страница 21: ...OPERATION MANUAL 21...


