background image

64

Deutsch

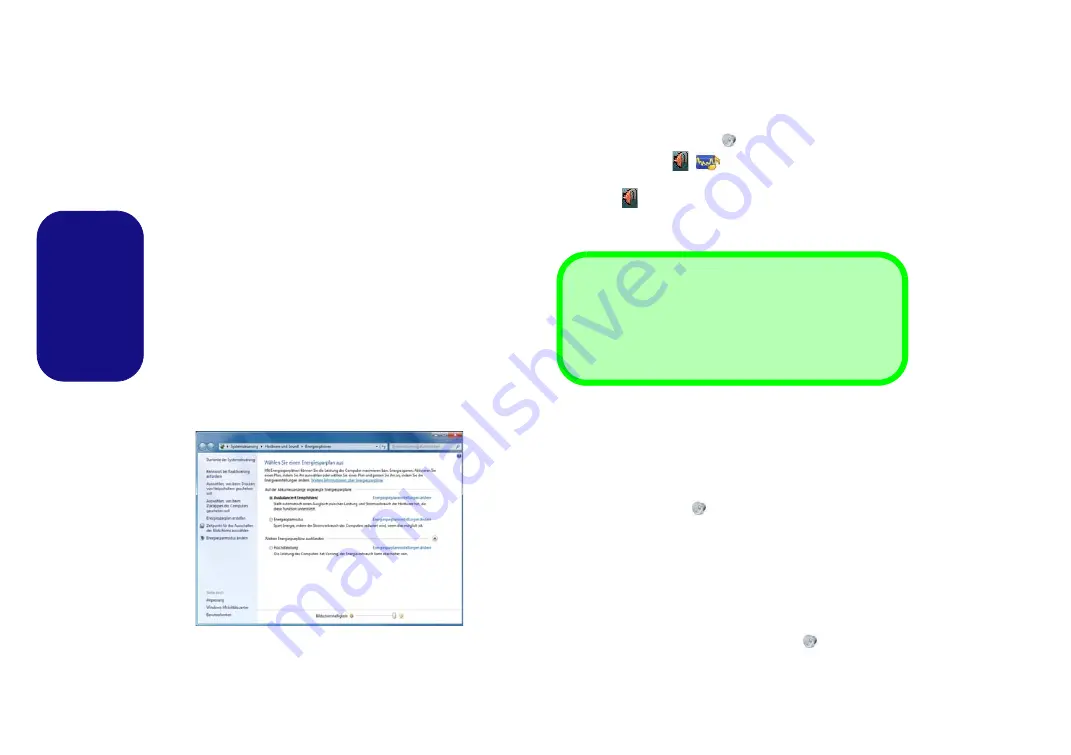
Energieoptionen

Die Energieoptionen von 

Windows

 ermöglichen Ihnen die

Konfiguration der Optionen für das Energiemanagement des
Computers. Sie können Strom sparen, indem Sie 

Ener-

giesparpläne

 erstellen und im linken Menü können Sie die

Optionen für den 

Netzschalter

, die 

Energiespartasten 

(

Fn

+ F4

) und 

Zuklappeinstellung 

(beim Schließen des

Dekkels) und den 

Anzeige-

 und 

Energiesparmodus

 (die

Standardeinstellung Energie sparen) konfigurieren.
Beachten Sie, dass sich die 

Energiesparpläne

  (

Ener-

giesparmodus

) auf die Computerleistung auswirken.

Wählen Sie einen bestehenden Plan aus, oder klicken Sie im
linken Menü auf 

Energiesparplan erstellen

, und wählen Sie

die Optionen, um einen neuen Plan zu erstellen. Klicken Sie
auf 

Energieplaneinstellungen ändern

, und klicken Sie auf

Erweiterte Energieeinstellungen ändern

, um weitere Op-

tionen für die Konfiguration aufzurufen.

Audiofunktionen

Die Audioeinstellungen können Sie bei 

Windows

 durch An-

klicken des 

Soundsymbols


oder des 

Realtek HD Audio

Manager-Symbols 

/

 im Infobereich/in der 

System-

steuerung

 aufrufen (wenn Sie mit der rechten Maustaste auf

das Symbol 

 im Infobereich klikken, wird das Audiomenü

aufgerufen). Die Lautstärke können Sie durch Drücken der
Tastenkombination  

Fn + F5/F6

 ändern.

Audio-Setup für HDMI

HDMI unterstützt Video- und 

Audio

signale. Es gibt Fälle, in

denen Sie in der Systemsteuerung bei Sound manuell die
HDMI-Audioausgabe konfigurieren müssen.

1.

Rufen Sie die Systemsteuerung auf.

2.

Klicken Sie auf 

Sound


 (

Hardware und Sound

).

3.

Klicken Sie auf 

Wiedergabe

 (Registerkarte).

4.

Das Wiedergabegerät wird ausgewählt.

5.

In manchen Fällen muss das Audiogerät ausgewählt werden und 
klicken Sie

 Als Standard

 (Schaltfläche).

6.

Klicken Sie doppelt auf das Gerät, um die Registerkarten 
aufzurufen.

7.

Konfigurieren Sie in den Registerkarten die HDMI-Einstellungen.

8.

Klicken Sie auf 

OK

, um das Fenster 

Sound


 zu schließen.

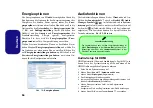
Abb. 19

 - Energieoptionen

Lautstärkeeinstellung

Die Lautstärke kann auch mit den Lautstärkeeinstellung im
Menü 

Einstellungen

 in der 

Charms-Bar

 (auf dem Start-

Bildschirm) oder über das 

Lautsprecher

-Symbol in der

Desktop-Taskleiste eingestellt werden. 

Содержание XMG-P724

Страница 1: ......

Страница 2: ......

Страница 3: ... version française de ce guide commence à la page 81 Le Manuel de l Utilisa teur étendu se trouve sur le disque de Pilotes Utili taires Manuel de l Utilisateur disque Device Drivers Utilities User s Manual Introducción Español Esta Guía del Usuario Concisa le presenta las caracterís ticas principales de su ordenador La versión española de esta guía comienza en la página 121 El Manual del usua rio ...

Страница 4: ...ting 37 Specifications 38 Inhalt Über das Ausführliche Benutzerhandbuch 41 Schnellstart 44 RAID Setup 45 Systemübersicht Ansicht von vorne mit geöffnetem LCD Bildschirm Modelle A D 48 Systemübersicht Ansicht von vorne mit geöffnetem LCD Bildschirm Modelle B C 49 LED Anzeigen 50 Tastatur Funktionstasten 51 Tastatur LED 52 Control Center Steuerzentrum 55 Systemübersicht Ansicht von vorne links recht...

Страница 5: ...112 Technologie Intel Smart Response 114 Technologie Intel Rapid Start 115 Dépannage 117 Spécifications 118 Contenidos cisa 121 Guía rápida para empezar 124 Configuración RAID 125 Mapa del sistema Vista frontal con panel LCD abierto Modelos A D 128 Mapa del sistema Vista frontal con panel LCD abierto Modelos B C 129 Indicadores LED 130 Teclado teclas de función 131 LED del teclado 132 Control Cent...

Страница 6: ...ra e posteriore Modelli A D 178 Descrizione del sistema Vista anteriore sinistra destra e posteriore Modelli B C 179 Descrizione del sistema Vista inferiore 180 Pannello di controllo di Windows 8 1 181 Schermata Start e Desktop di Windows 8 1 181 App Titoli 182 Charms Bar 182 Funzioni video 183 Opzioni risparmio energia 184 Funzionalità audio 184 Camera PC 186 Installazione driver 187 Modulo LAN W...

Страница 7: ...en t or you are planning to re configure or re install portions of the system refer to the expanded User s Manual The Device Drivers Utilities User s Manual disc does not contain an operating system Regulatory and Safety Information Please pay careful attention to the full regulatory notices and safety information contained in the expanded User s Manual on the Device Drivers Utilities Us er s Manu...

Страница 8: ...pted power supply If you are unsure of your local power specifications consult your service representative or local power company The AC DC adapter may have either a 2 prong or a 3 prong grounded plug The third prong is an important safety feature do not defeat its purpose If you do not have access to a compatible outlet have a qualified electrician install one When you want to unplug the power co...

Страница 9: ...the computer yourself may violate your warranty and expose you and the computer to electric shock Refer all servicing to qualified service personnel particularly under any of the following conditions When the power cord or AC DC adapter is damaged or frayed If the computer has been exposed to any liquids If the computer does not work normally when you follow the operating instructions If the compu...

Страница 10: ...or where you are re configuring your computer for a different system you will find this manual refers to Microsoft Windows 8 1 HDD RAID Support Your hard disk s can be set up in AHCI mode or RAID mode for increased performance or protection Note that setting up your hard disk s in RAID mode needs to be done prior to installing the Windows OS Do not change the mode unless you intend to reinstall yo...

Страница 11: ...tyle for the Top Cover RAID Level Description RAID 0 at lease two hard disks SSDs needed Identical drives reading and writing data in parallel to increase performance RAID 0 implements a striped disk array and the data is broken into blocks and each block is written to a separate disk drive RAID 1 at lease two hard disks SSDs needed Identical drives in a mirrored configuration used to protect data...

Страница 12: ...of the operable computer 3 Copy the f6flpy x64 folder from the location below D denotes your DVD drive on the Device Drivers Utilities User s Manual disc to the USB flash drive or external USB hard disk Windows 8 1 64bit D Options 00_IRST f6flpy f6flpy x64 4 Start up your notebook computer and press F2 to enter the BIOS 5 Go to the Boot menu select UEFI Setting and press Enter 6 Set UEFI Boot to E...

Страница 13: ...om the Windows 8 1 OS DVD you will be prompted to press a key to boot from the DVD Make sure your USB flash drive or external USB hard disk is attached to one of the USB ports on the computer 27 Press F7 as the computer starts up to bring up the boot device menu 28 Select the DVD drive containing the Windows 8 1 OS DVD and press Enter 29 Press a key at system startup to begin installing Windows fr...

Страница 14: ...15mm from the bottom of the pad and the left and right buttons are divided roughly down the middle as il lustrated below Press the left button zone for a left click and right button zone for a right click action Figure 5 Front View with LCD Pan el Open Models A D 1 PC Camera 2 PC Camera LED When the PC camera is in use the LED will be illuminated in red 3 Built In Microphone 4 LCD 5 Speakers 6 LED...

Страница 15: ...esign on your Model B C purchase option 1 A B A B Figure 6 Front View with LCD Panel Open Models B C 1 PC Camera 2 PC Camera LED When the PC camera is in use the LED will be illuminated in red 3 Built In Array Microphone 4 LCD 5 Volume Bar LED Model B Only 6 Speakers 7 Power Button 8 LED Indicators 9 Keyboard 10 Illuminated Clickpad Touchpad and Buttons Model B 11 Touchpad and Buttons Model C 12 F...

Страница 16: ...ck Activated White Airplane Mode is ON the WLAN Blue tooth Modules are OFF White Clickpad Touchpad Activated Orange The Battery is Charging Green The Battery is Fully Charged Blinking Orange The Battery Has Reached Critically Low Power Status Orange The AC DC Adapter is Plugged In Blinking Orange The AC DC adapter is plugged in and the powered USB Port is on Green The Computer is On Blinking Green...

Страница 17: ...alled Keys Function Visual Indicators Keys Function Visual Indicators Fn Play Pause in Audio Video Programs Fn Airplane Mode Toggle Fn Touchpad Toggle Fn Number Lock Toggle Fn Turn LCD Backlight Off Press a key to or use Touchpad to turn on Fn Scroll Lock Toggle Fn Mute Toggle Caps Lock Toggle Fn Sleep Toggle Fn Power But ton Powered USB Port Power Toggle see page 18 Fn Volume Decrease Increase Fn...

Страница 18: ...effects of the keyboard backlight Click on any of the but tons to view the effects on the keyboard Click Save when exiting the application to retain the setting Table 6 Mode Buttons Keyboard LED Function key Combinations Fn Launch the Keyboard Backlight Application Fn Toggle the Keyboard LED On Off Fn Keyboard LED Illumination Decrease Fn Keyboard LED Illumination Increase Fn Left keyboard LED on ...

Страница 19: ... your chosen colors to parts of the keyboard and touchpad if applicable Figure 9 Color Swatch Preview The bottom left section of the application allows you to preview the setting changes made to colors on the key board and touchpad if applicable Keyboard and Touchpad Sections The bottom right section of the application allows you to select partial areas or all of the keyboard and touchpad if appli...

Страница 20: ...Model B C Computers Fn Main LED Switch Toggle all LEDs On Off except the Power Button LED Fn Turn Volume Bar LED On Off Model B Only Use the Main LED switch to turn on off all LEDs Use the Fn key combination to turn on off the Vol ume Bar LED Model B Only Use the keyboard LED controls and backlight application to configure colors and effects for the touchpad keyboard power button and top case logo...

Страница 21: ...licking the appropriate icon at the top of the Control Center Each power mode will affect the Power Conservation Mode Airplane Mode Power Plan and PC camera power etc Control Center Menus The Control Center contains 3 menu headings System Program Device and Gaming under the Power Modes Click the Control Center icons to toggle the appropriate function or hold the mouse button down and move the dial...

Страница 22: ...he volume Power Conservation System Program This system supports Energy Star power management features that place computers CPU hard drive etc into a low power sleep mode after a designated period of inac tivity Click either the Performance Balanced or Ener gy Star button Sleep Button System Program Click either the Hibernate or Sleep button to have the computer enter the selected power saving mod...

Страница 23: ...avoid accidental ly triggering menus with the Windows Key Fan Speed Gaming The fan speed will adjust itself automatically to control the heat of the CPU However you can adjust the setting to maximum if you prefer Headphone Gaming The headphones may be set for different effects using this menu Backlight Keyboard Gaming Click the button to access the Backlight Keyboard appli cation ...

Страница 24: ...nto a working outlet or powered by the battery with a capacity level above 20 this may not work with certain devices see page 37 Toggle power to this port by using Fn power button 12 9 4 15 17 16 Rear 15 Figure 13 Front Left Right Rear Views Models A D 1 LED Indicators 2 Security Lock Slot 3 RJ 45 LAN Jack 4 Multi in 1 Card Reader 5 Line In Jack 6 S PDIF Out Jack 7 Microphone Jack 8 Headphone Jack...

Страница 25: ...Media icon 2 Click on Eject Thunderbolt Device Name 3 When you see the Safe to Remove Hardware message you can remove the cable 9 4 16 18 15 17 Rear 16 Figure 14 Front Left Right Rear Views Models B C 1 LED Indicators 2 Rear Left Right LEDs 3 Security Lock Slot 4 RJ 45 LAN Jack 5 Multi in 1 Card Reader 6 Line In Jack 7 S PDIF Out Jack 8 Microphone Jack 9 Headphone Jack 10 Optical Device Drive Bay ...

Страница 26: ...ischarges see the expanded User s Manual on the Device Drivers Utilities User s Manual disc 1 1 1 Figure 14 Bottom Views 1 Vent 2 Component Bay Cover 3 Sub Woofer 4 HDD Bay 5 Battery CPU The CPU is not a user ser viceable part Accessing the CPU in any way may vi olate your warranty Overheating To prevent your computer from overheating make sure nothing blocks any vent while the computer is in use ...

Страница 27: ...tart Screen Desktop The Apps control panels utilities and programs within Windows are accessed from the Start screen and or Windows Desktop app The Desktop which runs as an app within the Start screen can be accessed by clicking the Desktop item in the Start screen or by using the Windows Logo Key D key combination The taskbar is displayed at the bottom of the desktop screen and you can see the no...

Страница 28: ...Charms Bar The right side of the screen displays the Charms Bar The Charms Bar contains the Search Share Start Devices and Settings menus To access up the Charms Bar move the cursor to the upper or lower right corners of the screen and then hover over one of the items in the Charms Bar to activate it the bar will be black when it is active or use the Windows Logo Key C key combination Figure 17 St...

Страница 29: ...3 Right click the desktop use the Windows Logo Key D key combination to access the desktop and select NVIDIA Control Panel from the menu Display Devices Besides the built in LCD you can also use an external VGA monitor CRT external Flat Panel Display or TV connected to the HDMI Out port Thunderbolt port as your display device Multi GPU Configuration Models A B C Only This computer features NVIDIA ...

Страница 30: ...rol panel in Windows or from the Realtek HD Audio Manager icon in the notifica tion area control panel right click the notification area icon to bring up an audio menu The volume may also be adjusted by means of the Fn F5 F6 key combination Audio Setup for HDMI HDMI supports video and audio signals In some cases it will be necessary to go to the Sound control panel and manually configure the HDMI ...

Страница 31: ...tek HD Audio Manager or right click the notification area icon and select Sound Manager 3 Click Speakers tab and click Speaker Configuration tab 4 Select 5 1 Speaker or 7 1 Speaker from the Speaker Configuration pull down menu 5 Plug the front speaker cables into the Headphone Out Jack 6 Plug in the cables you may require an adapter to connect each cable to the appropriate jack e g a stereo mini t...

Страница 32: ...The camera interface will display two buttons on the right side of the screen 3 The upper button is used to record video and the lower button is used to take still pictures 4 Right click on the screen to bring up menu buttons at the bottom of the screen 5 These buttons enable you to access the Camera roll where captured pictures and video are displayed set the timer the time period before capture ...

Страница 33: ...llation Power When installing drivers make sure your computer is powered by the AC DC adapter connected to a working power source Some drivers draw a significant amount of power during the installation procedure and if the re maining battery capacity is not adequate this may cause the system to shut down and cause system problems note that there is no safety issue involved here and the battery wil...

Страница 34: ...lick Finish Touchpad 1 Click 5 Install Touchpad Driver Yes 2 Click Next 3 Click Finish Restart Now to restart the computer Airplane 1 Click 6 Install Airplane AP Yes 2 Click Next 3 Click Finish to restart the computer Hot Key 1 Click 7 Install Hotkey AP Yes 2 Click Next Next 3 Click Finish Finish to restart the computer Intel MEI 1 Click 8 Install MEI Driver Yes 2 Click Next Yes Next 3 Click Finis...

Страница 35: ... turned on and not in Airplane Mode before configuration begins Desktop Mode 1 Switch to the Windows Desktop click the Desktop item in the Start screen or use the Windows Logo Key D key com bination 2 Click the icon in the notification area of the taskbar 3 A list of available access points will appear Or Charms Bar 1 Go to the Charms Bar 2 Select Settings and then click the Wi Fi icon it should r...

Страница 36: ... in options 4 You will need to add a Windows password click Add under Password 5 After you have added the password you will need to restart the computer and use your password to log on to the system 6 Go to the Charms Bar 7 Select Settings and then click Change PC Settings 8 Click Accounts and then click Sign in options 9 Click Add under Fingerprint 10 Input the Windows password and click OK 11 Yo...

Страница 37: ...e is turned on and not in Airplane Mode before configuration begins Desktop Mode 1 Switch to the Windows Desktop click the Desktop item in the Start screen or use the Windows Logo Key D key com bination 2 Click the notification area of the taskbar and double click the Bluetooth icon or click and select Show Bluetooth Devices 3 The Bluetooth item in PC and devices will appear Or Charms Bar 1 Go to ...

Страница 38: ... to press F4 to save the changes and restart the computer 7 As the computer restarts press F2 to enter the BIOS again and go to the TPM Configuration menu 8 Select Pending TPM operation press Enter and select the option you require if you are initializing TPM you should select Enable Take Ownership You will then need to press F4 to save the changes and restart the computer 9 You can now install th...

Страница 39: ...form Features you want to use by clicking the appropriate tickbox 7 Enter a Basic User Password and re type to confirm it and click Next 8 Click Next to confirm the settings 9 The computer will then initialize the settings 10 Click Finish 11 Click the tabs and control panels to adjust the settings 12 Double click the taskbar icon to access the Infineon Security Platform Settings Tool or right clic...

Страница 40: ...ck the tickbox to accept the license and click Next 5 Click Next Next Next 6 Click Finish to restart the computer you will need to restart the system again after the computer has rebooted Enabling Intel Smart Response Tech nology 1 Click the icon Intel Rapid Storage Technology on the Apps screen 2 Click Enable acceleration under Performance Smart Response Technology note that you will need at leas...

Страница 41: ...ment Storage Disk Management 3 Right click the SSD and select Shrink Volume from the menu 4 Enter the figure which should be equal to amount of system memory RAM in your computer in Enter the amount of space to shrink in MB 5 Click Shrink any unallocated file space may be formatted for storage use 6 Run the Desktop app and right click the lower left hot corner or use the Windows Logo Key X key com...

Страница 42: ...ge DiskPart successfully set the partition ID will appear 18 Close the CMD window 19 Go the Windows control panel and double click Administrative Tools System and Security Computer Management Storage Disk Management 20 The disk partition should read Healthy Hibernation Partition 21 Restart the computer 22 Install the driver see below Intel Rapid Start Technology Driver Instal lation 1 Click Option...

Страница 43: ...les requires a substantial amount of disk space for each file Note that the Windows system requires a minimum of 20GB 64bit of free space on the C drive system partition It is recommended that you save the capture video file to a location other than the C drive limit the file size of the captured video or reduce video resolution The computer is off or in Sleep Mode but powered by the AC DC adapter...

Страница 44: ...rd Microsoft DirectX 11 1 Compatible Supports NVIDIA SLI Technology NVIDIA GeForce GTX 860M PCIe Video Card 4GB GDDR5 Video RAM on board Microsoft DirectX 11 1 Compatible Supports NVIDIA SLI Technology Video Adapter Model D NVIDIA GeForce GTX 880M PCIe Video Card 8GB GDDR5 Video RAM on board Microsoft DirectX 11 1 Compatible NVIDIA GeForce GTX 860M PCIe Video Card 4GB GDDR5 Video RAM on board Micr...

Страница 45: ...t Jack One Headphone Speaker Out Jack One Microphone In Jack One Line In Jack One RJ 45 LAN Jack One DC In Jack Note External 7 1CH Audio Output Sup ported by Headphone Microphone Line In and S PDIF Out Jacks Communication Built In Gigabit Ethernet LAN Models A D 2 0M FHD PC Camera Module Models B C Dual Camera Module 5 0M Pixels 2 0M HD WLAN Bluetooth Half Mini Card Modules Factory Option Intel C...

Страница 46: ...Full Range AC DC Adapter AC Input 100 240V 50 60Hz DC Output 19 5V 11 8A 230W Dimensions Weight Models A D 419mm w 293mm d 39 3 49 7mm h Around 3 9kg with 1 Video Card Battery and ODD Design I Models B C 419mm w 295mm d 42 52 8mm h Around 4 2kg with 1 Video Card Battery and ODD Design II Models B C 419mm w 295mm d 42 52 8mm h Around 4 4kg with 1 Video Card Battery and ODD ...

Страница 47: ...on ohne Vorankündigung zu überarbeiten und den Inhalt zu verändern Einige oder alle Funktionen des Computers sind bereits eingerichtet worden Falls das nicht der Fall ist oder wenn Sie ein zelne Teile des Systems neu konfigurieren oder neu installieren möchten finden Sie eine Anleitung im erweiterten Benut zerhandbuch Die Disc Device Drivers Utilities User s Manual enthält nicht das Betriebssystem...

Страница 48: ...le Benutzung vorge sehen sein benötigt aber trotzdem eine gleichmäßige ununterbro chene Stromversorgung Wenn Sie sich über Ihre lokalen Stromspezifikationen nicht im klaren sind wenden Sie sich an Ihren Servicevertreter oder Ihre lokale Stromgellschaft Der AC DC Adapter kann einen zwei oder dreipoligen geerdeten Netzstecker haben Der dritte Pol hat eine wichtige Sicherheitsfunk tion Setzen Sie die...

Страница 49: ...sanweisungen nicht korrekt arbeitet Wenn der Computer heruntergefallen ist oder beschädigt wurde berühren Sie nicht die giftige Flüssigkeit des LCD Bildschirms Wenn ein ungewöhnlicher Geruch Hitze oder Rauch aus dem Compu ter entweicht Reinigung Reinigen Sie den Computer mit einem weichen sauberen Tuch Tragen Sie das Reinigungsmittel nicht direkt auf den Computer auf Verwenden Sie keine flüchtigen...

Страница 50: ...nderes System neu konfigu rieren möchten finden Sie dazu eine Anleitung in diesem Handbuch zu Microsoft Windows 8 1 HDD RAID Unterstützung Die Festplatte n können im AHCI Modus und im RAID Mo dus für eine erhöhte Leistung oder Sicherheit eingerichtet werden Die Einrichtung der Festplatte n im RAID Modus muss vor der Installation des Windows Betriebssystems er folgen Ändern Sie den Modus nicht es s...

Страница 51: ...n SSDs erforderlich Identische Laufwerke lesen und schreiben Daten parallel um die Leistung zu verbessern Bei RAID 0 wird ein Striped Disk Array verwendet die Daten werden in Blöcke aufgeteilt und jeder Block wird auf ein anderes Laufwerk geschrieben RAID 1 mindestens zwei Fest platten SSDs erforderlich Identische Laufwerke mit einer Mirror Konfiguration zum Schutz von Daten Wenn ein Laufwerk das ...

Страница 52: ...s Manual den Ordner f6flpy x64 auf den USB Stick oder auf eine externe USB Festplatte Windows 8 1 64bit D Options 00_IRST f6flpy f6flpy x64 4 Starten Sie den Computer und drücken Sie auf die Taste F2 um in das BIOS zu gelangen 5 Gehen Sie zum Menü Boot wählen Sie UEFI Setting und drücken Sie auf die Eingabetaste 6 Wählen Sie UEFI Boot drücken Sie auf die Eingabetaste und wählen Sie Enabled 7 Drück...

Страница 53: ...Computer hochfährt startet dieser automatisch von der Windows 8 1 DVD Sie werden aufgefordert eine Taste zu drücken um den Systemstart von der DVD auszuführen Stellen Sie sicher dass ein USB Stick oder eine externe USB Fest platte an einen der USB Anschlüsse des Computers angeschlossen ist 27 Drücken Sie während des Computerstarts auf F7 um das Menü zum Festlegen des Bootgeräts aufzurufen 28 Legen...

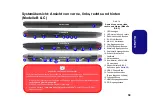
Страница 54: ... Maustastenbereich und für einen Rechtsklick auf den rechten Maustastenbereich Deaktivieren des Clickpads Touchpads Sie können das Clickpad Touchpad mit der Tastenkombination Fn F1 oder mit der Control Center Taste deaktivieren 9 Abb 5 Ansicht von vorne mit geöffnetem LCD Bild schirm Modelle A D 1 PC Kamera 2 LED der PC Kamera Wenn die PC Kamera verwendet wird leuch tet die LED rot 3 Eingebautes M...

Страница 55: ...Lautstärkeregler LED nur Modell B 6 Lautsprecher 7 Netzschalter 8 LED Anzeigen 9 Tastatur 10 Beleuchtete Clickpad Touchpad mit Tasten Modell B 11 Clickpad Touchpad mit Tasten Modell C 12 Fingerabdruckleser 2 1 3 8 5 6 4 7 6 10 3 12 9 2 1 3 8 6 4 7 6 11 3 12 9 Modell B Modell C A B Der Computer hat zwei HD Kameras Wenn der LCD Bildschirm geöffnet ist sehen Sie direkt auf die 2 0M Modell D HD Kamera...

Страница 56: ...ck ist aktiviert Weiß Flugzeugmodus ist EIN das WLAN und das Bluetooth Modul ausgeschaltet sind Weiß Clickpad Touchpad aktiviert Orange Der Akku wird geladen Grün Der Akku ist voll geladen Lampe blinkt orange Der Akku hat einen kritisch niedrigen Stromstatus erreicht Orange Der AC DC Adapter ist angeschlossen Lampe blinkt Orange Wenn der AC DC Adapter angeschlossen wird ist der USB Anschluss einge...

Страница 57: ...deoprogrammen Fn Flugzeugmodus ein ausschalten Fn Touchpad aktivieren deaktivieren Fn Ein Ausschalten der Nummerntastatur Fn LCD Hintergrundlicht ausschalten zum Einschalten beliebige Taste drücken oder Touchpad berühren Fn Ein Ausschalten des Scroll Modus Fn Stummschaltung Stummschal tung aufheben Ein Ausschalten der Feststelltaste Fn Wechsel Schlaf Wiederaufnahme Fn Netzschalter Ein Ausschalten ...

Страница 58: ...ergrundbelichtung ändern Klicken Sie auf eine der Schaltflächen um die Effekte auf der Ta statur zu sehen Klicken Sie auf Save Speichern wenn Sie die Anwendung verlassen um die Einstellung beizubehalten Tabelle 6 Modusschaltflächen Tastatur LED Funktionstastenkombinationen Fn Startet die Anwendung für das Tastatur Hintergrundlicht Fn Schaltet das Tastatur Hintergrundlicht ein aus Fn Tastatur LED B...

Страница 59: ...s verfügbar zuzuweisen Abb 9 Color Swatch Farbmuster Preview Vorschau Im unteren linken Abschnitt der Anwendung können Sie die an Farben vorgenommenen Änderungen für die Tastatur und das Touchpad falls verfügbar sehen Tastatur und Touchpad Abschnitte Im unteren rechten Abschnitt der Anwendung können Sie Teilbereiche oder sämtliche Bereiche der Tastatur und des Touchpad falls vorhanden auswählen in...

Страница 60: ...schalter alle LEDs ein ausschalten außer Netzschalter LED Fn Lautstärkeregler LED ein ausschalten nur Modell B Mit dem LED Hauptschalter können Sie alle LEDs ein aus schalten Mit der Tastenkombination Fn können Sie die Lautstärke regler LED ein ausschalten nur Modell B Mit den Tastatur LED Reglern und der Hintergrundlichtan wendung können Sie Farben und Effekte für die Touchpad die Tastatur die Ne...

Страница 61: ... Energiemodus einstellen indem Sie im Control Center auf das entsprechende Symbol klicken Jeder Energiemodus wird Einfluss auf den Energiesparmodus Flugzeugmodus Energiesparplan und PC Kamerastrom usw haben Control Center Menüs Das Control Center umfasst 3 Menütitel System Program Systemprogramm Device Gerät und Gaming für die Strommodi Klicken Sie auf die Symbole des Control Center um die entspre...

Страница 62: ...utstärke entweder mit dem Schieberegler oder mit der Tastenkombination Fn F5 F6 einstellen Mit der Tastenkombination Fn F3 wird der Ton ausgeschaltet Power Conservation Strom sparen System Pro gram Dieses System unterstützt die Energy Star Stromsparfunk tionen die Computer CPU Festplatte usw nach einer längeren Zeit der Inaktivität in einen Ruhemodus versetzen bei dem weniger Strom verbraucht wird...

Страница 63: ...um die Windows Taste auf der linken Seite der Tastatur zu deaktivieren Dies könnte hilfreich sein wenn Sie die Gaming Tasten W A S D benutzen und eine versehentliche Aktivierung von Me nüs über die Windows Taste vermeiden möchten Fan Speed Lüftergeschwindigkeit Gaming Die Lüftergeschwindigkeit wird sich automatisch einstellen um die Temperatur der CPU zu regeln Sie können die Ein stellung nach Bed...

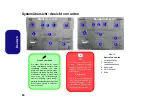
Страница 64: ...rgung kann bei bestimmten Geräten u U nicht funktionieren siehe Seite 77 Dieser Anschluss wird mit der Tastenkombination Fn Netzschalter eingeschaltet 12 Abb 13 Ansicht von vorne links rechts und hinten Modelle A D 1 LED Anzeigen 2 Sicherheitsschloß Buchse 3 RJ 45 LAN Buchse 4 Multi in 1 Kartenleser 5 Line Eingangsbuchse 6 S PDIF Ausgang Buchse 7 Mikrofon Eingangsbuchse 8 Kopfhörer Ausgangsbuchse ...

Страница 65: ...chluss 13 Eingeschaltete USB 3 0 Anschluss siehe Seite 58 14 USB 3 0 Anschlüsse 15 Thunderbolt Anschluss Siehe folgenden Hinweis 16 Luftungsoffnung 17 HDMI Ausgangsanschluss 18 DC Eingangsbuchse Vorderseite Linke Seite Rechte Seite Hinterseite Auswerfen von Thunderbolt Geräten Um Systemprobleme zu vermeiden sollten Sie das Kabel nicht einfach aus dem Thunderbolt An schluss herausziehen Zunächst mu...

Страница 66: ... weiterte Benutzerhandbuch auf der Disc Device Drivers Utilities User s Manual Abb 15 Ansicht von unten 1 Luftungsoffnung 2 Komponen tenfachabdekkung 3 Subwoofer 4 HDD Schacht 5 Akku CPU Die CPU darf nicht vom An wender repariert werden Jeglicher Zugriff auf die CPU führt zum Verlust der Garan tieansprüche Überhitzung Zum Schutz vor Überhitzung Ihres Computers dürfen die Luftungsoffnung en nicht w...

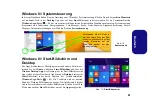
Страница 67: ...Desktop Die Apps Bedienfenster Dienstprogramme und andere Software er reichen Sie bei Windows über den Start Bildschirm und oder die Windows Desktop App Der Desktop der im Start Bildschirm eine App startet wird geöffnet durch Anklicken des Desktop Eintrags im Start Bildschirm oder durch Drücken der Tastenkombination Windows Logo Taste D Die Taskleiste wird am unteren Rand des Desktop Bildschirms a...

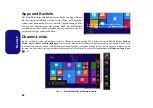
Страница 68: ...er rechten Seite des Bildschirms wird die Charms Leiste angezeigt Die Charms Leiste enthält die Menüs Suchen Teilen Start Geräte und Einstellungen Um eines der Menüs aus der Charms Leiste aufzurufen bewegen Sie den Cursor in die unteren rechten Ecken des Bildschirms und dann über den jeweiligen Eintrag in der Charms Leiste um diesen zu ak tivieren ein aktivierter Eintrag wird schwarz dargestellt o...

Страница 69: ...taste auf den Desktop der Desktop wird aufgerufen indem Sie die Windows Logo Taste und gleichzeitig auf D drücken und dann aus dem Menü die Option NVIDIA Systemsteuerung wählen Anzeigegeräte Neben dem integrierten LCD Monitor können Sie auch einen externen VGA Monitor Flachbildschirm oder ein Fernsehgerät an den HDMI Ausgangsanschluss Thunder bolt Anschluss angeschlossen als Anzeigegerät anschließ...

Страница 70: ...oundsymbols oder des Realtek HD Audio Manager Symbols im Infobereich in der System steuerung aufrufen wenn Sie mit der rechten Maustaste auf das Symbol im Infobereich klikken wird das Audiomenü aufgerufen Die Lautstärke können Sie durch Drücken der Tastenkombination Fn F5 F6 ändern Audio Setup für HDMI HDMI unterstützt Video und Audiosignale Es gibt Fälle in denen Sie in der Systemsteuerung bei So...

Страница 71: ...dio Manager oder klicken Sie mit der rechten Maustaste auf das Symbol im Infobereich und wählen Sie Sound Manager 3 Klicken Sie auf Lautsprecher Registerkarte und klicken Sie auf Lautsprecherkonfiguration Registerkarte 4 Wählen Sie bei Lautsprecherkonfiguration die Option 5 1 Lautsprecher oder 7 1 Lautsprecher 5 Schließen Sie die Kabel der vorderen Lautsprecher an die Kopfhörer Ausgangsbuchse an 6...

Страница 72: ...hen auf der rechten Seite des Bildschirms zeigen 3 Die obere Schaltfläche wird verwendet um Videos aufzunehmen und die untere Schaltfläche dient zum Aufnehmen von Standbildern 4 Rechtsklicken Sie auf den Bildschirm um die Menü Schaltflächen an der Unterseite des Bildschirms aufzurufen 5 Diese Schaltflächen ermöglichen es Ihnen auf die Eigene Aufnahmen zuzugreifen wo aufgenommene Bilder und Videos ...

Страница 73: ...dann die Installationsanweisungen Tabelle 8 Installationsvorgang Treiberinstallation und Stromversorgung Während die Treiber installiert werden muss der Computer über den AC DC Adapter mit Strom versorgt werden Einige Treiber benötigen für den Installationsvorgang sehr viel Strom Wenn der Akku nicht mehr über genügend Strom verfügt kann sich das System während der Installation ausschalten was zu S...

Страница 74: ...Touchpad Driver Ja 2 Klicken Sie auf Weiter 3 Klicken Sie auf Fertig stellen Jetzt neu starten um den Computer neu zu starten Airplane 1 Klicken Sie auf 6 Install Airplane Driver Ja 2 Klicken Sie auf Next 3 Klicken Sie auf Finish um den Computer neu zu starten Hot Key 1 Klicken Sie auf 7 Install Hotkey AP Ja 2 Klicken Sie auf Next Next 3 Klicken Sie auf Finish Finish um den Computer neu zu starten...

Страница 75: ... das WLAN Modul eingeschaltet ist Flugzeugmodus deaktiviert Desktop Modus 1 Wechseln Sie zum Windows Desktop klicken Sie auf den Desk top Eintrag im Start Bildschirm oder verwenden Sie die Tastenkombination Windows Logo Taste D 2 Klicken Sie auf das Symbol im Infobereich auf der Taskleiste 3 Eine Liste aller verfügbaren Zugriffspunkte wird angezeigt Oder Charms Leiste 1 Rufen Sie die Charms Leiste...

Страница 76: ...ssen ein Windows Kennwort hinzufügen klicken Sie auf Hinzufügen unter Kennwort 5 Nach dem Hinzufügen des Kennwortes müssen Sie den Computer neu starten und Ihr Kennwort für die Anmeldung am System verwenden 6 Rufen Sie die Charms Leiste auf 7 Wählen Sie Einstellungen und klicken Sie dann auf PC Einstellungen ändern 8 Klicken Sie auf Konten und klicken Sie dann auf Anmeldeoptionen 9 Klicken Sie auf...

Страница 77: ...odul eingeschaltet ist Flugzeugmodus deaktiviert Desktop Modus 1 Wechseln Sie zum Windows Desktop klicken Sie auf den Desk top Eintrag im Start Bildschirm oder verwenden Sie die Tastenkombination Windows Logo Taste D 2 Klicken Sie im Infobereich der Taskleiste und doppelklicken Sie auf das Bluetooth Symbol oder klicken Sie auf und wählen Sie Bluetooth Netzwerkgeräte anzeigen 3 Der Eintrag Bluetoot...

Страница 78: ...uter neu zu starten 7 Drücken Sie beim Neustart des Computers auf F2 um das BIOS erneut aufzurufen und gehen Sie zum Menü TPM Configuration 8 Wählen Sie Pending TPM operation Laufende TPM Operation drücken Sie auf die Eingabetaste und wählen Sie die benötigte Option aus wenn Sie TPM initialisieren sollten Sie Enable Take Ownership Besitz übernehmen aktivieren auswählen Sie müssen anschließend auf ...

Страница 79: ...ntsprechenden Kästchen aus 7 Geben Sie ein Basic User Password Benutzerkennwort ein und ein zweites Mal zur Bestätigung und klicken Sie auf Weiter 8 Klicken Sie auf Weiter um die Einstellungen zu bestätigen 9 Der Computer wird die Einstellungen anschließend initialisieren 10 Klicken Sie auf Fertig stellen 11 Klicken Sie auf die Registerkarten und Fenster um die Einstellungen anzupassen 12 Klicken ...

Страница 80: ...und klicken Sie dann auf Weiter 4 Klicken Sie auf Weiter Weiter Weiter 5 Klicken Sie auf Fertig stellen um den Computer neu zu starten Nach dem erneuten Hochfahren des Computers muss das System neu gestartet werden Aktivieren der Intel Smart Response Technologie 1 Klicken Sie auf das Symbol Intel Rapid Storage Technologie auf dem Apps Bildschirm 2 Klicken Sie bei Leistung Smart Response Technologi...

Страница 81: ... die Option Volume verkleinern 4 Geben Sie bei Zu verkleinernder Speicherplatz in MB einen Wert ein Dieser sollte mit der Grose des Systemspeichers RAM Ihres Computers ubereinstimmen 5 Klicken Sie auf Verkleinern jeder nicht zugewiesene Speicherbereich kann fur die Speicherverwendung formatiert werden 6 Starten Sie die Desktop App und klicken Sie mit der rechten Maustaste in die linke untere Hot C...

Страница 82: ...rfolgreich festgelget wird jetzt angezeigt 18 Schliesen Sie das CMD Fenster 19 Rufen Sie die Windows Systemsteuerung auf und klicken Sie doppelt auf Verwaltung System und Sicherheit Computerverwaltung Speicher Datentragerverwaltung 20 Diese Laufwerkspartition tragt nun die Bezeichnung Fehlerfrei Ruhezustandpartition 21 Starten Sie den Computer neu 22 Installieren Sie die Treiber siehe unten Instal...

Страница 83: ...rplatz Beachten Sie dass das Betriebssystem Windows mindestens 16GB 32bit oder 20GB 64bit freien Speicher im Laufwerk C der Systempartition benötigt Es wird empfohlen die aufgenommenen Videodateien in einem anderen Laufwerk als C zu speichern die Dateigröße der Aufnahmedateien zu beschränken oder die Auflösung der Videos zu verringern Der Computer ist ausgeschaltet oder im Energiesparmodus wird ab...

Страница 84: ...eForce GTX 880M PCI E Video Karte 8GB GDDR5 Video RAM On Board Kompatibel mit MS DirectX 11 1 Unterstützt die SLI Technologie von NVIDIA NVIDIA GeForce GTX 860M PCI E Video Karte 4GB GDDR5 Video RAM On Board Kompatibel mit MS DirectX 11 1 Unterstützt die SLI Technologie von NVIDIA Videoadapter Modell D NVIDIA GeForce GTX 880M PCI E Video Karte 8GB GDDR5 Video RAM On Board Kompatibel mit MS DirectX...

Страница 85: ...odelle A B C Eine S PDIF Ausgangsbuchse Eine Kopfhörer Ausgangsbuchse Eine Mikrofon Eingangsbuchse Eine Line Eingangsbuchse Eine RJ 45 LAN Buchse Eine DC Eingangsbuchse Hinweis Externe 7 1CH Audioausgabe bei Kopfhörer Mikrofon Line Eingang und S PDIF Ausgangsbuchsen Kommunikation Gbit PCI Express Fast Ethernet LAN Modelle A D 2 0M FHD PC Kamera Modul Modelle B C Doppelkameramodul 5 0M Pixels 2 0M ...

Страница 86: ... den gesamten Spannungsbereich AC Eingang 100 240V 50 60Hz DC Ausgang 19 5V 11 8A 230W Abmessungen und Gewicht Modelle A D 419 B x 293 T x 39 3 49 7 H mm Ca 3 9kg mit 1 Video Karte Akku und optischem Laufwerk Design I Modelle B C 419 B x 295 T x 42 52 8 H mm Ca 4 2kg mit 1 Video Karte Akku und optischem Laufwerk Design II Modelle B C 419 B x 295 T x 42 52 8 H mm Ca 4 4kg mit 1 Video Karte Akku und...

Страница 87: ...ublication ou de modifier son conte nu sans préavis Certains ou tous les éléments de l ordinateur peuvent avoir été déjà installés Si ce n est pas le cas ou si vous avez l intention de reconfigurer ou réinstaller des portions du système reportez vous au Manuel de l Utilisateur complet Le disque Device Drivers Utilities User s Manual ne contient pas de système d exploitation Informations de régleme...

Страница 88: ...vous n êtes pas sûr des caractèristiques du réseau électrique local consultez notre représentant de service ou la compagnie électrique locale L adaptateur AC DC que vous utilisez peut être à 2 broches ou à 3 broches comprenant une prise de terre Cette prise de terre est un des éléments de sécurité importants ne vous en passez pas Si une prise murale compatible n est pas disponible demandez à un él...

Страница 89: ...mbé par terre ou a été endommagé si l écran LCD est cassé ne touchez pas le liquide car il contient du poison Si une odeur inhabituel de la chaleur ou de la fumée apparaissait sortant de votre ordinateur Nettoyage Utilisez un chiffon propre et doux pour nettoyer l ordinateur mais n appliquez pas d agent de nettoyage directement sur l ordinateur N utilisez pas de produit de nettoyage volatil des di...

Страница 90: ...ifférent vous constate rez que ce manuel fait référence à Microsoft Windows 8 1 Prend en charge les disques durs RAID Votre disque dur peut être configuré en mode AHCI ou RAID pour améliorer les performances ou la protection Notez que la configuration de votre disque dur en mode RAID doit être faite avant d installer le SE Windows Ne modifiez pas le mode sauf si vous envisagez de réinstaller votre...

Страница 91: ...iption RAID 0 deux disques durs SSDs minimum sont nécessaires Disques identiques lisant et écrivant des données en parallèle pour améliorer les performances RAID 0 implémente une matrice de disques agrégés et les données sont décomposées en blocs et chaque bloc est écrit sur un disque séparé RAID 1 deux disques durs SSDs minimum sont nécessaires Des disques identiques dans une configuration en mir...

Страница 92: ...le dossier f6flpy x64 depuis l emplacement ci dessous D représente votre lecteur de DVD du disque Device Drivers Utilities User s Manual sur le lecteur flash USB ou le disque dur USB externe Windows 8 1 64bit D Options 00_IRST f6flpy f6flpy x64 4 Allumez l ordinateur et appuyez sur F2 pour aller dans le BIOS 5 Allez au menu Boot sélectionnez UEFI Setting et appuyez sur Entrée 6 Paramétrez UEFI Boo...

Страница 93: ...DVD du SE Windows 8 1 vous serez invité à appuyer sur une touche pour démarrer à partir du DVD Assurez vous que votre lecteur Flash USB ou votre disque dur USB externe est branché à l un des ports USB de l ordinateur 27 Appuyez sur F7 au démarrage de l ordinateur pour faire apparaître le menu des périphériques d amorçage 28 Sélectionnez le lecteur de DVD contenant le DVD du SE Windows 8 1 et appuy...

Страница 94: ...gauche et sur la zone du bouton droit pour faire un clic droit Désactiver le Clickpad Touchpad Utilisez Fn F1 ou le bouton de contrôle central pour désactiver le Clickpad Touchpad Figure 5 Vue de face avec l écran LCD ouvert Modèles A D 1 Caméra PC 2 Indicateur LED de caméra PC Quand la caméra PC est en cours d utilisation le Indicateur LED sera illuminé en rouge 3 Microphone intégré 4 Écran LCD 5...

Страница 95: ...chpad et boutons Modèle C 12 Lecteur d empreintes digitales 2 1 3 8 5 6 4 7 6 10 3 12 9 2 1 3 8 6 4 7 6 11 3 12 9 Notez que l ordinateur dispo sant d un système de double caméra Lorsque le LCD est ouvert la caméra en face de vous est la caméra 2 0M HD La ca méra de 5 0M pixels ci dessus est située sur le dessus du boîtier qui fera face à l op posé de vous lorsque l écran LCD est ouvert Notez que l...

Страница 96: ...Verrouillage défilement activé Blanc Mode Avion activé les modules WLAN Bluetooth sont désactivés Blanc Clickpad Touchpad activé Orange La batterie est en charge Vert La batterie est complètement chargée Orange clignotant La batterie a atteint le niveau bas cri tique Orange L adaptateur AC DC est branché Orange clignotant L adaptateur AC DC est branché et le port USB alimenté est activé Vert L ord...

Страница 97: ...urs visuels Fn Lecture Pause dans les programmes audio vidéo Fn Permutation du mode Avion Fn Activer Désactiver le Touchpad Activer Désactiver le pavé numérique Fn Eteindre le rétroéclairage LCD Appuyez sur une touche ou utilisez le Touchpad pour allumer Activer Désactiver l arrêt défilement Fn Allume Éteind le son Basculer entre majuscule et minuscule Fn Permutation veille Fn bouton d alimentatio...

Страница 98: ...afficher les effets sur le clavier Cliquez sur Save Enregistrer lorsque vous quittez l application pour conser ver le réglage Tableau 6 Boutons de mode Combinaisons de touches de fonction de LED du clavier Fn Lancer l application de rétroéclairage du clavier Fn Activer désactiver le rétroéclairage du clavier Fn Diminution de l illumination de la LED du clavier Fn Augmentation de l illumination de ...

Страница 99: ...u clavier et au touchpad le cas échéant Figure 8 Color Swatch Nuancier de couleurs Preview Aperçu La partie inférieure gauche de l application vous permet de prévisualiser les changements de réglages effectués sur les couleurs du clavier et du touchpad le cas échéant Sections Clavier et touchpad La partie inférieure droite de l application vous permet de sé lectionner des zones partielles ou toute...

Страница 100: ...eindre toutes les LED excepté la LED du bouton d alimentation Fn Activer Désactiver la LED de la barre de volume Modèle B seulement Utilisez l interrupteur LED principal pour allumer éteindre toutes les LED Utilisez la combinaison de touches Fn pour activer désac tiver la LED de la barre de volume Modèle B seulement Utilisez les commandes de LED du clavier et l application de rétroéclairage pour c...

Страница 101: ...opriée au dessus du Control Center Chaque mode d alimentation aura une incidence sur le mode Economie d énergie le mode Avion la gestion de l alimentation et l alimenta tion de la caméra PC de l ordinateur etc Menus du Centre de contrôle Le Centre de contrôle contient trois rubriques du menu System Program Programme système Device Périphérique et Gaming Jeux dans les modes d alimentation Cliquez s...

Страница 102: ... Volume indiquera le niveau du volume actuel Vous pouvez utiliser le curseur pour régler le volume ou les com binaisons de touches Fn F5 F6 ou utiliser les combinai sons de touches Fn F3 pour couper le volume Power Conservation Économie d énergie System Program Ce système prend en charge les fonctionnalités de gestion d alimentation Energy Star qui placent les ordinateurs CPU disque dur etc dans d...

Страница 103: ...e d alimentation choisi Left Windows Key Touche Windows gauche Ga ming Cliquez sur Désactiver pour désactiver la touche Windows sur le côté gauche du clavier Cela peut être utile si vous uti lisez les touches de jeu W A S D et que vous souhaitez éviter de déclencher les menus accidentellement avec la touche Windows Fan Speed Vitesse du ventilateur Gaming La vitesse du ventilateur s ajuste automati...

Страница 104: ...e pas fonctionner avec certains appareils voir la page 117 Basculer l alimentation sur ce port en utilisant la combinaison Fn bouton d alimentation 12 5 8 6 7 1 2 3 10 11 13 12 9 4 15 17 16 15 15 13 13 14 Face Gauche Droit Arrière Figure 12 Vues de face gauche droite arrière Modèles A D 1 Indicateurs LED 2 Fente de verrouillage de sécurité 3 Prise réseau RJ 45 4 Lecteur de carte Multi en 1 5 Prise...

Страница 105: ... 12 Port combiné eSATA et USB 2 0 13 Port USB 3 0 alimenté voir la page 98 14 Ports USB 3 0 15 Port Thunderbolt voir la remarque ci dessous 16 Ventilation 17 Prise de sortie HDMI 18 Prise d entrée DC Ejecter les périphériques Thunderbolt Afin d éviter les problèmes de système prenez soinde ne pas simplement tirer le câble du port Thun derbolt Le matériel doit être éjecté en toute sécurité 1 Accéde...

Страница 106: ... le disque De vice Drivers Utilities User s Manual Figure 14 Vues du dessous 1 Ventilation 2 Couvercle de baie de composant 3 Caisson de basses 4 Baie de disque dur 5 Batterie CPU Veuillez ne pas essayer d ouvrir ou de forcer le processeur UC de votre ordinateur Le fait d accéder au CPU de quelque manière que ce soit risque de violer la garantie Surchauffe Afin de ne pas causer une sur chauffe de ...

Страница 107: ... guration Écran d accueil bureau de Windows 8 1 Les applications les panneaux de contrôle les utilitaires et les programmes dans Windows sont accessibles depuis l écran d accueil et ou l application Bureau de Windows Le Bureau qui fonctionne comme une application dans l écran d accueil est accessible en cliquant sur l élément Bureau dans l écran d accueil ou en utilisant la combinaison de touches ...

Страница 108: ... côté droit de l écran affiche la Barre des charmes La Barre des charmes contient les menus Rechercher Partager Ac cueil Périphériques et Paramètres Pour accéder à la Barre des charmes déplacez le curseur vers les coins supérieurs ou inférieurs à droite de l écran puis passez la souris sur l un des éléments de la Barre des charmes pour l activer la barre est noire quand elle est active ou utilisez...

Страница 109: ...droit sur le bureau utilisez la combinaison de touches Touche Logo de Windows touche D pour accéder au bureau et sélectionnez Panneau de configuration NVIDIA dans le menu Périphériques d affichage En plus du LCD intégré vous pouvez aussi utiliser un moni teur VGA externe écran plat ou TV connecté à la prise de sortie HDMI au port Thunderbolt comme périphérique d af fichage Configuration Multi GPU ...

Страница 110: ...dows ou à partir de l icône du Gestionnaire audio DD Realtek dans la zone de notification dans le Panneau de Configu ration faites un clic droit sur l icône de la zone de notifica tion pour faire apparaître un menu audio Le volume peut aussi être réglé à l aide de la combinaison de touches Fn F5 F6 Configuration audio pour HDMI HDMI supporte les signaux vidéo et audio Dans certains cas il sera néc...

Страница 111: ... avec le bouton droit de la souris sur l icône de zone de notification et sélectionnez Gestionnaire de sons 3 Cliquez sur Haut parleurs onglet et cliquez sur Configuration du haut parleur onglet 4 Sélectionnez 5 1 Haut parleur ou 7 1 Haut parleur à partir du menu déroulant Configuration du haut parleur 5 Connectez les câbles du haut parleur avant à la prise de sortie casque 6 Branchez les câbles v...

Страница 112: ...r l icône Caméra 2 L interface de la caméra affiche deux boutons sur le côté droit de l écran 3 Le bouton supérieur est utilisé pour enregistrer de la vidéo et le bouton inférieur est utilisé pour prendre des photos 4 Faites un clic droit sur l écran pour faire apparaître les boutons du menu au bas de l écran 5 Ces boutons vous permettent d accéder à la Pellicule où les photos et les vidéos captur...

Страница 113: ...tes et alimentation Lors de l installation des pilotes assurez vous que votre ordi nateur est alimenté par l adaptateur AC DC connecté à une source d alimentation Certains pilotes consomment une quan tité importante d énergie pendant la procédure d installation et si la capacité restante de la batterie n est pas suffisante cela peut provoquer l arrêt du système et entraîner des problèmes de systèm...

Страница 114: ...quez sur 5 Install Touchpad Driver Oui 2 Cliquez sur Suivant 3 Cliquez sur Terminer Redémarrer maintenant pour redémarrer votre ordinateur Airplane 1 Cliquez sur 6 Install Airplane AP Oui 2 Cliquez sur Next 3 Cliquez sur Finish pour redémarrer votre ordinateur Hot Key 1 Cliquez sur 7 Install Hotkey AP Oui 2 Cliquez sur Next Next 3 Cliquez sur Finish Finish pour redémarrer votre ordinateur Intel ME...

Страница 115: ... et non en Mode Avion avant que la configuration commence Mode Bureau 1 Bascule sur le Bureau de Windows cliquez sur l élément Bureau dans l écran d accueil ou utilisez la combinaison de touches Touche Logo de Windows D 2 Cliquez sur l icône dans la zone de notification de la barre des tâches 3 Une liste des points d accès disponibles s affiche Ou Barre des charmes 1 Allez à la barre des charmes 2...

Страница 116: ...ions de connexion 4 Vous devrez ajouter un mot de passe Windows cliquez sur Ajouter sous Mot de passe 5 Une fois que vous aurez ajouté le mot de passe vous devrez redémarrer l ordinateur et utiliser votre mot de passe pour ouvrir une session sur le système 6 Allez à la barre des charmes 7 Sélectionnez Paramètres et cliquez sur Modifier les paramètres du PC 8 Cliquez sur Comptes puis cliquez sur Op...

Страница 117: ...la configuration commence Mode Bureau 1 Bascule sur le Bureau de Windows cliquez sur l élément Bureau dans l écran d accueil ou utilisez la combinaison de touches Touche Logo de Windows D 2 Cliquez sur la zone de notification de la barre des tâches puis double cliquez sur l icône Bluetooth ou cliquez et sélectionnez Afficher les périphériques Bluetooth 3 L élément Bluetooth dans PC et périphérique...

Страница 118: ...es modifications et redémarrer l ordinateur 7 Pendant le redémarrage de l ordinateur appuyez sur F2 pour accéder au BIOS et allez dans le menu TPM Configuration Configuration de TMP 8 Sélectionnez Pending TMP operation appuyez sur Entrée et sélectionnez l option adaptée si vous initialisez le TPM sélectionnez Enable Take Ownership Appuyez ensuite sur F4 pour enregistrer les modifications et redéma...

Страница 119: ...z utiliser en cliquant la case correspondante 7 Entrez un Mot de passe utilisateur de base et retapez le pour le confirmer et cliquez sur Suivant 8 Cliquez sur Suivant pour confirmer les paramètres 9 L ordinateur initialisera les paramètres 10 Cliquez sur Terminer 11 Cliquez sur les onglets et les panneaux de contrôle pour régler les paramètres 12 Cliquez deux fois sur l icône de la barre des tâch...

Страница 120: ...le contrat de licence puis cliquez sur Suivant 5 Cliquez sur Suivant Suivant Suivant 6 Cliquez sur Terminer pour redémarrer votre ordinateur Vous devrez redémarrer le système après le redémarrage de l ordinateur Activation de la technologie Intel Smart Response 1 Cliquez sur l icône Technologie de stockage Intel Rapid dans l écran Applications 2 Cliquez sur Activer l accélération sous Performance ...

Страница 121: ...ion des disques 3 Faites un clic droit sur le SSD et sélectionnez Réduire le volume dans le menu 4 Entrez le chiffre qui doit être égale à la quantité de mémoire système RAM dans votre ordinateur dans Quantité d espace à réduire en Mo 5 Cliquez sur Réduire tout espace non alloué du fichier peut être formaté pour une utilisation de stockage 6 Activez l application du Bureau et cliquez droit sur le ...

Страница 122: ...on apparaîtra 18 Fermez la fenêtre CMD 19 Allez au panneau de configuration de Windows et double cliquez sur Outils d administration Système et Sécurité Gestion de l ordinateur Stockage Gestion des disques 20 La partition du disque devrait indiquer Sain Partition de mise en veille prolongée 21 Redémarrez votre ordinateur 22 Installez le pilote voir ci dessous Installation du pilote de la technolog...

Страница 123: ...nécessite un espace substantiel sur le disque pour chaque fichier Notez que le système Windows nécessite un minimum de 16Go 32bit ou 20Go 64bit d espace libre sur la partition système du lecteur C Il vous est recommandé d enregistrer le fichier vidéo capturé dans un autre emplacement que le lecteur C limitez la taille du fichier de la vidéo capturée ou réduisez la résolution vidéo L ordinateur est...

Страница 124: ...80M RAM Vidéo interne GDDR5 2Go Compatible avec MS DirectX 11 1 Prennent en charge la technologie NVIDIA SLI Carte vidéo PCI E NVIDIA GeForce GTX 860M RAM Vidéo interne GDDR5 4Go Compatible avec MS DirectX 11 1 Prennent en charge la technologie NVIDIA SLI Adaptateur Vidéo Modèle D Carte vidéo PCI E NVIDIA GeForce GTX 880M RAM Vidéo interne GDDR5 2Go Compatible avec MS DirectX 11 1 Carte vidéo PCI ...

Страница 125: ...ie S PDIF Une prise de sortie casque Une prise d entrée de microphone Une prise d entrée de Ligne Une prise réseau RJ 45 Une prise d entrée en DC Remarque Sortie audio 7 1CH externe prise en charge par les prises casque microphone d entrée de ligne et de sortie S PDIF Communication Gigabit réseau Ethernet PCI E intégré Modèles A D Caméra PC 2 0M FHD Modèles B C Module de caméra double 5 0M Pixels ...

Страница 126: ...e bande Entrée AC 100 240V 50 60Hz Sortie DC 19 5V 11 8A 230W Dimensions physiques poids Modèles A D 419 l x 293 p x 39 3 49 7 h mm Environ 3 9kg avec 1 carte vidéo batterie lecteur optique Design I Modèles B C 419 l x 295 p x 42 52 8 h mm Environ 4 2kg avec 1 carte vidéo batterie lecteur optique Design II Modèles B C 419 l x 295 p x 42 52 8 h mm Environ 4 4kg avec 1 carte vidéo batterie lecteur o...

Страница 127: ...revisar esta publicación o cambiar su contenido sin previo aviso Algunas o todas las características del ordenador pueden haberse configurado de antemano Si no lo están o si desea reconfigurar o reinstalar partes del sistema consulte el Manual del usuario completo El disco Device Drivers Utilities User s Manual no contiene un sistema operativo Información de regulación y seguridad Por favor preste...

Страница 128: ...ero puede que necesite una fuente de alimentación continuada Si no está seguro de las especificaciones de alimentación locales consulte con el servicio de asistencia o compañía de electricidad del lugar El adaptador de alimentación puede tener un enchufe de 2 dientes o un enchufe con tierra de 3 dientes El tercer diente es una característica de seguridad no lo elimine Si no tiene acceso a un enchu...

Страница 129: ...guir las instrucciones de uso Si el ordenador se ha caído o dañado no toque el líquido venenoso si el panel LCD se rompe Si hay un olor fuera de lo normal calor o humo que sale del ordenador Limpieza Utilice un trapo limpio y suave para limpiar el ordenador pero no aplique limpiador directamente en el ordenador No utilice limpiadores volátiles derivados del petróleo o limpiadores abrasivos en ning...

Страница 130: ...o si desea reconfigurarlo con otro sistema este manual se refiere a Microsoft Windows 8 1 Soporte para HDD RAID Su s disco s duro s puede n configurarse en modo AHCI o en modo RAID para rendimiento mejorado o protección Tenga en cuenta que necesita configurar su s disco s duro s en el modo RAID antes de instalar el SO Windows No cambie el modo a menos que desee reinstalar el sistema operativo y as...

Страница 131: ...ID Descripción RAID 0 se necesitan al menos dos discos duros SSDs Unidades idénticas leyendo y escribiendo datos en paralelo para aumentar el rendimiento RAID 0 implementa una matriz de discos dividida los datos se dividen en dos bloques y cada uno se escribe en una unidad de disco diferente RAID 1 se necesitan al menos dos discos duros SSDs Se usan unidades idénticas en una configuración de espej...

Страница 132: ...ión siguiente D indica la unidad DVD en el disco Device Drivers Utilities User s Manual a la unidad Flash USB o disco duro externo USB Windows 8 1 64bit D Options 00_IRST f6flpy f6flpy x64 4 Inicie su ordenador y pulse F2 para entrar en la BIOS 5 Vaya al menú Boot seleccione UEFI Setting y pulse Entrar 6 Ajuste UEFI Boot a Enabled 7 Pulse Esc para salir del menú y vaya al menú Advanced 8 Seleccion...

Страница 133: ...ciar desde el DVD Asegúrese de que la unidad Flash USB o el disco duro externo USB esté conectado a uno de los puertos USB del ordenador 27 Presione F7 mientras el ordenador se reinicia para abrir el menú de dispositivo de arranque 28 Seleccione la unidad DVD que contiene el DVD Windows 8 1 OS y presione Entrar 29 Presione una tecla mientras el sistema arranca para comenzar a instalar Windows desd...

Страница 134: ...del botón izquierdo para clic izquierdo y la del botón derecho para hacer clic derecho Deshabilitar el Clickpad Touchpad Utilice Fn F1 o el botón central de control para desactivar el Clickpad Touchpad 9 Figure 5 Vista frontal con panel LCD abierto Modelos A D 1 Cámara PC 2 LED de cámara PC Cuando la cámara PC esté en uso el LED se iluminará en rojo 3 Micrófono incorporado 4 Panel LCD 5 Altavoces ...

Страница 135: ...ector de huellas digitales 2 1 3 8 5 6 4 7 6 10 3 12 9 2 1 3 8 6 4 7 6 11 3 12 9 Modelo B Modelo C A B Tenga en cuenta que el ordenador incluye un sistema de cámara dual Cuando la pantalla LCD está abierta la cámara hacia usted es HD de 2 0M La cámara de 5 0M píxeles superior está situada en la parte superior de la carcasa mirando hacia el lado opuesto con la pantalla LCD abierta Tenga en cuenta q...

Страница 136: ...esplazamiento está acti vado Blanco El Modo de avión está activado los módulos WLAN y Bluetooth están apagados Blanco Clickpad Touchpad activado Naranja La batería se está cargando Verde La batería está completamente cargada Naranja parpadeante La batería ha alcanzado el estado crí tico de poca energía Naranja El adaptador AC DC está conectado Naranja parpadeante El adaptador AC DC está enchufado ...

Страница 137: ...indicadores visuales Fn Reproducir pausar en los programas audio vídeo Fn Cambiar Modo de avión Fn Activar desactivar el Touchpad Fn Activar disactivar el teclado numérico Fn Apagar luz de fondo del LCD presione una tecla o utilice el Touchpad para encenderlo Fn Cambiar el bloqueo de despla zamiento Fn Conmutación mudo Cambio Bloq Mayúsculas Fn Conmutación dormir Fn botón de encendido Cambio de la...

Страница 138: ... ver los efectos en el teclado Haga clic en Save Guardar cuando salga de la aplicación para mantener la configuración Tabla 6 Botones de modo Combinaciones de teclas para la función LED del teclado Fn Abre la aplicación Retroiluminación de teclado Fn Enciende o apaga retroiluminación de teclado Fn Disminuir iluminación LED del teclado Fn Aumentar iluminación LED del teclado Fn Encendido y apagado ...

Страница 139: ...os a las partes del teclado y el touchpad si está disponible Figura 9 Color Swatch Paleta de colores Preview Vista previa La sección inferior izquierda de la aplicación le permite previsualizar los cambios realizados a los colores en el teclado y el touchpad si está disponible Secciones del teclado y touchpad La sección inferior derecha de la aplicación le permite seleccionar parte de áreas o toda...

Страница 140: ...ender y apagar todos los LEDs excepto el LED del botón de encen dido Fn Encender y apagar el LED de la barra del volumen sólo Modelo B Utilice el interruptor de LED principal para encender y apagar todos los LEDs Utilice la combinación de teclas Fn para encender y apagar el LED de la barra del volumen sólo Modelo B Utilice los controles LED del teclado y la aplicación de luz de fondo para configur...

Страница 141: ...iado en la parte superior del Control Center Cada modo de energía afectará a Power Conservation Mode Modo ahorro de energía Airplane Mode Modo de avión Power Plan Plan de energía y PC camera power Energía de cámara PC etc Menús del Centro de control El Control Center tiene 3 menús principales System Program Programas del sistema Device Dispositivos y Gaming Juegos en Modos de energía Haga clic en ...

Страница 142: ...cono Volumen mostrará el nivel actual del volumen También puede usar el control deslizante para ajustar el volumen o las combinaciones de teclas Fn F5 F6 o la combinación de teclas Fn F3 para silenciar el volumen Power Conservation Ahorro de energía System Program Este sistema soporta las características de administración de energía Energy Star que hace que los equipos CPU disco duro etc entren en...

Страница 143: ...a seleccionado Left Windows Key Tecla de Windows izquierda Gaming Haga clic en Disable Deshabilitar para deshabilitar la tecla Windows del lado izquierdo del teclado Esto puede resultar útil si utiliza teclas para juegos W A S y D y desea evitar que se abran los menús por accidente con la tecla Windows Fan Speed Velocidad del ventilador Gaming Esto ajustará la velocidad del ventilador automáticame...

Страница 144: ...ispositivos vea la página 157 Active o desactive este puerto con Fn botón de encendido 12 5 8 6 7 1 2 3 10 11 13 12 9 4 15 17 16 15 15 13 13 14 Parte frontal Lateral derecho Lateral izquierdo Parte posterior Figura 13 Vistas frontal izquierda de recha y posterior Modelos A D 1 Indicadores LED 2 Ranura del cierre de seguridad 3 Conector LAN RJ 45 4 Lector de tarjetas Multi en 1 5 Conector de entrad...

Страница 145: ...n de emergencia 12 Puerto combinado eSATA USB 2 0 13 Puerto USB 3 0 alimentado vea la página 138 14 Puertos USB 3 0 15 Puerto Thunderbolt vea nota abajo 16 Rejilla 17 Puerto de salida de HDMI 18 Conector de entrada DC Parte frontal Lateral derecho Lateral izquierdo Parte posterior Expulsar dispositivos Thunderbolt Para evitar problemas en el software asegúrese de no tirar directamente del cable de...

Страница 146: ...o tras unas 20 des cargas parciales consulte el Manual del usuario completo en el disco Device Dri vers Utilities User s Manual Figura 15 Vista inferior 1 Rejilla 2 Tapa de la bahía componente 3 Sub Woofer 4 Bahía HDD 5 Batería CPU El usuario no debe manipular la CPU El acceso a la CPU de cualquier modo puede anular su garantía Recalentamiento Para evitar que su ordena dor se recaliente comprue be...

Страница 147: ... Windows 8 1 A las apps paneles de control utilidades y programas en Windows se accede desde la pantalla Inicio y o desde la app Escritorio de Windows Al Escritorio que se ejecuta como una app dentro de la pantalla Inicio se puede acceder haciendo clic en Escritorio en la pantalla Inicio o usando la combinación Tecla de Windows tecla D La barra de tareas aparecerá en la parte inferior de la pantal...

Страница 148: ... pantalla muestra la barra Charms La barra Charms contiene los menús Buscar Compartir Inicio Dispositivos y Configuración Para acceder a la barra Charms mueva el cursor hacia la esquina superior o inferior derecha de la pantalla y luego mueva uno de los elementos hacia la barra Charms para activarla la barra estará en negro cuando esté activa o utilice la combinación Tecla de Windows tecla C Figur...

Страница 149: ...ón categoría O 3 Haga clic con el botón derecho en el escritorio utilice la combi nación Tecla de Windows tecla D para acceder al escri torio y seleccione Panel de control de NVIDIA en el menú Dispositivos de pantalla Además del LCD incorporado también puede utilizar un monitor VGA pantalla plana o TV conectado al puerto de salida de HDMI puerto Thunderbolt como dispositivo de pantalla Configuraci...

Страница 150: ...trador de sonido Realtek HD en el área de notificación o en el Panel de Control haga clic con el botón derecho en el icono del área de notificación para abrir el menú de audio El volumen también puede ajustarse con la combinación de teclas Fn F5 F6 Configuración de audio para HDMI HDMI soporta las señales de vídeo y audio En algunos casos será necesario ir al panel de control de Sonido para config...

Страница 151: ...sonido Realtek HD o haga clic con el botón derecho en el icono del área de notificación y seleccione Administrador de sonido 3 Haga clic en Altavoces ficha y haga clic en Configuración de los altavoces ficha 4 Seleccione 5 1 altavoces o 7 1 altavoces en el menú desplegable Configuración de altavoces 5 Enchufe los cables del altavoz frontal en el conector de salida de auriculares 6 Enchufe los cabl...

Страница 152: ...ara mostrará dos botones en el lado derecho de la pantalla 3 El botón superior se utiliza para grabar vídeo y el botón inferior para tomar fotos 4 Haga clic con el botón derecho en la pantalla para hacer aparecer los botones del menú de la parte inferior de la pantalla 5 Estos botones le permiten acceder a la carpeta Álbum de cámara donde aparecen las imágenes y vídeos capturados ajuste el tempori...

Страница 153: ...tación Cuando instale controladores asegúrese de que el ordenador esté alimentado por el adaptador AC DC conectado a una fuente de corriente activa Algunos controladores consumen una cantidad significativa de corriente durante el proceso de instalación y si la batería se consume puede provocar que el sistema se apague causando problemas en el sistema tenga en cuenta que esto no supone un problema ...

Страница 154: ...chpad 1 Haga clic en 5 Install Touchpad Driver Sí 2 Haga clic en Siguiente 3 Haga clic en Finalizar Reiniciar ahora para reiniciar el sistema Airplane 1 Haga clic en 6 Install Airplane AP Sí 2 Haga clic en Next 3 Haga clic en Finish para reiniciar el sistema Hot Key 1 Haga clic en 7 Install Hotkey AP Sí 2 Haga clic en Next Next 3 Haga clic en Finish Finish para reiniciar el sistema Intel MEI 1 Hag...

Страница 155: ...o LAN inalámbrica esté encendi do y no en Modo de avión antes de comenzar la configura ción Modo escritorio 1 Cambie al escritorio de Windows haga clic en Escritorio en la pantalla Inicio o utilice la combinación Tecla de Windows tecla D 2 Haga clic en el icono en el área de notificación de la barra de tareas 3 Aparecerá una lista de puntos de acceso disponibles O Barra Charms 1 Vaya a la barra Ch...

Страница 156: ...o haga clic en Opciones de inicio de sesión 4 Necesitará añadir una contraseña de Windows haga clic en Agregar bajo Contraseña 5 Tras añadir la contraseña necesitará reiniciar el ordenador y usar su contraseña para iniciar sesión en el sistema 6 Vaya a la barra Charms 7 Seleccione Configuración y haga clic en Cambiar configuración de PC 8 Haga clic en Cuentas y luego haga clic en Opciones de inici...

Страница 157: ...luetooth esté encendido y no en Modo de avión antes de comenzar la configuración Modo escritorio 1 Cambie al escritorio de Windows haga clic en Escritorio en la pantalla Inicio o utilice la combinación Tecla de Windows tecla D 2 Haga clic en el área de notificación de la barra de tareas y haga doble clic en el icono Bluetooth o haga clic y seleccione Mostrar dispositivos Bluetooth 3 El elemento Bl...

Страница 158: ...or reinicie presione F2 para entrar en la BIOS de nuevo y vaya al menú TPM Configuration Configuración de TPM 8 Seleccione Pending TPM operation Operación TPM pendiente presione Entrar y seleccione la opción necesaria si está inicializando TPM debería seleccionar Enable Take Ownership Activar tomar posesión Luego deberá presionar F4 para guardar los cambios y reiniciar el ordenador 9 Ahora puede i...

Страница 159: ...ndo clic en la casilla apropiada 7 Escriba una Contraseña básica de usuario y vuelva a escribirla para confirmarla y haga clic en Siguiente 8 Haga clic en Siguiente para confirmar la configuración 9 El ordenador inicializará la configuración 10 Haga clic en Finalizar 11 Haga clic en las fichas y paneles de control para ajustar la configuración 12 Haga doble clic en el icono de la barra de tareas p...

Страница 160: ... de licencia luego haga clic en Siguiente 5 Haga clic en Siguiente Siguente Siguiente 6 Haga clic en Finalizar para reiniciar el sistema deberá reiniciar el sistema otra vez después del reinicio del sistema Habilitar la tecnología Intel Smart Response 1 Haga clic en el icono Tecnología de almacenamiento Intel Rapid en la pantalla Aplicaciones 2 Haga clic en Activar aceleración bajo Rendimiento Tec...

Страница 161: ...cos 3 Haga clic con el botón derecho en SSD y seleccione Reducir volumen en el menú 4 Escriba el número que debería ser igual a la cantidad de memoria del sistema RAM en su equipo en Tamaño del espacio que desea reducir en MB 5 Haga clic en Reducir el espacio de archivos no asignado puede ser formateado para uso de almacenamiento 6 Ejecutar la app Escritorio y haga clic con el botón derecho en la ...

Страница 162: ...tableció correctamente el Id de la partición 18 Cierre la ventana CMD 19 Vaya al Panel de control de Windows y haga doble clic en Herramientas administrativas Sistema y Seguridad Administración de equipos Almacenamiento Administración de discos 20 La partición del disco debería aparecer como Correcto Partición de hibernación 21 Reinicie el sistema 22 Instale el controlador vea abajo Instalación de...

Страница 163: ...solución requiere una cantidad sustancial de espacio en el disco para cada archivo Tenga en cuenta que el sistema Windows requiere un mínimo de 16GB 32bit o 20GB 64bit de espacio libre en la partición del sistema unidad C Se recomienda que guarde el archivo de vídeo capturado en una ubicación distinta a la unidad C limite el tamaño de archivo del vídeo capturado o reduzca la resolución del vídeo E...

Страница 164: ...ídeo GDDR5 Compatible con MS DirectX 11 1 Soporta la Tecnología NVIDIA SLI Tarjeta de vídeo NVIDIA GeForce GTX 860M PCI E 4GB de RAM de vídeo GDDR5 Compatible con MS DirectX 11 1 Soporta la Tecnología NVIDIA SLI Adaptador de vídeo Modelo D Tarjeta de vídeo NVIDIA GeForce GTX 880M PCI E 8GB de RAM de vídeo GDDR5 Compatible con MS DirectX 11 1 Tarjeta de vídeo NVIDIA GeForce GTX 860M PCI E 4GB de RA...

Страница 165: ...entrada de línea Un conector de salida de auriculares Un conector de entrada para micrófono Un conector LAN RJ 45 Un conector de entrada DC Nota Salida de audio externa de 7 1CH compatible con conectores de altavoces micrófono entrada de línea y salida S PDIF Comunicaciones LAN Ethernet de Gigabit PCI E incorporada Modelos A D Módulo cámara PC FHD 2 0M Modelos B C Módulo de cámara dual 5 0M píxele...

Страница 166: ...ctor de corriente Entrada AC 100 240V 50 60Hz Salida DC 19 5V 11 8A 230W Dimensiones y peso Modelos A D 419 a x 293 l x 39 3 49 7 h mm Alrededor de 3 9kgs ccon 1 tarjeta de vídeo batería unidad óptica Diseño I Modelos B C 419 a x 295 l x 42 52 8 h mm Alrededor de 4 2kgs ccon 1 tarjeta de vídeo batería unidad óptica Diseño Il Modelos B C 419 a x 295 l x 42 52 8 h mm Alrededor de 4 4kgs ccon 1 tarje...

Страница 167: ...re la presente pubblicazione o di modificarne il contenuto senza preavviso È possibile che alcune o tutte le funzionalità del computer siano già state configurate In caso contrario o se si sta pianificando di riconfigurare o reinstallare componenti del sistema fare riferimento al Manuale per l utente completo Il disco Device Drivers Utilities User s Manual non contiene il sistema operativo Informa...

Страница 168: ... alimentazione stabile e continua Se non si è certi delle specifiche elettriche locali consultare l assi stenza tecnica o la società locale di fornitura elettrica L adattatore di alimentazione deve avere una spina dotata di messa a terra a due o tre poli Il terzo polo costituisce un importante funziona lità di sicurezza Non rinunciare al suo impiego Se non è disponibile una presa compatibile farne...

Страница 169: ... istruzioni operative Se il computer è caduto o si è danneggiato non toccare il liquido vele noso in caso di rottura dello schermo LCD Se c è un odore non usuale calore o fumo che fuoriesce dal computer Pulizia Per pulire il computer utilizzare solo un panno morbido e pulito evi tando di applicare detergenti direttamente sul computer Non utilizzare detergenti volatili distillati di petrolio o abra...

Страница 170: ...er per un sistema diverso questo manuale si riferisce a Microsoft Windows 8 1 Supporto RAID dei dischi rigidi I dischi rigidi possono essere configurati in modalità AHCI o in modalità RAID per ottenere maggiori prestazioni o più sicurezza Si noti che la configurazione dei dischi rigidi in modalità RAID deve essere effettuata prima di installare il S O Windows Non cambiare la modalità a meno che no...

Страница 171: ...lo di RAID Descrizione RAID 0 sono necessari almeno due dischi rigidi SSD Unità identiche leggono e scrivono dati in parallelo per aumentare le prestazioni RAID 0 implementa un array di dischi in configurazione striped e i dati vengono spezzati in blocchi Ciascun blocco viene scritto su un unità disco separata RAID 1 sono necessari almeno due dischi rigidi SSD Unità identiche in configurazione mir...

Страница 172: ...lpy x64 dalla posizione seguente la lettera D rappresenta l unità DVD sul disco Device Drivers Utilities User s Manual all unità flash USB o al disco rigido USB esterno Windows 8 1 64bit D Options 00_IRST f6flpy f6flpy x64 4 Accendere il computer e premere F2 per entrare nel BIOS 5 Aprire il menu Boot selezionare UEFI Setting e premere Invio 6 Impostare UEFI Boot su Enabled 7 Premere Esc per uscir...

Страница 173: ...er dal DVD Accertarsi che l unità flash USB o il disco rigido USB esterno sia collegato a una delle porte USB del computer 27 Premere F7 appena il computer si avvia per aprire il menu di avvio del dispositivo 28 Selezionare l unità DVD che contiene il sistema operativo Windows 8 1 e premere Invio 29 Premere un tasto qualsiasi all avvio del sistema per iniziare l installazione di Windows dal disco ...

Страница 174: ...ell area del pulsante destro per un clic destro Disattivazione del clickpad touchpad È possibile disattivare il clickpad touchpad con la combinazione di tasti Fn F1 o con l apposito pulsante del Control Center 9 Figure 5 Vista anteriore con pan nello LCD aperto Modelli A D 1 Camera PC 2 LED della camera PC Quando si utilizza la camera PC l indicatore LED si illumina in rosso 3 Microfono incorporat...

Страница 175: ...dello C 12 Lettore d impronte digitali 2 1 3 8 5 6 4 7 6 10 3 12 9 2 1 3 8 6 4 7 6 11 3 12 9 Modello B Modello C A B Si noti che il computer è dotato del sistema dual camera Quando LCD è aperto la camera che vi è di fronte è la camera HD 2 0M La camera 5 0M Pixels sopra è posizionata sulla custodia superiore che sarà volta in direzione opposta allca vostra quando il pannello LCD è aperto Si noti c...

Страница 176: ... modalità aereo è ON i moduli WLAN Bluetooth sono OFF White Clickpad Touchpad attivato Arancione La batteria è in carica Verde Batteria completamente carica Arancione lampeggiante La batteria ha raggiunto lo stato critico di carica bassa Arancione L adattatore AC DC è collegato Arancione lampeg giante L adattatore AC DC è collegato e la porta USB alimentata è attiva Verde Il computer è acceso Verd...

Страница 177: ...Play pausa nei programmi audio video Fn Commutazione modalità aereo Fn Attiva disattiva il touchpad Fn Attiva disattiva il tastie rino numerico Fn Spegne la retroilluminazione dello schermo LCD premere un tasto o utilizzare il touchpad per ripristinare lo schermo Fn Attiva disattiva il blocco dello scorrimento Fn Commutazione mute Attiva disattiva maiuscolo Fn Commutazione Sospendi Fn Pulsante di ...

Страница 178: ...edere gli effetti sulla tastiera Cliccare Save Salva quando si esce dall applicazione per mantenere l im postazione Tabella 6 Pulsanti di modalità Combinazione tasti funzione LED tastiera Fn Avviare l applicazione di retroilluminazione della tastiera Fn Attiva disattiva la retroilluminazione della tastiera Fn L illuminazione del LED della tastiera si riduce Fn L illuminazione del LED della tastier...

Страница 179: ...mpioni e per applicarli alle parti della tastiera e al touchpad se applicabile Figura 9 Color Swatch Campione colore Preview Anteprima La sezione inferiore sinistra dell applicazione consente di vedere in anteprima le modifiche alle impostazioni dei colori sulla tastiera e Touchpad se applicabile Sezioni Tastiera e Touchpad La sezione destra inferiore dell applicazione consente di selezionare aree...

Страница 180: ...ED di pulsante di alimentazione Fn Accendere e spegnere il LED barra del volume solo Modello B Usare l interruttore LED principale per accendere e spegnere tutti i LED Usare le combinazioni dei tasti Fn per accendere e spe gnere il LED barra del volume solo Modello B Usare i comandi della tastiera LED e applicazione di retroillu minazione per configurare colori ed effetti per i LED di tou chpad ta...

Страница 181: ...endo clic sull icona corrispondente nella parte superiore del Control Center Ogni modalità di alimentazione influirà sulla modalità di risparmio energetico modalità aereo pianificazione energetica e alimentazione camera PC ecc Menu del Control Center Il Control Center contiene 3 titoli di menu System Program Programma sistema Device Dispositivo e Gaming Gioco sotto le modalità di alimentazione Cli...

Страница 182: ...È possibile utilizzare la barra di scorrimento per regolare il Volume o le combinazioni di tasti Fn F5 F6 oppure utilizzare la combinazione di tasti Fn F3 per disattivare totalmente l audio Power Conservation Conservazione dell energia System Program Il sistema supporta le funzionalità della gestione energetica Energy Star che pone i computer CPU disco rigido ecc in una modalità di sospensione a b...

Страница 183: ...ndows sinistro Gaming Cliccare Disattiva per disattivare il tasto Windows sul lato sinistro della tastiera Questo può essere utile se si utilizzano i tasti di gioco W A S D e si desidera evitare di attivare menu con il tasto Windows Fan Speed Velocità ventola Gaming La velocità della ventola si regola automaticamente per controllare il calore della CPU Tuttavia se desiderato è possibile regolare l...

Страница 184: ...re con alcuni dispositivi vedere la pagina 197 Attivare disattivare la porta utilizzando Fn Pulsante di alimentazione 12 5 8 6 7 1 2 3 10 11 13 12 9 4 15 17 16 15 15 13 13 14 Figura 13 Vista anteriore sinistra de stra e posteriore Modelli A D 1 Indicatori LED 2 Slot blocco di sicurezza 3 Jack di rete tipo RJ 45 4 Lettore di schede Multi in 1 5 Jack di ingresso di linea 6 Jack uscita S PDIF 7 Jack ...

Страница 185: ... 2 0 combinata 13 Porta USB 3 0 alimentata vedere la pagina 178 14 Porte USB 3 0 15 Porta Thunderbolt vedere la nota sotto 16 Ventola 17 Porta uscita HDMI 18 Jack di ingresso DC Espulsione di dispositivi Thunderbolt Al fine di evitare problemi non tirare assolutamente il cavetto dalla porta Thunderbolt per rimuovere l hardware L hardware deve essere espulso in modo sicuro 1 Andare all area di noti...

Страница 186: ...utente esteso nel di sco Device Drivers Utilities User s Manual CPU La CPU non è un componente che necessita assistenza da parte dell utente Accedere alla CPU in qualsiasi modo implica una violazione della garanzia Surriscaldamento Per prevenire il surriscalda mento del computer accertarsi che non vi sia nulla che ostrui sca la le ventola ventole du rante l uso del computer Figura 15 Vista inferio...

Страница 187: ...n dows 8 1 Le app i pannelli di controllo utilità e programmi dentro Win dows sono accessibili dalla schermata Start e o Windows Desk top app Il Desktop che viene eseguito come app all interno della schermata Start è accessibile cliccando l oggetto del Desktop nella schermata Start o tramite la combinazione di tasti Tasto logo Windows D La barra delle applicazioni viene visualizzata nella parte in...

Страница 188: ...ermo Charms Bar Il lato destro dello schermo visualizza la Charms Bar La Charms Bar contiene i menu Ricerca Condivisione Start Dispositivi e Impostazioni Per accedere alla Charms Bar spostare il dispositivo di scorrimento negli angoli superiore e inferiore dello schermo e quindi passare sopra a uno degli oggetti nella Charms Bar per attivarlo quando è attiva la barra è nera oppure usare la combina...

Страница 189: ...one categoria O 3 Fare clic con il pulsante destro del mouse sul Desktop utilizzare la combinazione di tasti Tasto logo Windows D per accedere al Desktop e scegliere Pannello di controllo NVIDIA dal menu Dispositivi di visualizzazione Oltre allo schermo LCD integrato è possibile utilizzare un monitor VGA LCD a schermo piatto o una TV collegato alla porta uscita HDMI porta Thunderbolt come periferi...

Страница 190: ...na Gestione Audio Realtek HD nell area di notifica pannello di controllo fare clic con il pulsante destro del mouse sull icona dell area di notifica per aprire un menu audio Il volume può essere regolato anche con la combinazione di tasti Fn F5 F6 Configurazione audio per HDMI HDMI supporta i segnali video e audio In alcuni casi sarà necessario aprire il pannello di controllo Suoni e configurare m...

Страница 191: ...di controllo 2 Fare clic su Gestione Audio Realtek HD oppure fare clic con il pulsante destro del mouse sull icona nell area di notifica e selezionare Gestione Sonoro 3 Fare clic su Altoparlanti scheda e fare clic su Configurazione casse scheda 4 Selezionare 5 1 casse o 7 1 casse dal menu Configurazione casse 5 Collegare i cavi delle casse frontali nel jack di uscita delle cuffie 6 Collegare i cav...

Страница 192: ...o destro dello schermo 3 Il pulsante superiore è utilizzato per registrare i video mentre il pulsante inferiore per scattare foto 4 Fare clic con il pulsante destro del mouse sullo schermo per mostrare i pulsanti del menu nella parte inferiore della schermata 5 Questi pulsanti consentono di accedere al Rullino della fotocamera dove vengono visualizzate le foto e i video catturati impostare il time...

Страница 193: ...ne dei driver e alimentazione Quando si installano i driver assicurarsi che il computer sia alimentato con l alimentatore collegato a una fonte di corrente funzionante Alcuni driver assorbono una quantità considerevole di energia durante la procedura d installazione e se la capacità rimanente della batteria non è sufficiente il computer potrebbe spegnersi e causare problemi al sistema si noti che ...

Страница 194: ...are clic su 5 Install Touchpad Driver Sì 2 Fare clic su Avanti 3 Fare clic su Fine Riavvia ora per riavviare il computer Airplane 1 Fare clic su 6 Install Airplane AP Sì 2 Fare clic su Next 3 Fare clic su Finish per riavviare il computer Hot Key 1 Fare clic su 7 Install Hotkey AP Sì 2 Fare clic su Next Next 3 Fare clic su Finish Finish per riavviare il computer Intel MEI 1 Fare clic su 8 Install M...

Страница 195: ...ima di iniziare la configurazione Modalità Desktop 1 Passa al desktop di Windows fare clic sull oggetto del Desktop nella schermata Start o utilizzare la combinazione di tasti Tasto logo Windows D 2 Fare clic sull icona nell area di notifica della barra delle applicazioni 3 Apparirà un elenco dei punti di accesso disponibili O Barra Charms 1 Andare alla barra Charms 2 Selezionare Impostazioni e fa...

Страница 196: ...pzioni di accesso 4 Sarà necessario aggiungere una password di Windows cliccare su Aggiungi sotto Password 5 Dopo avere aggiunto la password sarà necessario riavviare il computer e usare la password per accedere al sistema 6 Andare alla barra Charms 7 Selezionare Impostazioni e fare clic su Modifica impostazioni PC 8 Fare clic su Account e quindi fare clic su Opzioni di accesso 9 Fare clic su Aggi...

Страница 197: ... in Mo dalità aereo prima di iniziare la configurazione Modalità Desktop 1 Passa al desktop di Windows fare clic sull oggetto del Desktop nella schermata Start o utilizzare la combinazione di tasti Tasto logo Windows D 2 Fare clic nell area di notifica della barra delle applicazioni e fare doppio clic sull icona Bluetooth oppure fare clic e selezionare Mostra dispositivi Bluetooth 3 Viene visualiz...

Страница 198: ...7 Quando il computer si riavvia premere F2 per entrare di nuovo nel BIOS e passare al menu TPM Configuration 8 Selezionare Pending TPM operation Operazione TPN in attesa premere Invio e selezionare l opzione desiderata se si sta inizializzando TPM occorre selezionare Enable Take Ownership Attiva presa di proprietà Sarà necessario premere F4 per salvare le modifiche e riavviare il computer 9 A ques...

Страница 199: ...tente di base e digitarla di nuovo per confermarla e fare clic su Avanti 8 Fare clic su Avanti per confermare le modifiche di configurazione apportate 9 Il computer inizializza le impostazioni 10 Fare clic su Fine 11 Selezionare le schede e i pannelli di controllo per regolare le impostazioni 12 Fare doppio clic sull icona dell area di notifica per accedere al Tool di configurazione di Infineon Se...

Страница 200: ...enza quindi fare clic su Avanti 5 Fare clic su Avanti Avanti Sì Avanti 6 Fare clic su Fine per riavviare il computer Dopo il riavvio del computer sarà necessario riavviare di nuovo il sistema Attivazione della tecnologia Intel Smart Response 1 Fare clic sull icona Tecnologia Intel Rapid Storage nella schermata della App 2 Fare clic su Attiva accelerazione in Prestazioni Tecnologia Smart Response S...

Страница 201: ...a SSD e selezionare Riduci volume dal menu 4 Immettere la cifra che dovrebbe essere uguale alla quantità di memoria di sistema RAM del computer in Specificare la quantità di spazio da ridurre in MB 5 Fare clic su Riduci tutto lo spazio libero può essere formattato per l uso di archiviazione 6 Eseguire l applicazione Desktop e fare clic con il pulsante destro del mouse nell angolo inferiore sinistr...

Страница 202: ...izzato il messaggio impostazione dell ID della partizione specificata completata 18 Chiudere la finestra di CMD 19 Aprire il pannello di controllo di Windows e fare doppio clic su Strumenti di amministrazione Sistema e sicurezza Gestione computer Archiviazione Gestione disco 20 La partizione del disco dovrebbe divenire Integro Partizione per ibernazione 21 Riavviare il computer 22 Installare il dr...

Страница 203: ...o Nota catturare file di video ad altra risoluzione molto spazio disco disponibile per ogni file Nota Windows richiede un minimo di 16GB 32bit o 20GB 64bit di spazio disco libero sulla partizione del disco C Si consiglia di salvare la cattura del file video in un ubicazione diversa dal disco C limitare la dimensione del file del video catturato o ridurne la risoluzione Il computer è spento o in mo...

Страница 204: ...PCI E 8GB GDDR5 Video RAM On Board Compatibile con MS DirectX 11 1 Supporto per tecnologia NVIDIA SLI Scheda video NVIDIA GeForce GTX 860MX PCI E 4GB GDDR5 Video RAM On Board Compatibile con MS DirectX 11 1 Supporto per tecnologia NVIDIA SLI Adattatore Video Modello D Scheda video NVIDIA GeForce GTX 880MX PCI E 8GB GDDR5 Video RAM On Board Compatibile con MS DirectX 11 1 Scheda video NVIDIA GeForc...

Страница 205: ... del microfono Un jack di ingresso di linea Line In Un jack RJ 45 per LAN Un jack di ingresso DC Nota Uscita audio 7 1 canali esterna con supporto di jack uscita delle cuffie jack ingresso del microfono jack di ingresso di linea e jack uscita S PDIF Comunicazione Ethernet LAN gigabit PCIe Modelli A D Modulo di camera PC FHD 2 0M Modelli B C Modulo camera duale 5 0M Pixels 1 0M HD Moduli Half Mini ...

Страница 206: ...40V 50 60Hz Uscita DC 19 5V 11 8A 230W Dimensioni fisiche peso Modelli A D 419 larghezza x 293 profondità x 39 3 49 7 altezza mm min Circa 3 9kg con 1 scheda video batteria unità ottica Design I Modelli B C 419 larghezza x 295 profondità x 42 52 8 altezza mm min Circa 4 2kg con 1 scheda video batteria unità ottica Design lI Modelli B C 419 larghezza x 295 profondità x 42 52 8 altezza mm min Circa ...

Отзывы: