background image

10


Operating instructions


Mod. MASTER


dal 1975


Congratulations  for your choice  of a wood oven by CLEMENTI s.n.c., a company  with a great  experience 
in the  wood cooking sector. 

®    

Our ovens  are  top quality articles;  built with the  utmost care,  precision  and  selected materials,  they are 
the  result  of long studies  and are  made  to last. 
A very important feature  of CLEMENTI's wood oven is that it works by indirect fire, those  baking is healthy 
and  leaves  flavours unaltered. 


IMPORTANT: for a  correct and lasting  working of the indoor or outdoor oven, read carefully the fol- 
lowing information before use.

Operating 

information


• 

To heat  the  oven is better  to use  dry, small cut  wood. 

• 

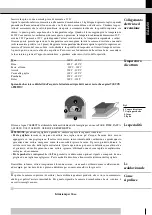
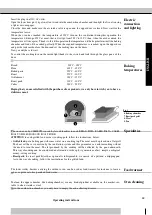
To reach  the  maximum temperature of 400°C 3,5 kg of wood are  needed. 

 When the  required  temperature is reached, it is advisable  to leave  only lighted coals  in the  combustion 

chamber.  But, if the  temperature should drop during the  cooking, feed  the  fire with very little wood. 

 When the oven is working, the temperature must never  be over 450°C. But if this should occur,  immedia- 

tely open  the  upper  door and  wait till the  temperature lowers  to normal levels. 

 The first three  times the  oven is used,  its temperature must not exceed  150°C. During these  operations 

is better  to take  out the  baking pans  which  are  inside. Besides,  during the  first three  (3) times, it might 
occur  that: 

- The glass  pane  of the combustion  chamber  steams  up owing to the dampness of the refractory  mate- 
rial. 
- Smoke leaks  from under  the  roof owing to the  dampness of the  insulation. 

NB: The manufacturing   firm disclaims  all  responsibilities  if the above mentionned rules and advices 
are not followed.

Technical 

instructions


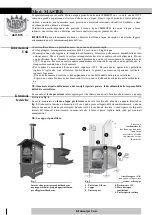
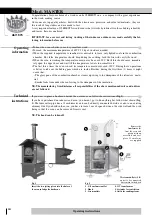
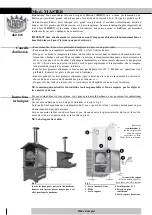
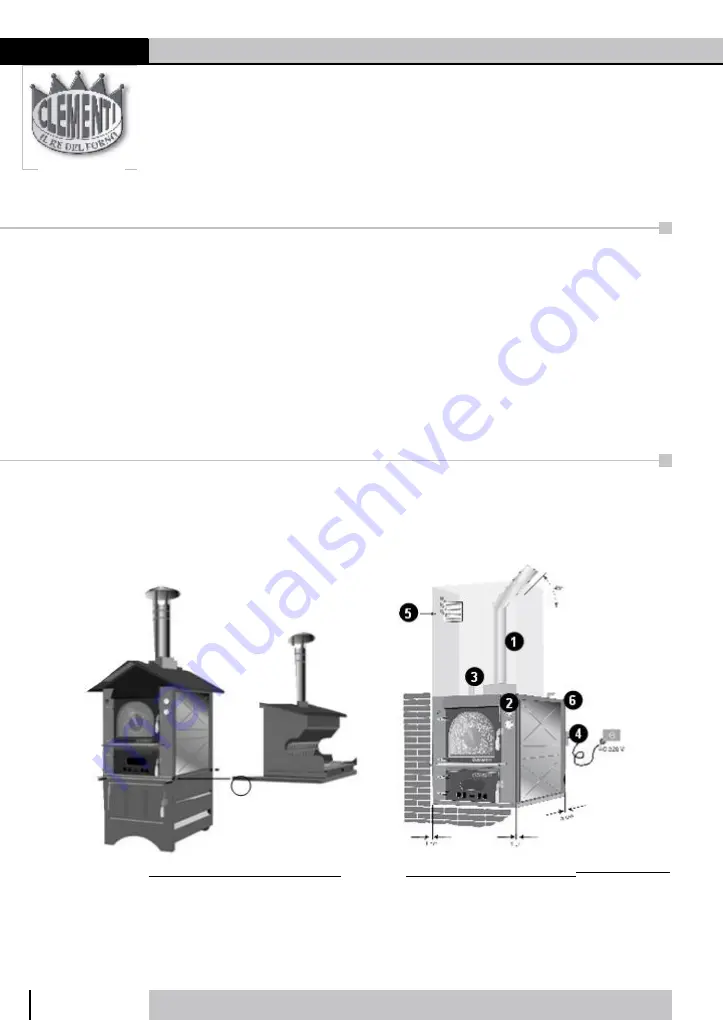
If you want  to place  a barbecue beside  the  outdoor  oven, follow the  instructions 

(fig. 1).


If you have  purchased an  indoor wood oven, you haven't  got to do anything but follow what  shown 

(fig.


2)

. The fume outlet pipe has  a 13 cm diameter  and can  be directly connected outside  or also to an existing 

chimney flue. If you build in the oven, you have to leave 1 cm of space between  the side wall and the oven 
lining so that  the  oven can  be  removed  from its seat. 


NB: The hood can be taken off.


Remove the 

transformer  (4) 

from the oven and 

1                   

position it in an 

accessible  and cool 
place. 50 cm of wire 

3                                  

are  supplied 


2                 6


4


5


 Fig. 1  


The 

steam outlets (3) (6)


are  not to be connected 

Fig. 2                                                       

but remain in the hood

Insert the two jutting pivots into the holes of 
the oven to lodge the barbecue.


1. Ø 13 cm fumes outlet


2. Hood


3. Steam outlets


4. 12  V transformer


5. Air intake  for ventilation


6. Outlet for cooking steam

Содержание BIJOUX

Страница 1: ...Istruzioni per l uso Operating instructions Bedienungsanleitung Mode d emploi Manual de instrucciones ...

Страница 2: ...oni per l uso Piano superiore premere al centro dal basso verso l alto e far scivolare il piano obliquamente Piani laterali Spingere il piano dal basso verso l alto e ribaltarlo Piano superiore Piani laterali ...

Страница 3: ...ITALIANO Amo il forno Clementi perché lui è come me 4 Mod Master 6 Mod Bijoux 6 Barbecue Automatico 7 Ricettario ...

Страница 4: ...eve superare i 150 C Durante queste operazioni è preferibile togliere le teglie che sono all interno Inoltre durante le prime 3 accensioni si potranno verificare i seguenti fenomeni Il vetro della camera di cottura si può appannare a causa dell umidità delle piane refrattarie Si possono vedere fuoriuscite del fumo sotto il tetto a causa dell umidità contenuta nella coibentazio ne NB il mancato ris...

Страница 5: ...l acquisto fatto dei nostri prodotti non ci resta che augurarVi BUON APPETITO Temperatura di cottura 6 Fig 3 8 6 Camera di cottura 7 7 Griglia porchetta 8 Carne 9 Teglia 9 Il forno a legna CLEMENTI è utilizzabile dalla moltitudine delle famiglie per cuocere PANE PIZZE PASTA AL FORNO DOLCI ARROSTI GRIGLIATE E PORCHETTE ATTENZIONE per cuocere grigliate e porchette occorre seguire le seguenti istruzi...

Страница 6: ...ioni per l uso Mod BIJOUX Ø 130 Barbecue Automatico P1 G2 G1 Fig 4 1 Infilare le gambe G1 e G2 negli alloggi del barbecue 2 Fissarle con le apposite viti 3 Incastrare il piano P1 sopra la traversa delle gambe ...

Страница 7: ...st ordine e finendo con un ultimo strato di lasagne ricoperte con la salsa bèchamel dei fiocchetti di burro qua e là e abbondante parmigiano grattugiato Infornate per circa 30 minuti a 250 C Prima di servire fate riposare le vostre lasagne per almeno dieci minuti Prendete la pasta di pane e posatela sulla spianatoia leggermente infarinata Aiutandovi con le mani stendete la pasta dandole la forma d...

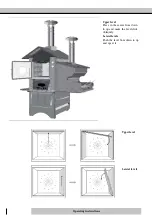
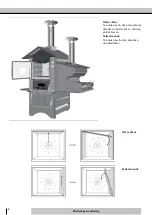
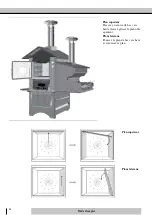
Страница 8: ...Operating instructions Upper level Press in the center from down to up and make the level slide obliquely Lateral levels Push the level from down to up and upset it Upper level Lateral levels ...

Страница 9: ...ENGLISH I love the Clementi kitchen because he is like me 10 Mod Mater 12 Mod Bijoux 12 Automatic barbecues 13 Recipe book ...

Страница 10: ...ature must not exceed 150 C During these operations is better to take out the baking pans which are inside Besides during the first three 3 times it might occur that The glass pane of the combustion chamber steams up owing to the dampness of the refractory mate rial Smoke leaks from under the roof owing to the dampness of the insulation NB The manufacturing firm disclaims all responsibilities if t...

Страница 11: ...our products we only have to wish you to have a delicious meal Baking temperatures 6 Fig 3 8 6 Baking chamber 7 7 Roast pork grill 8 Meat 9 Pan 9 The wood oven by CLEMENTI is used by lots of families to cook BREAD PIZZA BAKED PASTA CAKES ROAST GRILLED FOOD AND ROAST PORK ATTENTION to cook grilled food or roast sucking pork follow the instructions below Grilled food put a baking pan with some water...

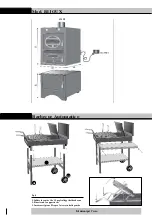
Страница 12: ...ing instructions Mod BIJOUX Ø 130 Automatic Barbecue P1 G2 G1 Fig 4 1 Insert the G1 and G2 legs into the barbecue housing 2 Fix them with the appropriate screws 3 Fix the P1 top over the crosspiece of the legs ...

Страница 13: ...armesan and the mozzarella you have chopped up Add further layers following this order finishing with a final layer of lasagne covered with béchamel sauce flakes of butter here and there and abundant grated Parmesan Cook for about 30 minutes at 250 C Leave the lasagne for at least ten minutes before serving Take the dough and place it on a slightly floured pastry board Stretch the dough out with y...

Страница 14: ...1 Bedienungasanleitung Obere ebene Von unten nach oben im zentrum druecken und die ebene schraeg gleiten lassen Seitenwaende Von unten nach oben druecken und umdrehen Obere ebene Seitenwaende ...

Страница 15: ...dEUTSCH Ich liebe den backofen Clementi denn er ist wie ich bin 16 Mod Master 18 Mod Bijoux 18 Automatische barbecue 19 Rezeptbuch ...

Страница 16: ...bei sollten die Bleche aus dem Ofen genommen werden Ausserdem koennte bei dem ersten drei maligen Anzuenden folgendes passieren Das Fenster kann beschlagen und zwar wegen der Feuchtigkeit der Refraktorflaechen Rauch kann unter dem Dach wegen Feuchtigkeit in dem Nichtleiter rauskom men ZUR BEACHTUNG bei nichtbeachtung der hinweise und ratschlaege entfaellt die verantwortung des herstellers Wenn sie...

Страница 17: ...ichts anderes als Ihnen guten Appetit zu wuenschen 6 Fig 3 8 6 Kochraum 7 7 Spanferkelrost 8 Fleisch 9 Blech 9 Der Holzbackofen CLEMENTI kann in der Familie vielseitig verwendet werden und zwar zum BACKEN VON BROT PIZZA NUDELN KUCHEN BRATEN GEGRILLTES FLEISCH UND SPANFERKEL ZUR BEACHTUNG Beim Grillen von Fleisch oder Spanferkel bitte Folgendes beachten Beim grillen ein Blech mit ein wenig Wasser a...

Страница 18: ...IJOUX Ø 130 Automatische Barbecue P1 G2 G1 Fig 4 1 Stecken Sie die Beine G1 und G2 in die Gehäuse des Barbecues 2 Machen Sie diese mit den dafür vorgesehenen Schrauben fest 3 Stecken Sie die Fläche P1 auf den Querträger der Beine ...

Страница 19: ...dere Schichten und beenden Sie mit der letzten Schichte Lasage die mit Béchamelsoße mit kleinen Butterflocken und mit reichlichen geriebenen Parmesankäse bedeckt werden Schieben Sie für zirka 30 minuti auf 250 C in den Ofen Bevor aufzutischen lassen Sie Ihre Lasagne für ungefähr zehn Minuten ruhen Nehmen Sie den Brotteig und stellen Sie ihn aufs leicht mit Mehl bestreute Nudelbrett Helfen Sie sich...

Страница 20: ... Mode d emploi Plan superieur Pressez au centre de bas vers haut et faisez glisser le plan obli quement Plans lateraux Poussez le plan de bas vers haut et renversez le plan Plan superieur Plans lateraux ...

Страница 21: ...FRANçAIS J aime le four Clementi parce qu il est comme moi 22 Mod Master 24 Mod Bijoux 24 Barbecue Automatique 25 Livre de Recettes ...

Страница 22: ...e descende jusqu à des niveaux inférieurs Pour les trois premiers allumages le four ne doit pas dépasser les 150 C Pendant ces opérations il est préférable d enlever les plats à rôti qui sont à l intérieur En outre pendant les trois premiers allumages il peut arriver que le verre de la chambre de cuisson se couvre de buée à cause de l humidité des plans réfractai res On peut voir des fuites de fum...

Страница 23: ... a souhaiter BON APPéTIT Temperatures de cuisson 6 Fig 3 8 6 Chambre à cuisson 7 7 Grille pour la porchetta 8 Viande 9 Plat à rôti 9 Le four à bois CLEMENTI est utilisé par la plupart des familles pour cuire PAIN PIZZA PATES AU FOUR GATEAUX ROTIS VIANDES GRILLEES ET PORCHETTA ATTENTION pour cuire les viandes grillees et la porchetta il faut suivre les instructions suivantes Pour les viandes grillé...

Страница 24: ...d emploi Mod BIJOUX Ø 130 Barbecue Automatique P1 G2 G1 Fig 4 1 Enfilez les pieds G1 et G2 dans les logements du barbecue 2 Fixez les avec les vis appropriées 3 Encastrez le plan P1 sur la traverse des pieds ...

Страница 25: ...pé en morceaux Composez d autres étages en suivant cet ordre et en finissant avec un dernier étage de lasagnes recouvertes de béchamel des petits morceaux de beurre et beaucoup de parmesan râpé Mettez au four à 250 C pendant environ 30 minutes Avant de servir faites reposer vos lasagnes pendant 10 minutes au moins Prenez la pâte à pain et posez la sur la planche à pâtisserie légèrement enfarinée E...

Страница 26: ...anual de instrucciones Plano superior Apretar en el centro desde abajo hacia arriba y deslizar el plano Plano inferior Apretar la repisa desde abajo hacia arriba y volcarlo Plano superior Plano inferior ...

Страница 27: ...ESPAñOL Amo el horno Clementi porque el es como yo 28 Mod Master 30 Mod Bijoux 30 Barbacoa automaticas 31 Recetario ...

Страница 28: ... primeros tres encendimientos el horno no debe superar los 150 Es preferible sacar las cazuelas que están en el horno Además durante los primeros tres encendimientos puede ocurrir El cristal de la cámara de cocedura puede apanãrse en consecuencia de la hume dad del material refracta rio Es posible veer la salida de humobajo el tejado en consecuencia de la humedad contenida en el aislamien to NB la...

Страница 29: ...PROVECHO Temperatura de cocedura 6 Fig 3 6 Cámara de cocedura 7 8 7 Parrilla para lechone asado 8 Carne 9 9 Cazuela El horno Clementi ha sido creado para cocer PAN PIZZA CANELONES DULCES ASADOS PARRILLADAS Y LECHONES ASADOS NOTA IMPORTANTE para cocer parailladas y lechones asado siga las siguentes instrucciones Parrilladas ponga una cazuela con un poco de agua Apoye la carne sobre una parrilla lla...

Страница 30: ...e instrucciones Mod BIJOUX Ø 130 Barbacoa Automaticas P1 G2 G1 Fig 4 1 Ajustrar las patas G1 y G2 en la base de la barbacoa 2 Fijarlas con los respectivos tornillos 3 Meter la mesa P1 sobre la travesa de las patas ...

Страница 31: ...den termina con una ultima capa de lasaña cubierta con la salsa bechamel mantequilla y abundante queso parmesano rallado Meter en el horno por 30 minutos a 250 C Antes de servir dejarla reposar por lo menos 10 minutos Tomar la masa de pan y aplanarla con un rodillo ligeramente con harina Ayudando con las manos extender la masa dandole la forma deseada Agregar la pulpa de tomate el oregano dos o tr...

Страница 32: ......

Страница 33: ......

Страница 34: ...und es für vollkommen befunden zu haben ohne sichtbare Mängel und entsprechend dem Kaufvertrag sowie der vom Verkäufer gegebenen Beschreibung Er erklärt außerdem dass das Produkt die Eigenschaften aufweist die vom Hersteller beworben werden und dass er daher das genannte Produkt als zu dem vom Käufer gewünschten Zweck geeignet ansieht Die Garantie erstreckt sich auf den korrekten Betrieb des Ofens...

Страница 35: ......

Страница 36: ... und es für vollkommen befunden zu haben ohne sichtbare Mängel und entsprechend dem Kaufvertrag sowie der vom Verkäufer gegebenen Beschreibung Er erklärt außerdem dass das Produkt die Eigenschaften aufweist die vom Hersteller beworben werden und dass er daher das genannte Produkt als zu dem vom Käufer gewünschten Zweck geeignet ansieht Die Garantie erstreckt sich auf den korrekten Betrieb des Ofen...

Страница 37: ...Clementi srl Zona ind le Berbentina 8 60041 Sassoferrato AN Tel 0039 0732 959862 Fax 0039 0732 959796 www clementi ovens com ...

Страница 38: ...tie wie diese durch ihren Vertragslieferanten geleistet wird entsprechend den Angaben in den Einkaufsbedingungen Sonstige Bauteile wie das Thermometer oder die Zeituhr werden zum Zeitpunkt ihres Einbaus in den Ofen überprüft sowie bei der Endprüfung Das empfindli chere Thermometer darf eine Temperatur von 450 C nicht überschreiten da ab einer solchen Temperatur die Messeigenschaften des Gerätes be...

Страница 39: ......

Страница 40: ...rzo 2005 dal 1975 CLEMENTI s n c di Clementi Clementino C Zona Industriale Berbentina 8 60041 Sassoferrato An Italy Tel 0039 0732 959862 Fax 0039 0732 959796 www clementi ovens com info clementi ovens com ...

Отзывы: