86b_1_5 en bedingt.fm, 24.07.2008
P1886E/EN 2008-07
11
Before initial operation
4
Abb. 4-2
4.5.2
Changing the speed
Abb. 4-3
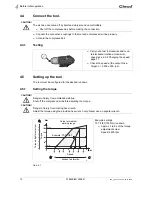
1. Hold the output drive firmly.
2. Carefully push the size 2 hex wrench
through the hole of the pistol grip housing
until it reaches the torque adjustment
screw .
3. Turn the torque adjustment screw and
roughly set the required torque,
see Abb. 4-1 , page 10.
Total number of turns = 6.
4. Pull out the hex wrench.
The hole closes automatically when the
tool starts.
5. Carry out the rundown.
6. Check the shut-off mechanism worked
properly, see 4.5.3 Measuring the torque,
page 12.
7. In case of deviations, correct the torque
setting
8. Repeat the rundown.
Requirement
Measure
Better shut-off accuracy –
particularly for hard joints.
Increase the number of pulses per rundown.
Recommended number of pulses
≥
6.
➔
Reduce the speed
Reducing the noise pressure level
➔
Reduce the speed
Reducing vibration
➔
Reduce the speed
Shortening the rundown time, particularly for
soft joints.
➔
Increase the speed
1. Unscrew the threaded pin using the size 2
hex wrench.
2. To reduce the speed, turn the exhaust air
throttle
clockwise.
3. To increase the speed, turn the exhaust
air throttle counterclockwise.
NOTE
A speed change may be carried out while the compressed air is activated.
After changing the speed, correct the torque if necessary;
see 4.5.1 Setting the torque, page 10.
Torque
Speed


