


Light Base
The ProfCam light base will not reach full luminescence until it has been powered up for at least 90 seconds. It
is a carefully designed piece of delicate electronics and there are no user-serviceable parts inside. Do not attempt
to change the bulbs in the light base! Doing so may expose you and others in the area to harmful chemicals.
The light base is rated for over 10,000 hours of operation and should not need replacement for the life of the
camera.
White Balance
The white balance of a camera is the function that determines what color is "true white". For example, under
some lighting conditions a white piece of paper may appear to have an undesirable yellow or blue tint. In these
cases you may wish to override the camera's automatic settings and set the white balance manually.
The ProfCam's default white balance setting is automatic. If for any reason you
want this changed, press the 'manual' button on the keypad or remote control.
The camera will then 'snap to' the correct settings for what it is viewing at that moment. It will stay at this setting
even if the camera is powered down and turned back on. To return to the "auto" setting, press the auto button.
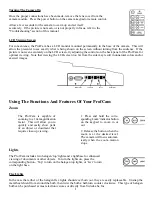
External Video Pass Through
The video pass through button switches between displaying the output from the ProfCam and the output from
another camera connected to the ProfCam. More information on viewing an external source is available in the
‘Using the Optional Ports’ section of the manual.
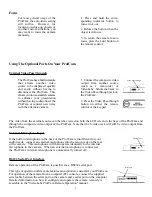
Document Viewing
The ProfCam's camera module can be easily rotated to adapt for different modes
of operation. When viewing a document on the light base, it is convenient to have
the document facing the presenter, as well as appear right-side up for the audience.
To rotate the camera for this type of operation, pull the spring pin on the camera
m o d u l e while sliding the module backwards. Remove the module completely from
the brackets, then rotate it 180º and reinsert.
Remote Control
Operation of the remote control is the same as using the camera's keypad, with one exception - the ability to use
manual focusing rather than just the default auto-focus.
H
ALOGEN LIGHTS GET VERY HOT DURING OPERATION
.
W
AIT FOR BULBS TO COOL BEFORE ATTEMPTING TO
REPLACE THEM
.
S
OME OBJECTS MAY APPEAR TINTED INCORRECTLY IF THE
W
HITE
B
ALANCE IS SET MANUALLY
. I
F THIS
OCCURS
,
RESET THE
W
HITE
B
ALANCE TO
‘
AUTO
.’
spring pin
6