ClearOne ProfCam Скачать руководство пользователя страница 3

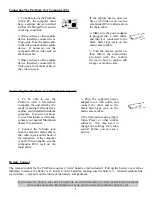
Connection Ports for ProfCam

Connecting The ProfCam To A TV Or VCR

T

HIS SECTION DOES NOT COVER REMOTE OPERATION USING THE CAMERA

S SERIAL PORT INTERFACE

.

F

OR MORE INFORMATION ON HOW TO CONFIGURE AND OPERATE THE CAMERA REMOTELY

,

REFER TO

THE

“V

IDEO

L

ABS

P

ROF

C

AM

R

EMOTE

O

PERATIONS

MANUAL

.

1.  Plug  the  supplied  power
adapter into a wall outlet and
connect the other end into the
black barrel jack on the main
camera cable.

2.  Locate  the  video-in  jacks
located  on  your  T V or  V C R .
Some  units  have  these  jacks
located on the front for conve-
nience.  If not, they will be in
the back.

3. Connect the S-Video jack
from  the  main  cable  to  the
video-in jack on your TV/VCR.
If the TV/VCR is not S-Video
capable,  use  the  composite
(RCA) video jack on the main
cable.

4. If desired, connect the audio
jack to the "audio in" jack on
the back of the TV/VCR.

If your TV/ VCR has stereo
audio capabilities, connect the
audio jack to the right audio in
(normally the red jack).  

5. If using a VCR, set the TV to
the channel normally used to
view VHS video tapes.  Turn
the VCR to the auxiliary chan-
nel, or "line in".  The VCR
power must be turned on.

6.  If  connecting  directly  to  a
T V set,  turn  the  channel  to
a u x i l i a r y or  "line  in".    T h e
p i c t u r e should appear on the
screen.

7. If you do not get a picture,
consult the manual for your TV
or VCR.  Most of the time there
is  a  simple  adjustment  that
needs  to  be  made  that  is
explained in the unit's manual.
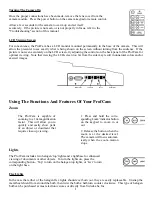
Main cable
connector

Video Pass-
through

External 
mic

External
synch

Serial Port

Brightness

Contrast

Color

Backlight

LCD Screen Controls

3

Содержание ProfCam

Страница 1: ...Control 4 Turning the Camera On 5 LCD Viewing Screen 5 II Using the Functions and Features of Your ProfCam Zoom 5 Lights 5 FlexLights 5 6 Light Base 6 White Balance 6 External Video Pass Through 6 Do...

Страница 2: ...VCR is not capable of receiving a S video signal use the composite video jack on the camera s main cable Red RCA Audio will connect to the audio in jack of a TV Yellow RCA Composite video connects to...

Страница 3: ...is not S Video capable use the composite RCA video jack on the main cable 4 If desired connect the audio jack to the audio in jack on the back of the TV VCR If your TV VCR has stereo audio capabilitie...

Страница 4: ...ack from main cable to the video in jack If the capture device does not have an S Video jack use the composite RCA video jack on the main cable 4 Make sure the power adapter is plugged into a wall out...

Страница 5: ...The Functions And Features Of Your ProfCam Zoom Lights The ProfCam includes two halogen top lights and a lightbase for enhanced viewing of documents or other objects To turn the lights on press the co...

Страница 6: ...he camera is powered down and turned back on To return to the auto setting press the auto button External Video Pass Through The video pass through button switches between displaying the output from t...

Страница 7: ...the serial port on the camera and a serial port on the computer Detailed information on how to configure and operate the camera remotely is available in the VideoLabs ProfCam Remote Operation manual s...

Страница 8: ...r and clean cloth Do not use glass cleaner to clean the LCD screen Any ammonia based products will turn the glass cover foggy and result in unsatisfactory images For best results use a damp cloth or p...

Страница 9: ...e base of the camera or at the rear of the base The camera mic should ideally be positioned behind the speakers being used This will help eliminate feedback Verify the audio out cable from the camera...

Отзывы: