background image

29

Parts & Service: 020 8988 7400 / E-mail: [email protected] or [email protected]

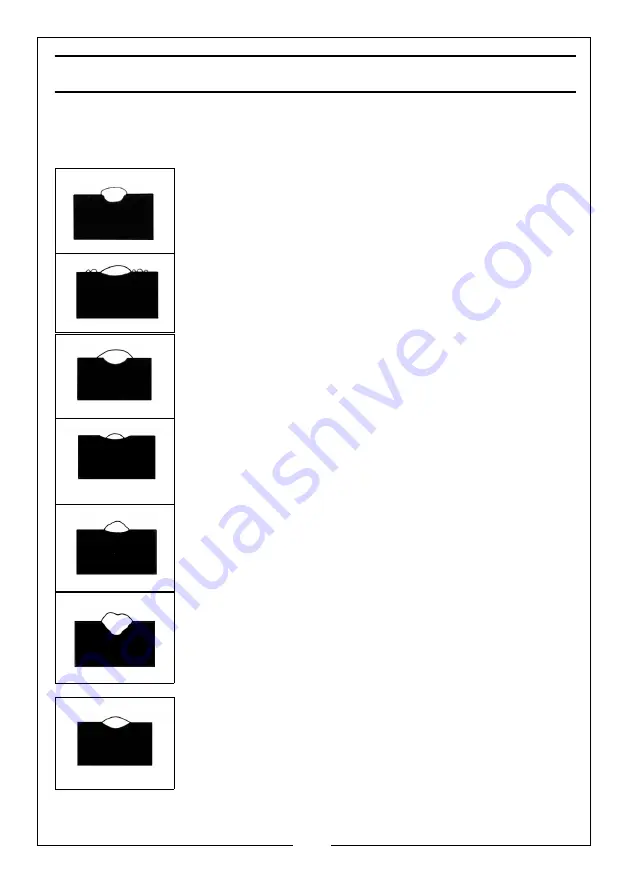
WELDING PITFALLS

The arc welding technique is an acquired skill and requires considerable 
practice before perfect results are obtained. The diagrams below will help to 
explain the pitfalls in your technique and how to overcome them.

ARC TOO SHORT

This causes irregular masses of weld to be deposited, with 
slag contamination on an uneven surface.

ARC TOO LONG

This causes poor penetration resulting in a weak weld with 
excessive spatter and porosity. Surface of the weld is rough 
and the arc makes a hissing sound

ELECTRODE MOVED TOO SLOWLY

This causes a very wide and heavy deposit which overlaps 
at the sides. It is wasteful both in terms of time and electrode 
use.

ELECTRODE MOVED TOO QUICKLY

This causes poor penetration with a ‘stringy’ and incomplete 
weld deposit. Slag is very hard to remove.

CURRENT TOO LOW

This causes poor penetration and causes the electrode to 
stick to the workpiece too readily. Also results in a very 
irregular and high weld deposit. Slag is very hard to remove.

CURRENT TOO HIGH

This causes excessive penetration with spatter and deep 
pointed crater. It may also cause holes to be burned in the 
workpiece. 

Burns electrodes very quickly.

THE PERFECT WELD

With the correct combination of arc length, current 
regulation, inclination and speed of the electrode, you will, 
with practice, produce the perfect weld.

This should be regular with uniform ripples and no slag 
contamination. The arc will make a steady crackling sound.

Содержание 6015601

Страница 1: ...OPERATION MAINTENANCE INSTRUCTIONS ORIGINAL INSTRUCTIONS GC0722 MIG MMA TIG INVERTER WELDER MODEL NO MIG120 MULTI PART NO 6015601...

Страница 2: ...CLARKE dealer immediately SPECIFICATIONS NOTE The details and specifications contained herein are correct at the time of going to print However CLARKE International reserve the right to change specifi...

Страница 3: ...t cool to create the welded joint Because of the versatility and simplicity of MMA welding it requires less skill and is used primarily to weld iron and steel including stainless steel but nickel and...

Страница 4: ...E In effect this means that this product must not be disposed of with general household waste It must be disposed of according to the laws governing Waste Electrical and Electronic Equipment WEEE at a...

Страница 5: ...VENTION Severe discomfort illness or death can result from fumes vapours heat or oxygen enrichment or depletion that welding or cutting may produce Prevent them with adequate ventilation NEVER ventila...

Страница 6: ...istant covers or shields Walls ceilings and floor near work should be protected by heat resistant covers or shields Fire watcher must be standing by with suitable fire extinguishing equipment during a...

Страница 7: ...rate lightweight clothing reflect from light coloured surfaces and burn the skin and eyes Skin burns resemble acute sunburn those from gas shielded arcs are more severe and painful PROTECTIVE CLOTHING...

Страница 8: ...from high currents can affect pacemaker operation Persons wearing pacemakers should consult with their doctor before going near arc welding or spot welding operations PROTECTION AGAINST SHOCK Keep you...

Страница 9: ...of power DO NOT open power circuit or change polarity while welding If in an emergency it must be disconnected guard against shock burns or flash from switch arcing Always shut OFF and disconnect all...

Страница 10: ...the smallest electric shock Stop welding IMMEDIATELY and DO NOT attempt to use the machine until the fault is diagnosed and corrected 9 NEVER allow the earth cable or torch to become wrapped around th...

Страница 11: ...klet carefully before use Do not expose to rain Wear welding mask Recycle unwanted materials under WEEE Directive Wear protective gloves General Hazard Wear a dust mask Warning Magnetic field created...

Страница 12: ...s shown below The old plug must be disposed of safely as insertion into a mains socket could cause an electrical hazard If the colours of the wires in the power cable of this product do not correspond...

Страница 13: ...ted with 1 On off Switch at rear 2 Gas cylinder connecting port at rear 3 Wire thickness selector switch 4 MIG MMA LIFT TIG function selector switch 5 Current selector knob 6 Positive terminal 7 Negat...

Страница 14: ...OL FUNCTIONS 1 Power LED When the power is switched on at the rear of the machine the switch will be illuminated as will the green Power On LED 2 Thermal overload LED If the duty cycle is exceeded as...

Страница 15: ...The clear glass must be fitted first to face the outside 3 Insert the two plastic screws and use the plastic wingnuts to clamp the glass panels to the shield The clear glass panel should be replaced...

Страница 16: ...wn and allowing the side panel to drop down 2 Remove any loose items that have been transported inside 3 Place the lower bottle bracket into position and secure in place using the 2 screws provided 4...

Страница 17: ...n the wire as it will unravel causing feeding problems later The wire will feed off the spool clockwise from the top of the reel The spool must be fitted in the correct orientation otherwise it will n...

Страница 18: ...ding 2 Loosen the tensioning knob and pivot it towards you 3 Lift up the arm 4 Feed the wire through the guide over the drive roller and into the torch liner Push about 10 15 cm into the torch liner 5...

Страница 19: ...elding wire being used Mild steel solid core with gas Flux cored no gas 1 Connect a bottled gas cylinder to the connector at the back of the welder FITTING THE WELDING ROD Select the appropriate weldi...

Страница 20: ...nnect the earth clamp to the negative terminal as shown FLUX WELDING WITH NO GAS If using 0 9mm flux cored wire connect the earth clamp to the positive terminal as shown MMA ELECTRODE WELDING Connect...

Страница 21: ...and fit it into the welding rod holder The following sizes can be used and are available from your CLARKE dealer 4 Attach the work clamp to the workpiece as close as possible to the area being welded...

Страница 22: ...voltage Settings 1 10 using the selector knob 3 With practice you will gain a feel for the correct current setting for different welding rod thicknesses THERMAL OVERLOAD The Thermal Overload shuts off...

Страница 23: ...satisfactory weld One of the problems experienced with novice welders is the welding wire sticking to the contact tip This is as a result of the wire feed speed being too slow It is always better ther...

Страница 24: ...workpiece the angle of the electrode must be maintained at between 20 and 30 NOTE When you prime the arc be sure to withdraw the electrode swiftly to leave the gap otherwise the electrode will weld it...

Страница 25: ...ed is usually added to the leading edge of the weld pool to fill the joint This process is ideally suited for welding thin metals such as car body panels pressure vessels heat exchangers pipes etc whe...

Страница 26: ...bottle tightly and attach the gas hose to the inlet connector securely with a hose clip 4 Turn the pressure regulator knob to set a pressure of approx 2 5kg cm2 35 lbf in2 5 Ensure the electrode at t...

Страница 27: ...ke mark on the surface of the workpiece it is advisable to strike the arc in the joint where the mark will be concealed by the weld Thin sheet and stainless steel may be welded with or without filler...

Страница 28: ...1 45 50 10 15 1 4 5 1 0 1 2 1 0 1 5 140 150 22 23 40 50 15 1 6 0 1 2 1 2 1 5 170 185 24 26 40 50 15 20 Positive 9 0 1 2 1 2 1 5 320 340 32 34 40 50 15 20 Positive Metal thickness mm Wire diameter mm W...

Страница 29: ...heavy deposit which overlaps at the sides It is wasteful both in terms of time and electrode use ELECTRODE MOVED TOO QUICKLY This causes poor penetration with a stringy and incomplete weld deposit Sla...

Страница 30: ...erter printed circuit is defective Contact your nearest CLARKE dealer Wrong output current Current selector control is defective Contact your nearest CLARKE dealer Low power supply voltage Check the m...

Страница 31: ...earth wires to opposite sites of the work piece No response from welder Check fuses and power lead Replace fuses as necessary If problem persists return welder to your local dealer Check fuse size Wel...

Страница 32: ...nsion roller Caution DO NOT over tighten Wire dirty rusty damp or bent Re cut wire and ensure it is clean Liner partially blocked Clean with compressed air Poor quality welds Insufficient gas at weld...

Страница 33: ...he hose for security and damage Wire feed unit The feed roller wire guide plays an important part in achieving consistent results Check the feed roller groove removing any deposits Torch Protect the t...

Страница 34: ...ase panel 2 Cover panel 14 Potentiometer 3 Main PCB 15 LED 4 Insulation board 1 16 3 gear switch 5 Insulation board 2 17 Coupling device 6 Dam board 18 Torch cable gland 10 dia 7 Centre panel 19 Torch...

Страница 35: ...d welding current e g When welding at 140 Amps the machine may be used for 6 minutes 60 in any10 minute period 1 Name address of manufacturer 9 Energy Supply symbol 2 Model Number Part Number 10 Range...

Страница 36: ...mini spool 0 9mm 8132110 Use for no gas welding Mild steel mini 0 6mm 8132100 Use for gas welding Mild steel mini 0 8mm 8132070 Use for gas welding Stainless Steel 0 8mm mini spool 8132090 Welding Ga...

Страница 37: ...chase Please keep your receipt as proof of purchase This guarantee is invalid if the product is found to have been abused or tampered with in any way or not used for the purpose for which it was inten...

Страница 38: ...38 Parts Service 020 8988 7400 E mail Parts clarkeinternational com or Service clarkeinternational com DECLARATION OF CONFORMITY UK...

Страница 39: ...39 Parts Service 020 8988 7400 E mail Parts clarkeinternational com or Service clarkeinternational com DECLARATION OF CONFORMITY CE...

Страница 40: ......

Отзывы: