background image

SETUP 

Document No. CS-BRTD101  


Page 26 of 36 

Revision 2  


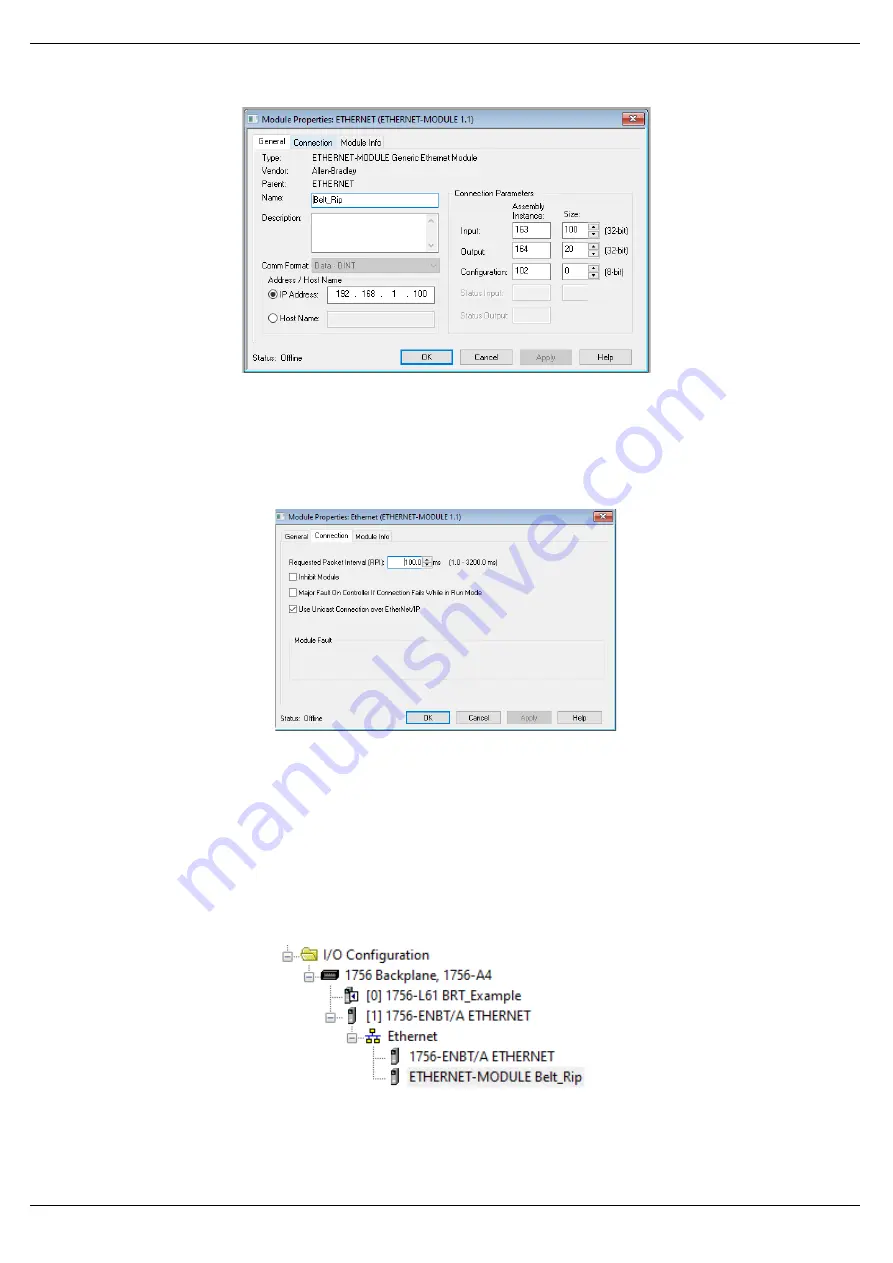
Figure 3.11 - RSLogix 5000 General module properties for Pre-start Warning


Next the user needs to add the connection requested packet interval (RPI). This is the 

rate  at  which  the  input  and  output  assemblies  are  exchanged.  The  recommended 

value is 100ms.  


Figure 3.12 - Connection module properties in RSLogix 5000 

Once the module has been added to the RSLogix 5000 I/O tree the user must assign 

the  User  Defined  Types  (UDTs)  to  the  input  and  output  assemblies.  The  user  can 

import  the  required  UDTs  by  right-clicking  on  User-Defined  sub-folder  in  the  Data 

Types folder of the I/O tree and selecting Import Data Type. The assemblies are then 

assigned  to  the  UDTs  with  a  ladder  copy  instruction  (COP)  as  shown  in  the  figure 

below.  


Figure 3.13 

 RSLogix 5000 I/O module tree 

Содержание CS-BRT20

Страница 1: ...Belt Rip Tear Detector User Manual Document No CS BRTD101 01 2021 Revision 2 ...

Страница 2: ...sor Wiring Via Junction Box Option Preferred 12 2 3 Power 13 2 3 1 DC Input 13 2 3 2 AC Input 14 2 4 IO Connections 15 2 4 1 Digital Inputs 15 2 4 2 Digital Outputs 16 2 4 3 PLC Interface 17 2 5 EtherNet Port 17 2 6 DIP Switches 18 2 6 1 System DIP Switches 18 2 6 2 Mode DIP Switches 19 2 6 3 SW3 DIP SWITCHES 19 3 SETUP 20 3 1 Install Configuration Software 20 3 2 Network Parameters 21 3 3 Logix I...

Страница 3: ... MODBUS TCP MAPPING 29 5 1 1 Holding Registers 29 5 1 1 Monitor Discrete Inputs 31 5 1 1 Control Outputs 31 6 DIAGNOSTICS 32 6 1 LEDs 32 7 TECHNICAL SPECIFICATIONS 34 7 1 Enclosure Details 34 7 2 Electrical 34 7 3 Sensors 35 7 4 Ethernet 35 7 5 Digital Inputs 35 7 6 Relay Outputs 36 ...

Страница 4: ...PREFACE Document No CS BRTD101 Page 4 of 36 Revision 2 Revision History Revision Date Comment 1 0 13 October 2020 First Issue 2 0 23 January 2021 Enclosure details updated ...

Страница 5: ...er Comprehensive internal and component diagnostics are integrated into the unit to ensure ongoing reliable operations These diagnostics include validation of the photoelectric beam functioning as well as an anti sabotage feature which prevents the reset button from being permanently engaged forced The status of the unit can be monitored via communications or alternately via a hardwired output on ...

Страница 6: ...the belt from restarting until it has been reset via the Reset pushbutton Should the Reset button be forced in the ON position for longer than 10 seconds the unit will issue a Fault output The trip output will not be disabled and will still operate under a belt rip condition Figure 1 1 Typical installation positions The units can accommodate both AC and DC power inputs thereby reducing required sp...

Страница 7: ... wiring standard www cisco com c en us td docs video cds cde cde205_220_42 0 installation guide cde205_220_420_hig Connectors html Table 1 1 Additional information 1 4 REFERENCES Resource Link Modbus http www modbus org Table 1 2 References 1 5 SUPPORT Technical support is provided via the Web in the form of user manuals datasheets etc to assist with installation operation and diagnostics For addi...

Страница 8: ...sor enclosures are wired back to the control unit which can be mounted in a more accessible location The control unit houses the primary control unit board and is the primary interface for the operator as well as to the control system hardwired and communications This configuration allows for individual components to be easily replaced should they become damaged Figure 2 1 Receiver and Emitter Enc...

Страница 9: ...0V 220V on request This unit is usually mounted to the side of the conveyor where it is easily accessed and the indications and reset button are accessible The Belt Rip and Tear detector can operate in a standalone mode with Trip and Fault outputs being hardwired directly to a PLC or MCC Alternatively the units are equipped with onboard EtherNet IP and Modbus TCP communications as a standard to al...

Страница 10: ...connected and power up the alignment of the units is confirmed when both the GREEN and YELLOW LED s on the receiver sensor are ON not flashing This indicates that the signal strength is at least twice that required to energize the output If the Green LED is flashing or if the Yellow LED is not on the sensors are not correctly aligned Figure 2 4 Receiver sensor showing sensors are aligned Ideally t...

Страница 11: ... of the Control Unit 2 2 1 DIRECT SENSOR WIRING OPTION The two sensor enclosures can be wired directly to the control unit Typical wiring details for this option are shown in figures below TX RX Control Unit Sensor cabling Figure 2 5 Direct Wiring of Sensors to Control Unit TX RX 24V 24V 0V 0V Gate N O Contact N C not wired Sensor cables 1 2 1 3 2 4 1 3 2 4 PWR 24V 24V 24V 24V 24V 24V 24V DO0 DO1 ...

Страница 12: ...Typical wiring details for this option are shown in figures below TX RX Control Unit CCG Sensor cabling 1 x 4C Control Unit Cable Figure 2 7 Wiring of Sensors to Control Unit via Junction Box 24VDC Gate 0V 24VDC TX RX 24V 24V 0V 0V Gate N O Contact N C not wired 1 2 1 3 2 4 1 3 2 4 PWR 24V 24V 24V 24V 24V 24V 24V DO0 DO1 DO2 C34 DO3 DO4 DI0 DI1 DI2 DI3 COM AI 0V DO0 DO1 DO2 DO3 DO4 DI0 DI1 MODE SY...

Страница 13: ... DI2 DI3 ETH OK STS TRANSFORMER ETHERNET SW 3 J5 J3 J2 1 2 1 3 2 4 1 3 2 4 PWR 24V 24V Live 24V 24V 24V 24V 24V 24V DO0 0V Neut DO1 DO2 C34 DO3 DO4 DI0 DI1 DI2 DI3 COM AI 0V DO0 DO1 DO2 DO3 DO4 DI0 DI1 MODE SYSTEM DI2 DI3 ETH OK STS TRANSFORMER ETHERNET SW 3 J5 J3 J2 Fuse F1 AC POWER DC POWER Figure 2 9 AC DC Power Circuits 2 3 1 DC INPUT A three way power connector is used to connect Power Power ...

Страница 14: ...chnical specifications section in this document Live Earth Neutral Figure 2 11 AC Power Connector The unit is protected from AC supply disturbances by a replaceable 1A fuse as well as a MOV The unit s AC rated supply voltage should be confirmed from the label as a well as by confirming the supply jumper configuration Figure 2 12 AC Power Jumper Configuration NOTE Ensure that the correct voltage is...

Страница 15: ...J2 1 2 1 3 2 4 1 3 2 4 PWR 24V 24V Live 24V 24V 24V 24V 24V 24V DO0 0V Neut DO1 DO2 C34 DO3 DO4 DI0 DI1 DI2 DI3 COM AI 0V DO0 DO1 DO2 DO3 DO4 DI0 DI1 MODE SYSTEM DI2 DI3 ETH OK STS TRANSFORMER ETHERNET SW 3 J5 J3 J2 Fuse F1 DIGITAL INPUTS DIGITAL OUTPUTS Figure 2 13 Input and Output Connection 2 4 1 DIGITAL INPUTS The four digital input channels are optically isolated sharing a common ground A vol...

Страница 16: ...the receiver sensor It indicates that there is a clear path between emitter and receiver sensors DO 1 Output for control of 24V TRIP FAULT LED Red This LED is on when a Trip signal has been received Sensor beam broken the reset button has been retained in the On position or when an internal unit fault has been diagnosed Once triggered it will remain on until the unit is reset locally or via commun...

Страница 17: ... Digital Outputs 3 4 Typical connection is as per Figure 2 16 PLC Interface Wiring PLC 24V PLC Supply PLC Fault Input PLC Trip Input 1 2 1 3 2 4 1 3 2 4 PWR 24V 24V 24V 24V 24V 24V 24V DO0 DO1 DO2 C34 DO3 DO4 DI0 DI1 DI2 DI3 COM AI 0V DO0 DO1 DO2 DO3 DO4 DI0 DI1 MODE SYSTEM DI2 DI3 ETH OK STS CONTROL UNIT Figure 2 16 PLC Interface Wiring 2 5 ETHERNET PORT The Ethernet connector should be wired acc...

Страница 18: ... C34 DO3 DO4 DI0 DI1 DI2 DI3 COM AI 0V DO0 DO1 DO2 DO3 DO4 DI0 DI1 MODE SYSTEM DI2 DI3 ETH OK STS TRANSFORMER ETHERNET SW 3 J5 J3 J2 Figure 2 17 Location of DIP Switches 2 6 1 SYSTEM DIP SWITCHES System DIP Switch Settings DIP Switch Description DIP Switch 1 Used to force the module into Safe Mode When in Safe Mode the module will not load the application firmware and will wait for new firmware to...

Страница 19: ...or Healthy no Fault 1 Contact open for Healthy no Fault Table 2 4 Mode DIP Switch Settings Note 1 Trip condition is triggered and latched for a detected belt rip condition This is used to Trip the conveyor belt Note 2 Fault condition indicates a Reset Forced condition or a unit diagnostic fault Beam sensor fault or unit fault 2 6 3 SW3 DIP SWITCHES DIP Switch Description DIP Switch 1 Used to commo...

Страница 20: ...URATION SOFTWARE All the network setup and configuration of the module is achieved by means of the Circular Configurator device configuration environment This software can be downloaded from http www circularsolutions co za configurator Figure 3 1 Circular Configurator Environment ...

Страница 21: ...parameters IP address subnet mask etc There are several DHCP utilities available however it is recommended that the DHCP server in Circular Configurator be used Within the Circular Configurator environment the DHCP Server can be found under the Tools menu Figure 3 2 Selecting DHCP Server Once opened the DHCP server will listen on all available network adapters for DHCP requests and display their c...

Страница 22: ...w will open Figure 3 4 Assigning IP Address The required IP address can then be either entered or a recently used IP address can be selected by clicking on an item in the Recent List If the Enable Static checkbox is checked then the IP address will be set to static after the IP assignment thereby disabling future DHCP requests Once the IP address window has been accepted the DHCP server will autom...

Страница 23: ...cycled again In addition to the setting the IP address a number of other network parameters can be set during the DHCP process These settings can be viewed and edited in Circular Configurator s Application Settings in the DHCP Server tab Once the DHCP process has been completed the network settings can be set using the Ethernet Port Configuration via the Target Browser The Target Browser can be ac...

Страница 24: ...including the Port Configuration option Figure 3 8 Selecting Port Configuration All the relevant Ethernet port configuration parameters can be modified using the Port Configuration window Figure 3 9 Port Configuration Alternatively these parameters can be modified using Rockwell Automation s RSLinx software ...

Страница 25: ...HERNET MODULE is selected to be added as shown in the figure below NOTE See the next section for importing the configuration L5X Figure 3 10 Add a Generic Ethernet Module in RSLogix 5000 The user must enter the IP address of the Belt Rip and Tear Detector module that has been configured The assembly instance and size must also be added for the input output and configuration in the connection param...

Страница 26: ...igure 3 12 Connection module properties in RSLogix 5000 Once the module has been added to the RSLogix 5000 I O tree the user must assign the User Defined Types UDTs to the input and output assemblies The user can import the required UDTs by right clicking on User Defined sub folder in the Data Types folder of the I O tree and selecting Import Data Type The assemblies are then assigned to the UDTs ...

Страница 27: ...ance STRING The instance name of the module that was configured under the general Belt Rip and Tear module configuration in Circular Configurator Input General Status BOOL Bit 0 Class 1 owned Bit 1 Modbus comms OK Bit 2 Sensor Beam Healthy Bit 3 Trip Bit 4 Fault Bit 5 Beam Test Fail Bit 6 Reset Button Tamper Bit 7 Reset Button Bit 8 Beam Self Test Enabled Mode DIP Switch SINT Status of Mode DIP Sw...

Страница 28: ...L Last On Current consumption of Trip Fault LED mA CurrentDO2On REAL Last On Current consumption of DO2 Emitter Gate mA Beam Unhealthy Counter DINT Beam Unhealthy Fault Counter Trip Counter DINT Trip Counter Fault Counter DINT Fault Current Fault Counter Reset Counter DINT Reset Button Counter Beam Self Test Counter DINT Beam Self Test Counter ResetStatsCommand Readback DINT Echo of Output Assembl...

Страница 29: ...ResetButton Bit 8 Beam Self Test Enabled 0 INT BOOL BOOL BOOL BOOL BOOL BOOL BOOL BOOL BOOL 1 0 0 0 0 0 0 0 0 0 Reset button forced Reserved 1 INT 1 Reserved for future use Mode DIP Switch 2 INT 1 Status of Mode DIP Switches System DIP Switch Boot 3 INT 1 Status of System DIP Switches at power up System DIP Switch Current 4 INT 1 Status of System DIP Switches Firmware Major Rev 5 INT 1 Major Firmw...

Страница 30: ...0On 21 INT 1 Last On Current consumption of DO0 CurrentDO1On 22 INT 1 Last On Current consumption of DO1 CurrentDO2On 23 INT 1 Last On Current consumption of DO2 Beam Unhealthy Counter 24 INT 1 Beam Unhealthy Counter Trip Counter 25 INT 1 Trip Counter Fault Counter 26 INT 1 Fault Counter Reset Counter 27 INT 1 Reset Counter Beam Self Test Counter 28 INT 1 Beam Self Test Counter ResetStatsCommand R...

Страница 31: ...r BOOL 1 DI 7 General Status Bit 7 Reset Button BOOL 1 DI 8 General Status Bit 7 Beam Self Test Enabled BOOL 1 DI 16 DI Status DI0 BOOL 1 DI 17 DI Status DI1 BOOL 1 DI 18 DI Status DI2 BOOL 1 DI 19 DI Status DI3 BOOL 1 DI 24 DO Status DO0 BOOL 1 DI 25 DO Status DO1 BOOL 1 DI 26 DO Status DO2 BOOL 1 DI 27 DO Status DO3 BOOL 1 DI 28 DO Status DO4 BOOL 1 Table 5 2 Modbus TCP Discrete Inputs 5 1 1 CON...

Страница 32: ...I0 DI1 DI2 DI3 COM AI 0V DO0 DO1 DO2 DO3 DO4 DI0 DI1 MODE SYSTEM DI2 DI3 ETH OK STS TRANSFORMER ETHERNET SW 3 J5 J3 J2 Figure 6 1 Module Diagnostic LEDs LED Description Colour Description PWR Green Indicates that the unit is powered either from the 24VDC supply or alternately from the 110 220V AC supply DO0 Green Digital Output used to power Sensor Healthy LED LED is Green when output is on DO1 Gr...

Страница 33: ...Green The Ethernet LED will light up when an Ethernet link has been detected by plugging in a connected Ethernet cable The LED will flash every time traffic was detected OK Green Red The module LED will provide information regarding the system level operation of the module If the LED is red then the module is not operating correctly For example if the module application firmware has been corrupted...

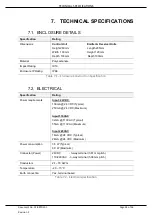
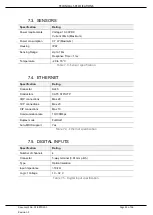
Страница 34: ...ating IP66 Table 7 1 Enclosure Construction Specification 7 2 ELECTRICAL Specification Rating Power requirements Input 24V DC 130mA 24 VDC Typical 250mA 24 VDC Maximum Input 110VAC 32mA 110VAC Typical 55mA 110VAC Maximum Input 220VAC 16mA 24 VDC Typical 28mA 24 VDC Maximum Power consumption 3 5 W Typical 6 0 W Maximum Connector Power 24VDC 3 way terminal 3 81 mm pitch 110 220VAC 3 way terminal 5 0...

Страница 35: ... 7 3 Sensor specification 7 4 ETHERNET Specification Rating Connector RJ45 Conductors CAT5 STP UTP ARP connections Max 20 TCP connections Max 20 CIP connections Max 10 Communication rate 10 100Mbps Duplex mode Full Half Auto MDIX support Yes Table 7 4 Ethernet specification 7 5 DIGITAL INPUTS Specification Rating Number of channels 4 Connector 5 way terminal 3 81 mm pitch Type Optical Isolation In...

Страница 36: ...ge 36 of 36 Revision 2 7 6 RELAY OUTPUTS Specification Rating Number of channels 5 Connector terminal 3 81 mm pitch Type Solid State Normally Open Single Pole Load Current 400 mA maximum Load Voltage 60 Vdc maximum Table 7 6 Relay Output specification ...

Отзывы: