background image

100  Getting Connected


Beam information using Bluetooth

You can beam information, such as contacts, calendar items, and 

tasks, as well as files from your device to your computer or to another 

Bluetooth-enabled device.

Note


If your computer does not have built-in Bluetooth capability, you need to 

connect and use a Bluetooth adapter or dongle on your computer.

To beam information from your device to a computer

1. 

Turn on Bluetooth on your device, and make your device 

discoverable. For information about this, see “To turn Bluetooth 

on and make your device discoverable”.

2. 

You also need to set Bluetooth on your computer to discoverable 

mode. Do one of the following:

  If your computer has Windows XP SP2 and your computer’s 

built-in or external Bluetooth adapter is supported by Windows 

XP SP2, open 

Bluetooth Devices

 from the Control Panel. 

Click the 

Options

 tab, then select the 

Turn discovery on

 and 

the 

Allow Bluetooth devices to connect to this computer


options.

  If the Bluetooth adapter on your computer was installed 

using a third-party provided driver, open the Bluetooth 

software that came with the Bluetooth adapter. This software 

varies by manufacturer, but in most cases, you will find a 

Содержание 8500

Страница 1: ... User Manual Cingular 8500 8525 Handheld with Windows Mobile C I N G U L A R M A K E S B U S I N E S S R U N B E T T E R ...

Страница 2: ...ecording feature of your Pocket PC Phone TRADEMARK INFORMATION Microsoft MS DOS Windows Windows NT Windows Server Windows Mobile ActiveSync Excel Internet Explorer MSN Outlook PowerPoint and Word are either registered trademarks or trademarks of Microsoft Corporation in the United States and or other countries Important Health Information and Safety Precautions When using this product the safety p...

Страница 3: ...dinances SAFETY PRECAUTIONS FOR POWER SUPPLY UNIT Use the correct external power source A product should be operated only from the type of power source indicated on the electrical ratings label If you are not sure of the type of power source required consult your authorized service provider or local power company For a product that operates from battery power or other sources refer to the operatin...

Страница 4: ...se a risk to the vehicle SAFETY PRECAUTIONS FOR ACOUSTIC PRESSURE CAUTION Using earphones or headphones and prolonged listening at high volume levels may cause permanent hearing loss NOTE For France mobile headphones or earphones manufactured by Merry model number EMC220 for this device have been tested to comply with the Sound Pressure Level requirement laid down in NF EN 50332 1 2000 standard as...

Страница 5: ... and are reminded of the need to observe restrictions on the use of radio equipment in fuel depots chemical plants or where blasting operations are in progress Areas with a potentially explosive atmosphere are often but not always clearly marked These include fueling areas below deck on boats fuel or chemical transfer or storage facilities and areas where the air contains chemicals or particles su...

Страница 6: ...uding but limited to amplifiers that produce heat Avoid wet areas Never use the product in a wet location Avoid pushing objects into product Never push objects of any kind into cabinet slots or other openings in the product Slots and openings are provided for ventilation These openings must not be blocked or covered Mounting Accessories Do not use the product on an unstable table cart stand tripod ...

Страница 7: ...lume before using headphones or other audio devices Cleaning Unplug the product from the wall outlet before cleaning Do not use liquid cleaners or aerosol cleaners Use a damp cloth for cleaning but NEVER use water to clean the LCD screen ...

Страница 8: ...ing the Programs 26 1 6 Device Settings 29 Chapter 2 Entering and Searching for Information 33 2 1 Using the Sliding Keyboard 34 2 2 Input Methods 35 2 3 Using the On screen Keyboard 36 2 4 Using Letter Recognizer 36 2 5 Using Block Recognizer 37 2 6 Using Transcriber 37 2 7 Using Symbol Pad 39 2 8 Using Notes to Draw Write and Record Voice Notes 40 2 9 Searching for Information 40 ...

Страница 9: ...d Setting Up E mail Security 55 4 1 Setting Up ActiveSync 56 4 2 Synchronizing Information 60 4 3 Synchronizing via Infrared and Bluetooth 64 4 4 Synchronizing Music Video and Pictures 65 4 5 Setting Up E mail Security 66 Chapter 5 Managing Your Pocket PC Phone 69 5 1 Personalizing Your Pocket PC Phone 70 5 2 Adding and Removing Programs 77 5 3 Managing Memory 79 5 4 Backing Up Files 80 5 5 Protec...

Страница 10: ...dem 109 6 7 Using Terminal Services Client 114 Chapter 7 Mail and Messaging 117 7 1 E mail and Text Messages 118 7 2 Set up Xpress Mail 128 7 3 MMS Messages 134 7 4 Pocket MSN 140 7 5 Calendar 141 7 6 Contacts 143 7 7 Tasks 148 7 8 Notes 149 Chapter 8 Experiencing Multimedia 153 8 1 Using Camera Cingular 8525 only 154 8 2 Using Pictures Videos 168 8 3 Using Windows Media Player Mobile 173 ...

Страница 11: ...e 180 9 3 Viewing Slide Shows with PowerPoint Mobile 181 9 4 Using ClearVue PDF 182 9 5 Using MIDlet Manager 183 9 6 Using ZIP 187 9 7 Using Voice Speed Dial 189 Appendix 193 A 1 Regulatory Notices 194 A 2 PC Requirement to Run ActiveSync 4 x 200 A 3 Specifications 201 Index 205 ...

Страница 12: ...12 ...

Страница 13: ...Chapter 1 Getting Started 1 1 Getting to Know Your Device and Its Accessories 1 2 About the SIM Card and Battery 1 3 Starting Up 1 4 The Today Screen 1 5 Using the Programs 1 6 Device Settings ...

Страница 14: ...14 Getting Started 1 1 Getting to Know Your Device and Its Accessories 2 5 3 4 1 7 9 8 6 10 11 12 14 15 16 13 17 ...

Страница 15: ...g applications scroll up or down to navigate through menus program instructions press the trackwheel to carry out selection During a call or playing music scroll up or down to adjust the sound volume When receiving an incoming call scroll down to silence the audio notification 7 OK Button Press to confirm your data entries or to exit the program in use On the Today screen press to open the Start m...

Страница 16: ...ontrol Enter Press this multi directional control up down left or right to move through menus and program instructions carry out the selection by pressing the center button 16 End Button Press to end a call or to return to the Today screen 17 OK Button Press to confirm your data entries or to exit the program in use ...

Страница 17: ...Getting Started 17 18 19 20 21 22 23 24 25 26 31 30 28 32 27 29 ...

Страница 18: ...mporarily This switches your device to sleep mode To turn it off completely press and hold for about 5 seconds You can still receive calls and messages even when your device is in sleep mode When you turn off the device completely all functions including the phone will be unavailable for use 24 COMM MANAGER button Press to launch Comm Manager Comm Manager lets you manage phone features and data co...

Страница 19: ...our device 32 Microphone Speak into the microphone when receiving or making a phone call or creating a voice recording Accessories 2 1 3 5 4 No Accessory Function 1 AC adapter Recharge the battery 2 USB Sync cable Connects your device to a PC and synchronizes data 3 Stereo headset Provides a volume control slider and a Send End button Press the Send End button to pick up a call or put a call on ho...

Страница 20: ...ries and accessories Battery performance depends on many factors including your wireless service provider s network configuration signal strength the temperature of the environment in which you operate your device the features and or settings you select and use items attached to connecting ports and your voice data and other program usage patterns Battery life estimates approximations Standby time...

Страница 21: ...using your device it is recommended that you install and charge the battery Some batteries perform best after several full charge discharge cycles You can charge the battery in two ways Connecting your device directly to the AC adapter Connecting your device to a PC via the provided USB Sync cable Low battery When the low battery warning appears do the following Immediately save your current data ...

Страница 22: ...ton turns off your device temporarily and switches it to sleep mode You will still be able to receive messages and calls while your device is in sleep mode Calibrate the device Calibrating the device screen involves tapping the center of a cross with the stylus as the cross moves around the screen This process ensures that when you tap the screen with your stylus the tapped item is activated If yo...

Страница 23: ...ams while Landscape mode may be optimal for viewing lengthy files Portrait mode Landscape mode To change the orientation tap Start Settings System tab Screen and select the orientation you want To smooth the edges of screen fonts for many programs on the ClearType tab select the Enable ClearType check box To increase the readability or to see more content on the screen on the Text Size tab adjust ...

Страница 24: ...al strength Tap to configure the phone settings 4 Tap to adjust device ringer volume 5 Displays the current time Tap to check the current date and upcoming appointments 6 Displays the current date and time Tap to set up date time alarm and more 7 Tap to set owner information 8 Your day at a glance with reminders Tap to open the related program tasks messages and appointments 9 Tap to lock or unloc...

Страница 25: ...ice call in progress Wi Fi function enabled but device not connected to a wireless network Calls are forwarded Wireless network s detected Call on hold Connected to wireless network Missed call Synchronizing via Wi Fi Maximum signal strength Ringer in vibration mode No signal Sound on Phone is turned off Sound off No phone service Alarm Searching for phone service No SIM card inserted 3G UMTS netw...

Страница 26: ...d program 4 Tap to view and select more programs that are installed on your device 5 Tap to change device settings 6 Tap to see a Help topic for the current screen 1 4 5 2 3 6 1 5 Using the Programs The following are some of the programs that are already installed on your device Icon Description ActiveSync Synchronizes information between your device and a PC or the Exchange Server Calculator Perf...

Страница 27: ...and PIM data with a valid account Help See Help topics for the current screen or application Internet Explorer Browse Web and WAP sites as well as download new programs and files from the Internet Messaging Send and receive e mail MMS and text messages MIDlet Manager Download and install Java applications such as games and tools on your device Notes Create handwritten or typed notes drawings and r...

Страница 28: ...l Kit Service Access information and other services offered by Cingular Wireless Tasks Keep track of your tasks and sync them back to your Task list on your desktop PC Terminal Services Client Log on to a PC running Terminal Services or Remote Desktop and use all of the programs available on that PC from your mobile device Voice Speed Dial Record voice tags so that you can dial a phone number or l...

Страница 29: ... a password for your device Menus Sets what programs will appear in the Start menu Owner Information Enter your personal information on your device Phone Customize phone settings such as ring tone set a PIN number for your SIM card and more Sounds and Notifications Enables sounds for events notifications and more and allows you to set the type of notification for different events Today Customize t...

Страница 30: ...a program error occurs technical data about the state of the program and your computer will be logged in a text file and delivered to Microsoft s technical support if you choose to send it Key Lock Locks the buttons on your device except for the Power button when the device is in sleep mode This ensures you will not switch the device on by accident and consume unnecessary power Memory Shows the de...

Страница 31: ...local network CSD Line Type Sets the line type to use when making a circuit switch data CSD connection Normally you do not need to change the setting unless you encounter a problem on establishing a connection GPRS Setting Sets the GPRS authentication method Consult your wireless service provider first before changing this setting Network Cards Allows your device to scan for available wireless net...

Страница 32: ...32 Getting Started ...

Страница 33: ...ing the Sliding Keyboard 2 2 Input Methods 2 3 Using the On screen Keyboard 2 4 Using Letter Recognizer 2 5 Using Block Recognizer 2 6 Using Transcriber 2 7 Using Symbol Pad 2 8 Using Notes to Draw Write and Record Voice Notes 2 9 Searching for Information ...

Страница 34: ...board You can do the following with the QWERTY keyboard To type lowercase letters press the keys using your thumbs or fingers To use all uppercase letters press first then press To change back to all lowercase letters press these buttons again To use a single uppercase letter press and then press the corresponding key To enter a number or symbol labeled in blue color press and then press the corresp...

Страница 35: ... Input Methods When you start a program or select a field that requires text or numbers the Input Panel automatically becomes available The Input Panel provides access to the various input methods available on your device including Block Recognizer Keyboard Letter Recognizer Symbol Pad and Transcriber By default the Input Panel icon appears on the menu bar to indicate which input method is current...

Страница 36: ...put Selector arrow and tap Keyboard 2 Enter text by tapping keys on the on screen Keyboard To enlarge the on screen Keyboard 1 Tap the Input Selector arrow then tap Options 2 In the Input method list select Keyboard 3 Tap Large keys 2 4 Using Letter Recognizer With Letter Recognizer you can write individual letters numbers and punctuation which are then converted into typed text To use Letter Reco...

Страница 37: ...m a program tap the Input Selector arrow and tap Block Recognizer 2 Write characters numbers and symbols in the designated writing area Enter letters by writing in the abc left area of the box Enter numbers by writing in the 123 right area of the box Enter symbols and punctuation by tapping in either area of the box and then writing the desired character Note Block Recognizer is available when tex...

Страница 38: ...omes with an on screen keyboard that provides an easy way to add punctuation or a special symbol to existing text From a program tap on the Transcriber toolbar The keyboard remains visible until you tap the button again Tips To reposition the keyboard tap and hold the title bar then drag to the desired location When no text is selected you can also open the keyboard by doing the gesture For more i...

Страница 39: ... RIGHT to navigate through the available symbols on screen then press Enter to select a symbol Tap to close the Symbol Pad without selecting any symbol Symbol Pad icon This indicates the current page and the total number of symbol pages To open the Symbol Pad and select a symbol 1 Create or open a document such as a Word document 2 To open the Symbol Pad Tap the Input Selector arrow then tap Symbo...

Страница 40: ...words located in the item For example you can search in e mail messages notes appointments contacts and tasks as well as in online Help To search for a file or an item 1 Tap Start Programs Search 2 In the Search for field you can Enter the file name word or other information you want to search for Tap the down arrow icon and from the list select one item that you have looked for before 3 In the Type ...

Страница 41: ...Chapter 3 Using Phone Features 3 1 Using the Phone 3 2 Making a Call 3 3 Receiving a Call 3 4 Smart Dialing 3 5 In call Options 3 6 Additional Dialing Information 3 7 Setting Up SIM Access Profile SAP ...

Страница 42: ...N Most SIM cards are preset with a PIN personal identification number that is provided by Cingular Wireless You may need to enter the PIN whenever you use your device 1 Enter the preset PIN assigned by Cingular Wireless 2 Tap Enter Note If your PIN is entered incorrectly three times the SIM card will be blocked If this happens you can unblock it with the PUK PIN Unblocking Key obtained from Cingul...

Страница 43: ...i Fi disabled Adjust the device volume 1 Tap the Speaker icon 2 Under Volume do the following Adjust the phone volume or device volume by moving the slider to the desired volume level Tap On Vibrate or Off to change both the system and ringer volume settings Volume adjustment Notes To adjust the conversation phone volume you must do it during a call Adjusting the volume at another time will affect...

Страница 44: ...w to erase each subsequent digit of a number To erase the entire number tap and hold the Back arrow Make a call from Contacts Tap Start Contacts then do one of the following Press Navigation Control up or down to select a contact and press Talk twice once to send the number to the Phone keypad and once to dial the number Tap the desired contact in the contacts list and tap the phone number that yo...

Страница 45: ... phone number and tap Call Make a call from Speed Dial Use Speed Dial to call frequently used numbers with a single tap For example if you assign a contact to the location 2 in Speed Dial you can simply tap and hold on the Phone screen to dial the contact s number Before you can create a Speed Dial entry the number must already exist in Contacts To create a Speed Dial entry 1 On the Phone screen t...

Страница 46: ...tries to Contacts on your device and make a call from your SIM card To call a SIM contact 1 Tap Start Programs SIM Manager Wait for your SIM card contents to load 2 Tap and hold the name or phone number of the person you want to call and tap Call 3 3 Receiving a Call When you receive a phone call a message will appear giving you the option to either answer or ignore the incoming call To answer or ...

Страница 47: ...correspond to the phone number or contact you want to call Alternatively you can use the sliding keyboard to input When you start entering a number or letter the Smart Dialing panel will appear automatically on the Phone screen You can change the panel size according to your need by tapping the arrow icon Portrait view with minimized Smart Dialing panel Landscape view with expanded Smart Dialing p...

Страница 48: ...can just enter the first letter of a contact s first name or surname Smart Dialing will search for the letter starting from the first character of a contact name as well as from the character that appears after a space dash or underscore in a contact name For example if you tap number 2 which is associated with a b c on the Phone keypad contact names such as the following will be considered matche...

Страница 49: ...e highlighted item will scroll one page when you tap the arrows 4 Do one of the following When the correct contact is selected tap Talk or press the Talk button to make a call To call a different phone number associated with the selected contact tap and hold the selected contact and tap the phone number you want to call Tap and hold the contact to pop up the shortcut menu To send an SMS or text me...

Страница 50: ... displayed when the contact is selected in the matching list Select the Enable drag scroll check box to scroll in the matched list by dragging Select the Enable double click for dialing check box to make a call by double clicking the item in the matched list Select the Expand panel when using hardware keyboard check box to automatically expand the Smart Dialing panel when you are using the sliding...

Страница 51: ...e call 1 Either put a call on hold and dial a second number or accept a second incoming call when you already have one in progress 2 Tap Conference Note Not all service providers support conference calling Contact your service provider for details To turn on and off the Speakerphone The built in Speakerphone on your device allows you to talk hands free or lets other people listen to the conversati...

Страница 52: ...Make an emergency call Enter the international emergency number for your locale and tap Talk Tip Additional emergency numbers may be included in your SIM card Contact your service provider for details Make an international call 1 Tap and hold on the Phone keypad until the sign appears The replaces the international prefix of the country that you are calling 2 Enter the full phone number you want to...

Страница 53: ... kit phone search for Bluetooth devices Consult your car kit phone s manual to learn how to do this Your device should show up on the car kit phone screen 5 If this is the first time you are connecting the car kit with the device you will be required to enter a passkey displayed on the car kit LCD into your device Enter the passkey in your device 6 A pop up message should appear saying that a conn...

Страница 54: ...54 Using Phone Features ...

Страница 55: ...ing Information and Setting Up E mail Security 4 1 Setting Up ActiveSync 4 2 Synchronizing Information 4 3 Synchronizing via Infrared and Bluetooth 4 4 Synchronizing Music Video and Pictures 4 5 Setting Up E mail Security ...

Страница 56: ...ynchronizing Select which types of information are synchronized and specify how much information is synchronized For example you can choose how many weeks of past Calendar appointments to synchronize Add and remove programs on your device For details see Chapter 5 Adding and Removing Programs To install and set up ActiveSync on the computer 1 Install ActiveSync on your PC as described in the Getti...

Страница 57: ...r name and password and the domain name If you do not know the Exchange server address and the domain name check with your network administrator or do the following to find them in your computer In Outlook click Tools E mail Accounts Select View or change existing e mail accounts Double click Microsoft Exchange Server On the Exchange Server Settings screen you will see the Exchange Server name Sync...

Страница 58: ...l then see the domain name 6 On your device you also need to enter the Exchange server settings For information about this see Synchronizing directly with Exchange Server 7 On the Synchronization Setup Wizard click Next 8 Select the information types to synchronize between your device and computer 58 Synchronizing Information and Setting Up E mail Security ...

Страница 59: ...ese items cannot be synchronized to both Select the check boxes of the other information types if you want to synchronize them with your computer Information types on the PC and Exchange Server 9 Click Next 10 Click Finish When you finish the wizard ActiveSync synchronizes your device automatically Once synchronization completes you can disconnect your device from your PC Synchronizing Information...

Страница 60: ...nize without connecting to the PC over a cellular network 2 In ActiveSync tap Sync To end synchronization before it completes tap Stop Synchronize Outlook information with the computer If you have set up a synchronization relationship between your device and the PC synchronization keeps Outlook information up to date on both your device and PC You can also set up your device to synchronize with mo...

Страница 61: ...ct it from your PC 1 In ActiveSync on your device tap Menu Options 2 Do one or both of the following Select the check box for any items you want to synchronize If you cannot select a check box you might have to clear the check box for the same information type elsewhere in the list Clear the check box for any items you want to stop synchronizing To stop synchronizing with one PC completely tap the...

Страница 62: ... To change available synchronization settings select the type of information and tap Settings 6 Tap Finish Schedule synchronization with Exchange Server You can schedule information to be synchronized automatically between your device and the Exchange Server or schedule synchronization at regular time intervals Choose between these two methods depending on your e mail volume and which method you t...

Страница 63: ...n tap the Microsoft Direct Push button The button will turn to which indicates that you will receive e mail as they arrive When the button is in the state you need to manually retrieve your e mail Using ActiveSync to Enable Direct Push 1 In ActiveSync on your device tap Menu Schedule 2 Select As items arrive in the Peak times and Off peak times boxes Note When both the GPRS EDGE UMTS HSDPA and Wi ...

Страница 64: ...fferent requirements To synchronize with a computer via infrared 1 Follow the instructions in ActiveSync Help on the computer for setting up your computer to receive infrared beams 2 Line up the infrared IR ports of your device and your computer so that they are unobstructed and within close range 3 On your device tap Start Programs ActiveSync 4 Tap Menu Connect via IR To synchronize with a comput...

Страница 65: ...s Media Player Before media can be synchronized you must do the following Install Windows Media Player Version 10 on the PC Windows Media Player 10 works only in Windows XP or later versions Connect your device to the PC with a USB cable If your device is currently connected using Bluetooth or infrared you must end that connection before media can be synchronized Insert a Micro SD card into your d...

Страница 66: ...ws Media Player in Chapter 8 4 5 Setting Up E mail Security Windows Mobile on your device protects your Outlook e mail through Secure Multipurpose Internet Mail Extension S MIME which allows you to digitally sign your messages as well as encrypt them Using authorization keys and certificates S MIME allows you to digitally sign your e mail messages to prove your identity to the recipients Authoriza...

Страница 67: ...these options are unavailable Digitally sign and encrypt all messages ActiveSync allows you to set up S MIME e mail encryption and signing You must obtain a valid certificate to sign and encrypt e mail messages successfully 1 Tap Start Programs ActiveSync 2 Tap Menu Options 3 Select the E mail information type and tap Settings On the E mail Sync Options screen tap Advanced 4 Do one or both of the ...

Страница 68: ...ox 5 Tap Choose Certificate to select a certificate for signing or encrypting outgoing e mail messages You can select certificates to sign or encrypt e mail messages individually if you do not choose to sign or encrypt all outgoing e mail For information about signing and encrypting individual messages see Individually sign and encrypt a message in Chapter 7 68 Synchronizing Information and Setting U...

Страница 69: ...anaging Your Pocket PC Phone 5 1 Personalizing Your Pocket PC Phone 5 2 Adding and Removing Programs 5 3 Managing Memory 5 4 Backing Up Files 5 5 Protecting Your Pocket PC Phone 5 6 Resetting Your Pocket PC Phone ...

Страница 70: ... the item and tap Move Up or Move Down To add a custom background image You can use one of your own pictures as the background image on the Today screen Be aware that pictures can affect the readability of text on the Today screen 1 Tap Start Settings Personal tab Today 2 Select the Use this picture as the background check box and tap Browse to view a list of your picture files 3 Tap the file name o...

Страница 71: ...the Category list select whether to display only tasks assigned to a specific category or to display all tasks Customize the Start menu You can choose which items appear in the Start menu 1 Tap Start Settings Personal tab Menus 2 Select the check boxes of the items you want to appear in the Start menu You can select up to seven items Tip You can also create folders and shortcuts to appear on the S...

Страница 72: ...the time and date 1 Tap Start Settings System tab Clock Alarms Time tab 2 Select the correct time zone and change the date or time Note During synchronization the time on your device is updated with the time on your PC To set an alarm 1 Tap Start Settings System tab Clock Alarms Alarms tab 2 Tap Description and enter a name for the alarm 3 Tap the day of the week for the alarm You can select multi...

Страница 73: ... be available on the other tabs 4 To customize settings further tap the appropriate tabs and select the desired options Personal and system settings To reassign programs or shortcuts to program buttons Your device may come with programs already assigned to hardware buttons You can customize these buttons to open the programs you use most or to perform certain shortcuts such as changing the screen ...

Страница 74: ...ve battery power To adjust the speed for scrolling Pressing and holding Navigation Control up or down scrolls through the items in a list Follow these steps to set the scrolling speed 1 Tap Start Settings Personal tab Buttons Up Down Control tab 2 Do one of the following Under Delay before first repeat move the slider to shorten or lengthen the time that elapses before scrolling begins To change t...

Страница 75: ...r left to decrease the brightness To set the backlight to dim after a time delay 1 Tap in the title bar of the Today screen 2 On the Power settings screen tap the Menu Backlight 3 Tap the Battery power tab or the External power tab 4 Select the Turn off backlight if device is not used for check box and specify the time delay Phone settings You can customize phone settings such as the ring type and...

Страница 76: ... tasks that rely on tones from your phone such as accessing messages from an answering machine If set to Short tones the tone is heard only for one or two seconds If set to Off no tone will be heard 1 From the Phone keypad tap Menu Options Phone tab 2 In the Keypad list tap the option you want Phone services Phone Services such as Call Waiting enable you to choose how to handle all incoming calls ...

Страница 77: ...me of your device the version of Windows Mobile software running on it and the type of processor This information will help you select a program that is compatible with your device For more information see To get detailed device information and To find the operating system version number in this chapter Programs available for purchase usually include a Setup program commonly named setup exe that y...

Страница 78: ...ror message stating that the program is valid but that it is designed for a different type of computer You will need to copy this program to your device If you cannot find any installation instructions for the program use ActiveSync to copy the program file to the Program Files folder on your device To remove programs You can only remove programs that you installed Programs that come with your dev...

Страница 79: ...iously inserted more than one storage card tap the list box and then the storage card whose information you want to see To free up program memory Try the following to free memory on your device Close programs you are not currently using Move e mail attachments to a storage card Move files to a storage card Tap Start Programs File Explorer Tap and hold the file and tap Cut Browse to the storage card ...

Страница 80: ...xpansion slot for inserting a Mini SD card Using ActiveSync you can copy or move information from the PC to your device and vice versa Copying a file results in separate versions of a file on your device and PC Because the files are not synchronized changes made to one file will not affect the other Note If you want to automatically update information on both your device and PC synchronize the inf...

Страница 81: ...file from your PC to your device On your PC navigate to the folder that contains the file you want to copy Right click the file then click Copy Right click the destination folder under Mobile Device then click Paste To automatically save files on a storage card In the Word Mobile Excel Mobile and Notes programs you may find it helpful to save all new documents notes and workbooks directly on a stora...

Страница 82: ...en phone is used 3 To change the PIN at any time tap Change PIN Tip Emergency calls can be placed at any time without requiring a PIN To protect your device with a password 1 Tap Start Settings Personal tab Lock 2 Select the Prompt if device unused for check box and in the box to the right select how long your device must be turned off before a password is required In the Password type box select ...

Страница 83: ...does not allow others to guess your password The hint will be displayed after the wrong password is entered four times 4 Tap OK To display owner information on the my info screen Having your contact information displayed on the my info screen on startup allows for easy identification of the device in case it is lost 1 Tap Start Settings Personal tab Owner Information 2 On the Options tab select th...

Страница 84: ...ng unsaved work will be lost You can also perform a hard reset also known as a full reset A hard reset should be performed only if a normal reset does not solve a system problem After a hard reset the device is restored to its default settings the way it was when you first purchased it and turned it on Any programs you installed data you entered and settings you customized on your device will be l...

Страница 85: ...t Key and at the same time use the stylus to press the Reset button at the bottom of your device Left Soft Key Right Soft Key Warning Your device will be set back to factory default settings Please ensure any additional installed programs and or user data have been backed up before a hard reset is performed ...

Страница 86: ...86 Managing Your Pocket PC Phone ...

Страница 87: ...apter 6 Getting Connected 6 1 Connecting to the Internet 6 2 Internet Explorer Mobile 6 3 Using Comm Manager 6 4 Using Bluetooth 6 5 Using Wi Fi 6 6 Using Wireless Modem 6 7 Using Terminal Services Client ...

Страница 88: ...ettings My ISP Internet Service Provider and My Work Network The My ISP settings are used to connect to the Internet while My Work Network settings can be used to connect to any private corporate network To set up a data connection to the Internet GPRS EDGE UMTS HSDPA is a data service that allows information to be sent and received across the wireless network You can use GPRS EDGE UMTS HSDPA to c...

Страница 89: ...ame for the connection 4 In the Select a modem list select Cellular Line GPRS 3G then tap Next 5 Enter the Access point name then tap Next 6 Enter the user name and password only if required 7 Tap Finish Notes To view help information for any screen tap the help icon ...

Страница 90: ...ns 2 Under My ISP tap Add a new modem connection 3 On the Make New Connection screen enter a name for the connection 4 In the Select a modem list select Cellular Line then tap Next 5 Enter the ISP server phone number then tap Next 6 Enter your user name password and any other information required by your ISP 7 Tap Finish To connect to a private network 1 Obtain the following information from your ...

Страница 91: ...ap an adapter to modify settings list and then tap Name Servers Most networks use DHCP dynamic IP addressing so you should not have to change these settings unless you have been instructed to do so 4 If necessary connect the network card to the network by using a network cable For information see the documentation that came with your network card 5 To start a connection insert the network card and...

Страница 92: ...enu Home To use MEdia Net from Cingular MEdia Net offered by Cingular brings your favorite web pages downloads and more to your device To access and use MEdia Net do the following 1 Tap Start Settings Connections tab Connections 2 On the Advanced tab tap Select Networks 3 Fromt the list displaying My ISP select MEdia Net and tap OK 4 Tap Start Internet Explorer 5 Tap Favorites MEdia Net or Menu Fa...

Страница 93: ...te and tap Delete To change the size of text on Web pages In Internet Explorer Mobile tap Menu Zoom and tap the size you want To change how Web pages fill the screen 1 In Internet Explorer Mobile tap Menu View 2 Tap one of the following One Column Arranges the content into one column that is as wide as the screen This means that you will rarely have to scroll horizontally Default Maintains a layout...

Страница 94: ...e tap Menu Tools Options Memory tab 2 Tap Delete Files All pages stored on your device including offline favorites content will be deleted To set up Internet security settings Cookies are small files containing information about your identity and preferences so that a page can tailor information to your needs The page sends the file and it is stored on your device 1 In Internet Explorer Mobile tap...

Страница 95: ...UMTS HSDPA You cannot reconnect data services in Comm Manager 4 Tap to open ActiveSync so you can synchronize the device and computer For more information about the configuration settings for ActiveSync see Chapter 4 5 Tap to toggle between turning on or off Bluetooth Tap Settings Bluetooth Settings to configure Bluetooth on your device See Using Bluetooth for details 6 Tap to toggle between autom...

Страница 96: ...luetooth service Once you connect to another device or computer using Bluetooth you can locate and use any of the services available on that device Create a connection between your device and another Bluetooth enabled phone to use that phone as a modem Note Normally you will need another phone as a modem only if your Pocket PC device has no integrated phone capability Bluetooth modes Bluetooth on ...

Страница 97: ... entering the same passkey on both devices Creating a partnership between two devices is a one time process Once a partnership is created the devices can recognize the partnership and exchange information without entering a passkey again Make sure the two devices are within a range of 10 meters from one another and Bluetooth is turned on and in discoverable mode To create a Bluetooth partnership 1...

Страница 98: ... and 16 characters 4 Tap Next 5 Tap Finish You can now exchange information with the paired device To rename a Bluetooth partnership 1 Tap Start Settings Connections tab Bluetooth 2 Tap and hold the partnership on the Devices tab 3 On the shortcut menu tap Edit 4 Enter a new name for the partnership 5 Tap Save To delete a Bluetooth partnership 1 Tap Start Settings Connections tab Bluetooth 2 Tap a...

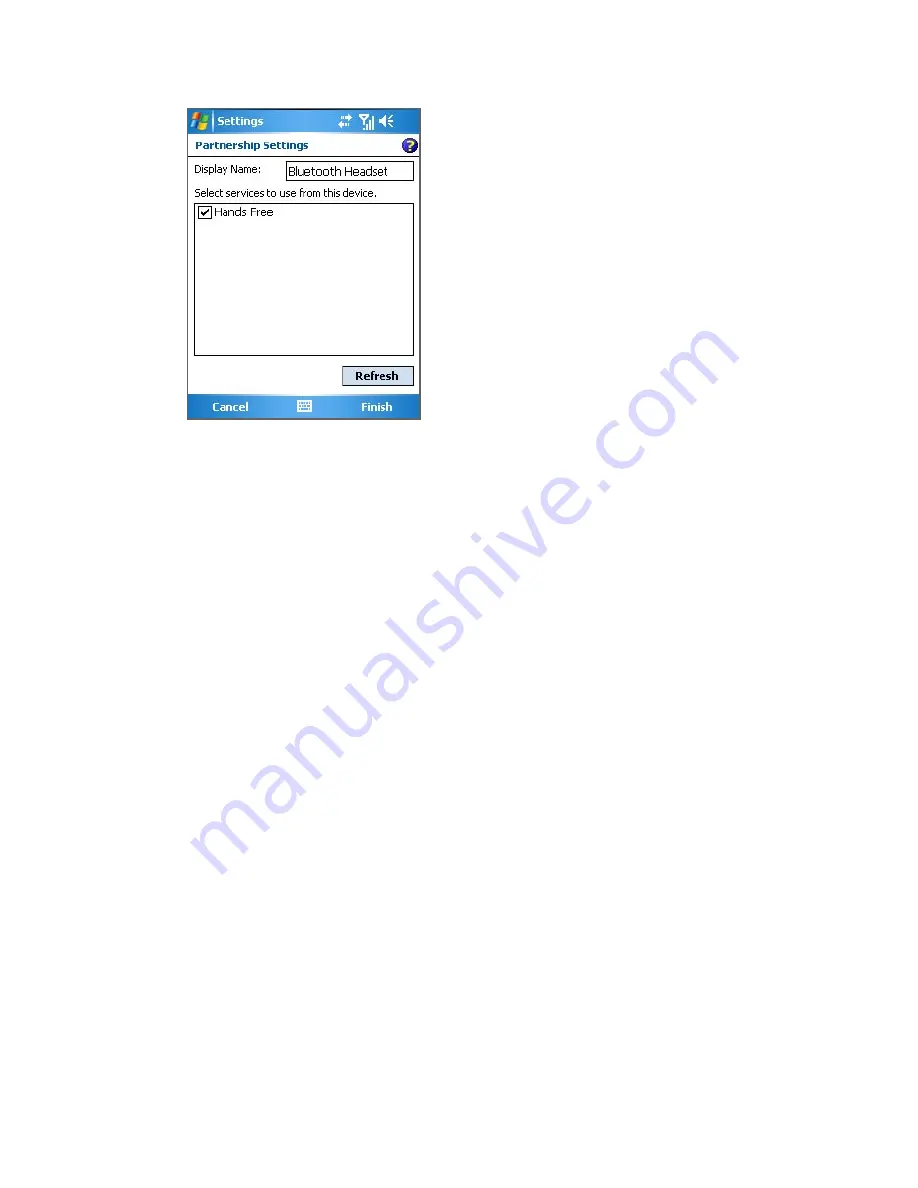
Страница 99: ...n and within close range and that the headset is discoverable Refer to the manufacturer s documentation to find out how to set the headset in discoverable mode 2 Tap Start Settings Connections tab 3 Tap Bluetooth Devices tab New Partnership Your device searches for other Bluetooth enabled devices and displays them in the list 4 Tap the name of the Bluetooth headset then tap Next 5 Enter the passkey...

Страница 100: ...n about this see To turn Bluetooth on and make your device discoverable 2 You also need to set Bluetooth on your computer to discoverable mode Do one of the following If your computer has Windows XP SP2 and your computer s built in or external Bluetooth adapter is supported by Windows XP SP2 open Bluetooth Devices from the Control Panel Click the Options tab then select the Turn discovery on and t...

Страница 101: ...m 7 If you beamed an Outlook item and it is not automatically added to Outlook select File Import and Export in Outlook to import it To beam information to a Bluetooth enabled device such as another Pocket PC follow steps 3 and onwards in the above procedure Notes If the computer or device you want to beam to cannot be detected by your device make sure that its Bluetooth is turned on set to discov...

Страница 102: ... Select Let me choose my own passkey then enter a passkey 1 up to 16 digits that will serve as an identification number for establishing a secure connection between your device and the computer Click Next 7 A confirmation message then appears on your device Tap Yes to accept the connection enter the same passkey then tap Next 8 On the computer click Finish to exit the wizard 9 On your device s Partn...

Страница 103: ...ds text box enter AT CGDCONT 1 IP APN where APN is the access point name provided by your mobile network operator to give you access to the Internet Then click OK 8 Click OK to exit the Phone and Modem Options Your device is now set up as a Bluetooth modem For details about how to connect to the Internet see To dial up and connect to the Internet in this chapter Use another Bluetooth phone as a mo...

Страница 104: ...t Settings Connections tab Connections 2 Tap Add a new modem connection 3 Enter a name for the connection 4 In the Select a modem list tap Bluetooth 5 Tap Next 6 If the phone appears in the My Connections list skip to step 11 7 If the phone does not appear in the My Connections list tap New Partnership and follow the remaining steps 8 Select the phone from the list and tap Next 9 Enter a passkey a...

Страница 105: ... other objects through which the signal passes To connect to a Wi Fi network 1 Open Comm Manager 2 Tap the Wi Fi button to turn on off the wireless function The Wi Fi icon indicates the wireless status Wi Fi is turned on Wi Fi is turned off 3 After Wi Fi has been turned on your device then scans for available wireless networks in your area The network names of the detected wireless networks will b...

Страница 106: ...ettings on your device Note Wi Fi networks are self discoverable which means no additional steps are required for your device to connect to a Wi Fi network It may be necessary to provide a username and password for certain closed wireless networks however To save battery power while connected to a Wi Fi network 1 Tap Start Settings Connections tab Wireless LAN to open the Wireless LAN Settings scr...

Страница 107: ...evice the Wi Fi ON icon will appear on the title bar After Wi Fi is turned on your device scans for available wireless networks and the wireless signal icon appears on the title bar The arrows in this icon will move back and forth while your device is scanning for a wireless LAN signal Once your device successfully connects to a wireless LAN the arrows stop moving Wireless LAN screen Main tab Here...

Страница 108: ...s tab This screen displays the wireless networks currently available To connect to a wireless network in the list tap and hold on the desired network then tap Connect Tap a wireless network in the list to view or change its connection settings You can also add new wireless networks if available by tapping Add New ...

Страница 109: ... up a data or phone dial up modem connection on your device For more information about setting up a data connection see To set up a data connection to the Internet For more information about setting up a phone dial up connection see To set up a dial up connection to your ISP Also make sure you have connected your device to a computer via infrared USB or Bluetooth When you activate Wireless Modem A...

Страница 110: ...ted then click Next 2 Wait for Windows to finish installing the infrared modem then click Finish 3 You can now connect your computer to the Internet Follow the steps in To dial up and connect to the Internet To add your device as a USB modem to your computer 1 After you tap Menu Start on the Wireless Modem screen of your device your computer will automatically detect that your device has been conne...

Страница 111: ...to the Internet To dial up and connect to the Internet Once the computer recognizes your device as a modem you can now use the computer to dial up and connect to the Internet 1 On your computer click Start Settings Control Panel 2 Double click Network Connections 3 Click File New Connection 4 In the New Connection Wizard click Next 5 Click Connect to the Internet then click Next 6 Select Set up my...

Страница 112: ... connection then click Next 10 If you are connecting to the Internet via GPRS enter the telephone number as 99 Otherwise enter your ISP s dial up phone number then click Next 11 Under Internet Account Information you may not need to enter a user name and password when using GPRS Just click Next to proceed 12 Click Finish to exit the wizard 13 The Connect dialog box then opens Click Dial to dial up...

Страница 113: ...Getting Connected 113 Next time you want to dial up again from your computer click Start Settings Control Panel double click Network Connections then double click the modem connection ...

Страница 114: ...grams Terminal Services Client 2 Enter the server name 3 You can also select a server name in Recent servers if you have recently connected to a server 4 Select the Limit size of server desktop to fit on this screen check box if you want to use programs that have been specifically sized for use with your device 5 Tap Connect To navigate within Terminal Services Client When connected to a remote serv...

Страница 115: ...t Notes Do not use the Start menu on your device If a network administrator has configured Terminal Services Client on your device to reconnect to disconnected sessions and you previously disconnected from a Terminal Server without ending the session the Terminal Services Client reconnects to that session To disconnect after ending a session 1 From the Terminal Services Client screen on your devic...

Страница 116: ...116 Getting Connected ...

Страница 117: ...Chapter 7 Mail and Messaging 7 1 E mail and Text Messages 7 2 Set up Xpress Mail 7 3 MMS Messages 7 4 Pocket MSN 7 5 Calendar 7 6 Contacts 7 7 Tasks 7 8 Notes ...

Страница 118: ...is ready to send and receive Outlook e mail For information about the Synchronization Setup Wizard see To install and set up ActiveSync on the computer in Chapter 4 If you have not set up a synchronization relationship yet do the following to set up your device to synchronize Outlook e mail 1 To synchronize remotely you need to set up and connect to an over the air connection GPRS EDGE UMTS HSDPA ...

Страница 119: ...4 Set up a POP3 IMAP4 e mail account You need to set up an e mail account that you have with an Internet service provider ISP or an account that you access using a VPN server connection typically a work account before you can send and receive mail 1 Tap Start Messaging 2 Tap Menu Tools New Account 3 Enter your e mail address then tap Next Auto configuration attempts to download necessary e mail se...

Страница 120: ... an ISP May be required for a work account Account type Select POP3 or IMAP4 Account name Enter a unique name for the account such as Work or Home This name cannot be changed later Incoming mail server Enter the name of your e mail server POP3 or IMAP4 Outgoing mail server Enter the name of your outgoing e mail server SMTP Require SSL connection Select this to ensure you always receive e mail for ...

Страница 121: ...our e mails do not start arriving on your device check with your e mail service provider to validate your eligibility Tip You can set up several e mail accounts in addition to your Outlook email account Send and receive messages To compose and send a message 1 In the message list tap Menu Go To and select an account 2 Tap New 3 Enter the e mail address or text message address of one or more recipi...

Страница 122: ...ginal message from the list view tap Menu Tools Options Message tab and select the When replying to e mail include body check box In the Outlook E mail account you will send less data if you do not edit the original message This may reduce data transfer costs based on your rate plan To exclude your e mail address when replying to all When you reply to all the recipients of an e mail your own e mai...

Страница 123: ...ent if it has been fully downloaded or marks it for download the next time you send and receive e mail You can also download attachments automatically with your messages if you have an Exchange Server mail account If you have an Outlook e mail account do the following 1 Tap Start Programs ActiveSync 2 Tap Menu Options 3 Tap E mail Settings then select Include file attachments If you have an IMAP4 e...

Страница 124: ... typically a work account download messages through a remote e mail server For more information see To download messages from the server later in this chapter Text messages are automatically received when phone is turned on When your phone is turned off in flight mode messages are held by your service provider until the next time your phone is turned on To download messages from the server To send ...

Страница 125: ...utlook e mail message protects the privacy of the message by converting it from plain readable text into cipher scrambled text Only the recipient who has the authorization key can decipher the message Digitally signing a message applies your certificate with the authorization key to the message This proves to the recipient that the message is from you and not from an imposter or a hacker and that ...

Страница 126: ...he sender s certificate may have expired it may have been revoked by the certificate authority or the server that verifies the certificate is unavailable Contact the sender to report the problem Manage folders Each Messaging account has its own folder hierarchy with five default Messaging folders Inbox Outbox Deleted Items Drafts and Sent Items The messages you receive and send through the account...

Страница 127: ...d you move e mail messages to a folder you created the link is broken between the messages on the device and their copies on the e mail server The next time you connect the e mail server will detect that the messages are missing from the Inbox folder on the device and will delete them from the e mail server This prevents having duplicate copies of a message but it also means that you will no longe...

Страница 128: ...ail setup supports 13 popular ISP s including Yahoo AOL MSN Hotmail Comcast Earthlink BellSouth covering over 90 of all personal email accounts in the U S Xpress Mail also includes a custom set up process for other POP3 email providers Self Service Corporate Email Setup In additional to easy access to personal email Xpress Mail continues to provide self service access to corporate email through us...

Страница 129: ... download page 4 Tap Yes Open file after download should be checked 5 Tap OK to accept the license agreement 6 Enter your 10 digit mobile cell number numbers only and tap Next 7 Select Portal or ISP and tap Next 8 Choose your provider and tap Next If your email provider is not listed tap More to view an additional list of personal email providers 9 Enter your User Name and Password and Tap Next to ...

Страница 130: ...utomatically display the Xpress Mail Settings screen No setting changes are required just click Xpress Mail at the bottom right hand corner Note If your email provider is not listed on the two screens described here go to www cingular com tutorials cingular8525 Send and Receive Personal Email 1 Tap Start then tap Messaging 2 Tap the Inbox and select your email provider 3 Tap Menu and tap Send Rece...

Страница 131: ... Good Mobile Messaging and Microsoft Direct Push require that your IT organization install software centrally and provide you access Self Service Xpress Mail Xpress Mail can provide wireless access to your corporate email from your 8525 without support from IT To set up Xpress Mail you will need Work email address The type of mail server your company runs Microsoft Exchange Lotus Notes or IMAP The...

Страница 132: ...to download 5 Click Yes when asked whether or not you want to install the desktop software 6 Click Next to begin setup and follow the onscreen instructions When prompted for a user name and password use those created in step 2 7 When Xpress Mail has successfully connected to your corporate email account you will receive a message confirming that your software is installed and you are now connected ...

Страница 133: ...t 6 Enter your 10 digit mobile cell number numbers only and tap Next 7 Select Work and tap Next 8 Select Personal Edition and tap Next 9 Select Register Device and tap Next 10 Enter the Xpress Mail User Name and Password you created online earlier and tap Next 11 Tap Register 12 After successfully registering your 8525 will automatically display the Xpress Mail Settings screen No setting changes a...

Страница 134: ...e message and tap Send 7 3 MMS Messages Creating and sharing multimedia messages MMS with your friends and family are easy with your device You can attach pictures or video and an audio clip in an MMS You can even use the device camera optional to capture photos and video clips while composing a new MMS message and send them along with your message Notes Please note that MMS is a charged service I...

Страница 135: ...age will be temporarily stored on an MMS server of your wireless service provider When others send you an MMS message similarly the MMS message will be stored on the MMS server until you retrieve it Hence your device must be configured with the location of the MMS server for you to be able to send and receive MMS messages on your device When you purchase your device it is already preset with your ...

Страница 136: ... and request a delivery or read receipt You can also specify a resolution for images you send and message delivery attempts 5 Tap the Servers tab and check if your device is preset with MMS server settings If there are no preset settings tap New and enter the following information which you can get from your wireless service provider Server name A descriptive name such as your wireless service pro...

Страница 137: ... As Default Create and send MMS messages After configuring the required settings you can start to compose and send MMS messages To compose an MMS message You can compose MMS messages in a combination of various slides where each slide can consist of a photo audio or video clip and or text 1 On the MMS screen tap New 2 On the Choose a Media Message screen tap a preset template or tap Custom to open...

Страница 138: ...go to the next slide 8 While composing an MMS message you can also do the following Tap Menu Message Options Background to choose a background color from the list Tap Menu Message Options Text Above or Message Options Text Below to make the included text appear above or below the photo video Tap Menu Message Options Send Options to specify the sending time validity priority class and other setting...

Страница 139: ...a new phrase to the list tap New To add an audio clip to an MMS message You can add audio clips to your MMS message However you can add only one audio clip per slide 1 Tap Insert an audio clip By default it will open My Sounds folder To navigate to any other folder containing audio files tap the Down arrow next to the My Sounds folder 2 Select an audio file When selected you can Tap to play the audi...

Страница 140: ...u can do the following Send and receive instant messages See which contacts are online or offline Subscribe to status updates for selected contacts so you know when they come online Block contacts from seeing your status or sending you messages Before you can use MSN Messenger your device must be connected to the Internet For information about setting up an Internet connection see Connecting to the...

Страница 141: ...m you want to send a message 2 Enter your message in the text entry area at the bottom of the screen and tap Send Tip To quickly add common phrases tap Menu My Text and select a phrase in the list 7 5 Calendar Use Calendar to schedule appointments including meetings and other events Your appointments for the day can be displayed on the Today screen If you use Outlook on your PC you can synchronize...

Страница 142: ...Use Calendar to schedule meetings via e mail with contacts who use Outlook or Outlook Mobile 1 Tap Start Calendar 2 Schedule a new appointment or open an existing one and tap Edit 3 Tap Attendees 4 Tap the name of the contact you want to invite 5 To invite each additional attendee tap Add and tap the name 6 Tap OK 7 The meeting request will be sent to the attendees the next time you synchronize yo...

Страница 143: ...information From there you can call or send a message If you use Outlook on your PC you can synchronize contacts between your device and PC To create a contact on your device 1 Tap Start Contacts 2 Tap New and enter the contact information 3 When finished tap OK Tips If someone who is not in your list of contacts calls you or sends you a message you can create a contact from Call History or from th...

Страница 144: ...earch for a contact by entering a name or number or by using the alphabetical index To switch to Name view tap Menu View By Name To see a summary of information about a contact tap the contact From there you can also make a call or send a message To see a list of available actions for a contact tap and hold the contact To see a list of contacts employed by a specific company tap Menu View By Compa...

Страница 145: ...you can change the indicator that will be appended to the SIM contact names for each phone number type 4 After modifying tap OK 5 Tap Menu Contacts to SIM 6 Select the check boxes of the contacts that you want to copy to your SIM card then tap Save To find a contact on your device There are several ways to find a contact when your contact list is long 1 Tap Start Contacts 2 If you are not in Name v...

Страница 146: ...ing request immediately to anyone in your organization Access to the GAL is available if your organization is running Microsoft Exchange Server 2003 with SP2 and you have completed your first synchronization with the Exchange Server 1 Synchronize with Exchange Server if you have never done so 2 Tap Start Contacts Menu View By Name 3 Do any of the following In Contacts tap Menu Find Online In a new...

Страница 147: ...device must be set up with a data connection You can search on the following information as long as that information is included in your organization s GAL First name Last name E mail name Display name E mail address or Office location ...

Страница 148: ...new task box enter a subject and press Enter If the task entry box is not available tap Menu Options and select the Show Tasks entry bar check box To change the priority of a task Before you can sort tasks by priority you need to specify a priority level for each task 1 Tap Start Programs Tasks 2 Tap the task you want to change the priority for 3 Tap Edit and in the Priority box tap a priority lev...

Страница 149: ...p Menu Sort By and tap a sort option Filter the list by category Tap Menu Filter and tap the category you want displayed Tip To filter your tasks further tap Menu Filter Active Tasks or Completed Tasks 7 8 Notes Notes help you to quickly capture thoughts questions reminders to do lists and meeting notes You can create handwritten and typed notes record voice notes convert handwritten notes to text...

Страница 150: ...Tap Start Programs Notes In the note list tap New 2 Tap the Input Selector arrow next to the Input Method icon on the menu bar tap the input method you want and enter your text 3 If the Input Selector arrow is not displayed tap the Input Method icon 4 When finished tap OK to return to the note list Notes To select handwritten text tap and hold next to the writing As soon as dots appear and before t...

Страница 151: ...ou can create a stand alone recording voice note or you can add a recording to a note To create a voice note 1 Tap Start Programs Notes 2 Do one of the following To create a stand alone recording record from the note list To add a recording to a note create or open a note 3 If you do not see the Recording toolbar tap Menu View Recording Toolbar 4 Tap the Record icon to begin recording 5 Hold your ...

Страница 152: ... creating a stand alone recording the recording will appear in the note list To change recording formats 1 Tap Start Settings Personal tab Input 2 Tap the Options tab and select the desired format you want in the Voice recording format list 3 Tap OK Note You can also change recording formats from within Notes In the note list tap Menu Options Global Input Options link at the bottom of the page ...

Страница 153: ...Chapter 8 Experiencing Multimedia 8 1 Using Camera Cingular 8525 only 8 2 Using Pictures Videos 8 3 Using Windows Media Player Mobile ...

Страница 154: ...range Macro mode to take shots at close up range Switch between modes by sliding the selector up or down To open the Camera screen Tap Start Programs Camera or Tap Start Programs Pictures Videos Camera icon or Press the Camera button on your device Camera button To exit the Camera Tap the exit icon Capture modes The camera on your device allows you to capture pictures and video clips by using vari...

Страница 155: ...ps suitable for sending via MMS Contacts Picture Captures a still image and gives you the option to immediately assign it as a Photo ID for a contact Picture Theme Captures still images and places them within frames Panorama Captures a sequence of still images continuously in one direction and allows stitching of all the images to create a panoramic view of a scenery Sports Captures a sequence of ...

Страница 156: ...Enter button as the shutter release Press the Camera button or the Enter button to take a photo or contacts picture Press the Camera button or the Enter button to start recording video press it again to stop recording Press the Camera button or the Enter button each time when taking photos for a picture theme or panorama To take consecutive shots in Sports mode press the Camera button or the Enter...

Страница 157: ...4 15 1 Mode Switching control Tapping the left right arrow on the screen allows you to switch the capture mode 2 Resolution The resolution icon indicates the current resolution Tap to toggle among the different resolutions 3 Storage Tap to toggle between saving captured photos or video clips on the device memory or on the memory card 9 ...

Страница 158: ...ter Area and Average 10 Flash Light Tap to turn on or off the flash light that is located at the back of your device When the flash light is on the camera gives off a flash when taking photos 11 White Balance Tap to toggle among the different white balance settings Auto Daylight Night Incandescent and Fluorescent 12 Self timer Tap to set the Self timer to 2 seconds 10 seconds or off when in the Photo...

Страница 159: ... first frame of the captured video clip by default on the Review screen Before you capture a video clip you can specify the desired length of recording in terms of time or file size on the Camera Settings screen Video clips will be saved in MPEG 4 format MMS Video capture mode The MMS Video capture mode makes it convenient for you to capture a video file and then send it via MMS Press the Enter bu...

Страница 160: ...it via e mail or MMS and more Review screen icons Sports and Burst modes 6 Photo Video MMS Video Panorama and Picture Theme modes Contacts Picture mode 1 2 3 4 1 Back Tap to go back to Camera screen 2 Delete Tap to remove the captured image or video 3 Send Tap to send via e mail or MMS 4 View Tap to view the image in the Pictures Videos program or play the captured video in Windows Media Player 5 ...

Страница 161: ...t in focus move closer and you can zoom out to make the object move farther away In all capture modes use Navigation Control on your device or tap the triangular Up arrow above the Zoom Ratio indicator to zoom in your subject When the zooming limit is reached you will hear a beep To zoom out press Navigation Control down or tap the Down arrow The camera zoom range for a picture or a video clip dep...

Страница 162: ...aded Panorama Large 640 x 480 1 0x to 4 0x Medium 320 x 240 1 0x to 8 0x Small 160 x 120 1 0x to 8 0x Sports Large 640 x 480 1 0x to 2 0x Medium 320 x 240 1 0x to 8 0x Burst 1M 1280 x 1024 No zooming available Large 640 x 480 1 0x to 2 0x Medium 320 x 240 1 0x to 8 0x Note The capture sizes available for certain capture formats also vary from one capture mode to another The zoom range has been cal...

Страница 163: ...tings screen You can either tap on screen or press the Navigation Control buttons to navigate the Camera Settings screen 1 2 1 Tap an icon to display the desired menu Alternatively when using the Navigation Control press Navigation Control down first The background of the icon bar at the bottom then becomes black Now press Navigation Control left right or tap the left right arrow to navigate to th...

Страница 164: ...ing 2 seconds or 10 seconds delays the capturing by the specified time after you press the Camera button or the Enter button Template menu Template Select a template in Picture Theme mode only Panorama Settings menu Direction Choose in what direction images will be stitched in a panorama Stitch Count Select the desired number of snapshots to be taken and stitched into a panorama Auto Stitch When th...

Страница 165: ...enu Resolution Select the desired image or video size Quality Select the JPEG image quality level for all captured still images You can choose from Basic Normal Fine and Super Fine Storage Select where you want to save your files You can either save the files to the main memory or to a storage card Metering Mode Select a metering mode to allow the camera to measure the amount of light in the centr...

Страница 166: ... Format Select the desired file format Shutter Sound Choose whether or not you want the camera to make a shutter sound when you press the Enter button or the Camera button to take photos or record video clips Grid Choose whether or not to show a grid on the Camera screen Showing a grid helps you frame and center your subject more easily and accurately Grid Keep Backlight Choose whether to turn the...

Страница 167: ...a video clip it will have no audio Prefix Specify how to name captured images and video clips When Default is selected the file name of each new captured file is set to IMAGE or VIDEO followed by a sequential number for example IMAGE_001 jpg You may also choose to name files using either the current Date or Date Time as the prefix Counter By default the newly captured image or video files are name...

Страница 168: ...close the submenu without applying and saving the changes 8 2 Using Pictures Videos The Pictures Videos program collects organizes and sorts images and video clips in the following formats on your device File Type File Extensions Image bmp jpg GIF animation gif Video avi wmv mp4 3gp You can view the pictures as a slide show beam them send them via e mail edit them or set them as the background on ...

Страница 169: ...C to the folder you created on the memory card To view pictures 1 Tap Start Programs Pictures Videos The images in the My Pictures folder appear as thumbnails by default 2 Select a picture and tap View If you cannot find a picture in the default My Pictures folder go to another folder by tapping the Down arrow To play GIF animation files 1 Tap Start Programs Pictures Videos 2 Select a picture and t...

Страница 170: ...display in a slide show Tap Menu Options then tap Portrait Pictures or Landscape Pictures on the Slide Show tab Tap anywhere on the screen to display the Slide Show toolbar which you can use to stop or pause the slide show rotate the view and more Press Navigation Control right or left to move forward or backward through the slides To sort pictures and video clips If you store a large number of pi...

Страница 171: ...re 90 degrees counterclockwise tap Rotate To crop a picture tap Menu Crop Next tap and drag to select the area to crop Tap inside the box to crop or tap outside the box to cancel cropping To adjust the brightness and contrast levels of a picture tap Menu AutoCorrect Note To undo an edit tap Menu Undo To cancel all unsaved edits you made to the picture tap Revert to Saved To set a picture as the To...

Страница 172: ...nize your device Note Pictures and video clips are saved automatically before they are sent To beam a picture or video clip You can beam a picture or video file to another mobile device using Infrared 1 Tap Start Programs Pictures Videos 2 Select the picture or video file you want to beam 3 Tap Menu Beam 4 Select a device to beam the file to 5 Tap OK To assign pictures to contacts You can assign a p...

Страница 173: ...s Media Player Mobile You can use Microsoft Windows Media Player 10 Mobile for Pocket PC to play digital audio and video files that are stored on your device or on a network such as on a Web site Using Windows Media Player you can play both audio and video files These are the following file formats that are supported by this version of Windows Media Player Video File Formats Supported File Extensi...

Страница 174: ... 8 4 9 1 Plays Pauses a file 2 Displays the video in full screen 3 Displays a Web site where you can find music and videos to play 4 Adjusts the playback progress of a selected file 5 Skips to the beginning of the current file or to the previous file 6 Skips to the next file 7 Decreases the volume level 8 Increases the volume level 9 Turns the sound on or off Note You can rewind and fast forward f...

Страница 175: ...n your device About licenses and protected files Some content such as digital media files downloaded from the Internet CD tracks and videos have associated licenses that protect them from being unlawfully distributed or shared Licenses are created and managed by using digital rights management DRM which is the technology for securing content and managing its access rights Some licenses may prevent...

Страница 176: ...r larger storage card into your device and then connect your device to your PC 3 If you have not set up synchronization between your device and PC the Device Setup Wizard opens on your PC 4 In the wizard click Automatic select the Customize the playlists that will be synchronized check box and then select the playlists that you want to synchronize 5 Click Finish 6 The files begin synchronizing to y...

Страница 177: ... Playlist File List Sync List Note Audio files copy faster if the desktop Player is configured to automatically set the quality level for audio files copied to your device For more information see desktop Player Help on the PC Play media To play items on your device Use the library on Windows Media Player Mobile to find and play songs videos and playlists that are stored on your device or removabl...

Страница 178: ...s a file or a folder then tap Play To play an item on a network Use the Open URL command to play a song or video that is stored on the Internet or on a network server 1 If you are not on the Library screen tap Menu Library 2 Tap Menu Open URL 3 Do one of the following In the URL box enter a network address In the History box tap a URL that you have previously used Note To play an item on a network...

Страница 179: ...hapter 9 Using Other Applications 9 1 Word Mobile 9 2 Excel Mobile 9 3 Viewing Slide Shows with PowerPoint Mobile 9 4 Using ClearVue PDF 9 5 Using MIDlet Manager 9 6 Using ZIP 9 7 Using Voice Speed Dial ...

Страница 180: ...ent and indentation insert the date do a spelling check and more 4 When finished tap OK to save and close the file When you close a newly created document it is automatically named after the first several words in the document and placed in the Word Mobile document list You can easily rename the document with a more meaningful name and move it to another folder or a storage card Note Word Mobile doe...

Страница 181: ...and cell comments Some data and formatting may be lost when you save the workbook on your device To see a complete list of features that are not supported in Word Excel see Help on your device 9 3 Viewing Slide Shows with PowerPoint Mobile With PowerPoint Mobile you can open and view slide show presentations created on your PC Slide shows in ppt and pps format created using PowerPoint 97 and later...

Страница 182: ...oomed in to see a slide in more detail you cannot navigate to another slide until you zoom out Tapping Next or Previous may play an animation on a slide rather than navigate to another slide To stop a slide show In a PowerPoint Mobile presentation tap End Show 9 4 Using ClearVue PDF ClearVue PDF allows you to open and view Portable Document Format PDF files These files usually have a pdf file exte...

Страница 183: ...er allows you to download Java applications such as games and tools that are specifically designed for mobile devices Although some Java applications and games have already been installed on your device the Java MIDlet Manager gives you the flexibility of installing and managing additional J2ME applications from the Internet To install MIDlets from the Internet 1 Locate the MIDlet MIDlet suite whi...

Страница 184: ...nstall 3 Confirm to complete the installation Note To remove a MIDlet file from the temporary folder tap and hold the file then tap Delete from the shortcut menu To run MIDlets on your device 1 Tap Start Programs MIDlet Manager 2 Tap a MIDlet to run To view the MIDlets currently running Tap the down arrow on the top left of the MIDlet Manager screen then tap Running Note To view the most recently u...

Страница 185: ... can display them by group To select a sorting order 1 Tap the down arrow on the top right of the MIDlet Manager screen to open the Sort By menu 2 Choose to sort by Name or by Size To change the display name of a MIDlet 1 Tap and hold a MIDlet and tap Rename 2 Enter a new name for the MIDlet then tap OK Note You cannot change the name of a MIDlet suite To uninstall a MIDlet MIDlet suite Before you...

Страница 186: ...security options that you can set for a running MIDlet MIDlet suite Security Option Description Net Access Determines whether a MIDlet MIDlet suite can access the Internet Local Connectivity Enables a MIDlet MIDlet suite to access services such as infrared and Bluetooth App Auto Run Enables a MIDlet MIDlet suite to run at specified times or any time Messaging Determines whether a MIDlet MIDlet sui...

Страница 187: ... files or open an existing archive file on your device Each time you start ZIP on your device it searches for files that have the zip file extension and displays these files on the Archive List screen To start ZIP on your device Tap Start Programs ZIP To open a ZIP file and extract files 1 Open a file using any of the following Select a file and tap File Open Archive Tap and hold a file and tap Open ...

Страница 188: ...ose a folder in which files will be extracted to then tap Extract To create a zip archive 1 Tap File New Archive 2 On the Save As screen enter a zip file name and choose a folder in which to save the zip file You can also choose whether the zip file will be saved on the device s main memory or a storage card 3 Tap Save 4 Tap Action Add 5 Double tap the folder that contains the files you want to archive...

Страница 189: ... 9 7 Using Voice Speed Dial You can record voice tags so that you can dial a phone number or launch programs simply by speaking a word Create a voice tag for a phone number 1 Tap Start Contacts to open the Contacts list 2 Do one of the following Tap and hold the desired contact then tap Add Voice Tag Select the desired contact then tap Menu Add Voice Tag Tap the desired contact to open the contact...

Страница 190: ...rding 5 When you create a voice tag for the item you can do one of the following Tap the Record button to rebuild the voice tag Tap the Play button to play the voice tag Tap the Delete button to delete the voice tag Tip To ensure voice recognition accuracy please record your voice in a quiet place ...

Страница 191: ...oice Speed Dial 2 After a beep sound say the recorded voice tag that you have assigned to the phone number you want to call or the program you want to launch The system will repeat the voice tag and then dial out or launch the program automatically Note If the system cannot recognize your voice tag please speak clearly and reduce the surrounding noise then try again To view and test the voice tags...

Страница 192: ...192 Using Other Applications ...

Страница 193: ...Appendix A 1 Regulatory Notices A 2 PC Requirement to Run ActiveSync 4 x A 3 Specifications ...

Страница 194: ...the Commission of the European Community Compliance with these directives implies conformity to the following European Norms in parentheses are the equivalent international standards EN 60950 1 IEC 60950 1 Safety of Information Technology Equipment ETSI EN 301 511 Global system for mobile communications GSM Harmonized EN for mobile stations in the GSM 900 and GSM 1800 bands covering essential requ...

Страница 195: ...e and portable UE radio and ancillary equipment EN 301 908 Electromagnetic compatibility and radio spectrum matters ERM Base stations BS and user equipment UE for IMT 2000 third generation cellular networks ETSI EN 300 328 Electromagnetic compatibility and Radio spectrum Matters ERM Wideband Transmission systems data transmission equipment operating in the 2 4 GHz ISM band and using spread spectru...

Страница 196: ... harmful interference in a residential installation This equipment generates uses and can radiate radio frequency energy and if not installed and used in accordance with the instructions may cause harmful interference to radio communications However there is no guarantee that interference will not occur in a particular installation If this equipment does cause harmful interference to radio or TV r...

Страница 197: ...re to a wireless base station antenna the lower the power output Before a phone model is available for sale to the public it must be tested and certified to the FCC that it does not exceed the limit established by the government adopted requirement for safe exposure The tests are performed in positions and locations for example at the ear and worn on the body as required by the FCC for each model ...

Страница 198: ...iately Hearing Aids Some digital wireless phones may interfere with some hearing aids In the event of such interference you may want to consult your service provider or call the customer service line to discuss alternatives Other Medical Devices If you use any other personal medical device consult the manufacturer of your device to determine if they are adequately shielded from external RF energy ...

Страница 199: ...to the specified collection point for recycling of such hazardous waste Isolated collection and proper recovery of your electronic and electrical waste equipment at the time of disposal will allow us to help conserving natural resources Moreover proper recycling of the electronic and electrical waste equipment will ensure safety of human health and environment For more information about electronic...

Страница 200: ... Microsoft Windows Server 2003 x64 Edition Service Pack 1 Microsoft Windows XP Professional Service Packs 1 and 2 Microsoft Windows XP Home Service Packs 1 and 2 Microsoft Windows XP Tablet PC Edition 2005 Microsoft Windows XP Media Center Edition 2005 Microsoft Windows XP Professional x64 Edition Microsoft Outlook 98 Microsoft Outlook 2000 and Microsoft Outlook XP and Microsoft Outlook 2003 messa...

Страница 201: ... for GSM 180 250 hours for UMTS HSDPA Talk time Screen off 4 5 hours for GSM 2 4 hours for UMTS Media playback 8 hours WMV 12 hours WMA AC Adapter AC input 100 240V AC 50 60 Hz DC output 5V and 1A Display LCD Type 2 8 transflective TFT LCD with backlight LEDs touch sensitive screen Resolution 240 x 320 with 65 536 colors Alignment Portrait and Landscape WCDMA GSM EDGE Module Functionality UMTS HSD...

Страница 202: ...deo 352x288 CIF 320x240 QVGA 176x144 QCIF 128x96 Digital Zoom Up to 8x Controls and Lights Navigation Buttons 5 way Navigation Control Five program buttons Messaging Internet Explorer Camera Cingular 8525 only Comm Manager PTT Push To Talk Two phone functions Talk and End Start Menu button Two OK buttons Two soft keys Trackwheel Power button Reset button Sliding keyboard QWERTY keyboard with two a...

Страница 203: ...t bi color LED shows Green and Amber lights for UMTS GSM standby UMTS GSM message UMTS GSM network status notification and battery charging status Audio Audio Controller AGC Microphone Speaker Built in Dual Hands free Headphone AMR AAC WAV WMA MP3 codec Connections Infrared IrDA SIR I O Port mini USB for USB serial audio and power connections Car Antenna Connector External connector for WCDMA GSM ...

Страница 204: ...204 Appendix ...

Страница 205: ...Index ...

Страница 206: ...ognizer 37 Bluetooth Bluetooth modem 103 discoverable 96 97 hands free headset 98 modes 96 overview 96 partnership pairing 97 synchronize 64 turn on and off 95 Burst capture mode 155 Button controls and LEDs 202 C Calculator 26 Calendar 26 141 Calendar search 40 Calibration 22 Camera 8525 only capture modes 154 155 controls 156 file formats 156 icons 156 macro mode 154 normal mode 154 overview 26 s...

Страница 207: ...DRM 175 Digital signature verify 126 Dimensions and weight 202 Direct Push 62 95 Disconnect data services 95 Download Agent 27 Download messages 124 Draw 150 E E mail IMAP4 119 Outlook 118 POP3 119 search 40 security 66 settings POP3 IMAP4 120 Edit picture 171 Emergency call 52 Encrypt messages 67 125 Excel Mobile 27 180 Exchange Server schedule synchronization 62 synchronize 61 Exclude e mail add...

Страница 208: ...ttings 94 K Keyboard on screen 36 QWERTY 34 Keypad tone 76 L Language 72 Letter Recognizer 36 Library screen Windows Media Player Mobile 175 M Mail search 40 Make call from Call History 45 from Contacts 44 from Phone program 44 from SIM Manager 46 from Speed Dial 45 MEdia Net 92 Media synchronization settings 65 Memory 79 201 Message folders 126 Messaging IMAP4 119 MMS 134 Outlook e mail 118 overv...

Страница 209: ...ete 171 edit picture 171 file formats 168 overview 27 play GIF animation 169 play videos 170 sort 170 view pictures 169 view slideshows 170 Picture Theme capture mode 155 PIN 42 82 Playback screen Windows Media Player Mobile 175 Play GIF animation 169 Play media 177 Play videos 170 Pocket MSN 27 140 POP3 119 PowerPoint Mobile 27 181 Programs ActiveSync 26 Calculator 26 Calendar 26 141 Camera 8525 o...

Страница 210: ...r 95 Ring tone 75 Ring type 76 S SAPSettings overview 28 set up SAP 53 Save picture from Web page 94 Search 28 40 Secure Multipurpose Internet Mail Extension S MIME 66 Security settings Internet Explorer 94 Send messages 121 Send pictures and videos via e mail 172 Settings Connections tab Beam 31 Bluetooth 31 Comm Manager 31 Connections 31 CSD Line Type 31 GPRS Setting 31 Network Cards 31 Wireless...

Страница 211: ...ble space 79 copy files 80 synchronize 66 Swap switch calls 51 Symbol Pad 39 Synchronize ActiveSync 60 change information types 61 music video and pictures 65 Outlook information with com puter 60 Outlook information with Ex change Server 61 schedule synchronization with Exchange Server 62 via Bluetooth 64 via Infrared 64 Windows Media Player 65 176 Sync Setup Wizard 56 System information 201 T Tas...

Страница 212: ...te voice tags 189 overview 28 189 Voice tags create for phone numbers 189 create for programs 191 use 191 Volume 43 W Web pages layout 93 text size 93 Wi Fi 95 105 Windows Media Player Mobile file formats 173 menus 175 overview 28 troubleshoot 178 Wireless Modem 28 109 Word Mobile 28 180 X Xpress Mail 128 Z ZIP create archive 188 open zip file and extract files 187 overview 28 187 Zoom Camera 161 ...

Отзывы: