background image

   Parts and module replacement

H Series Service Manual

55

020-000802-03 Rev. 1 (12-2016)

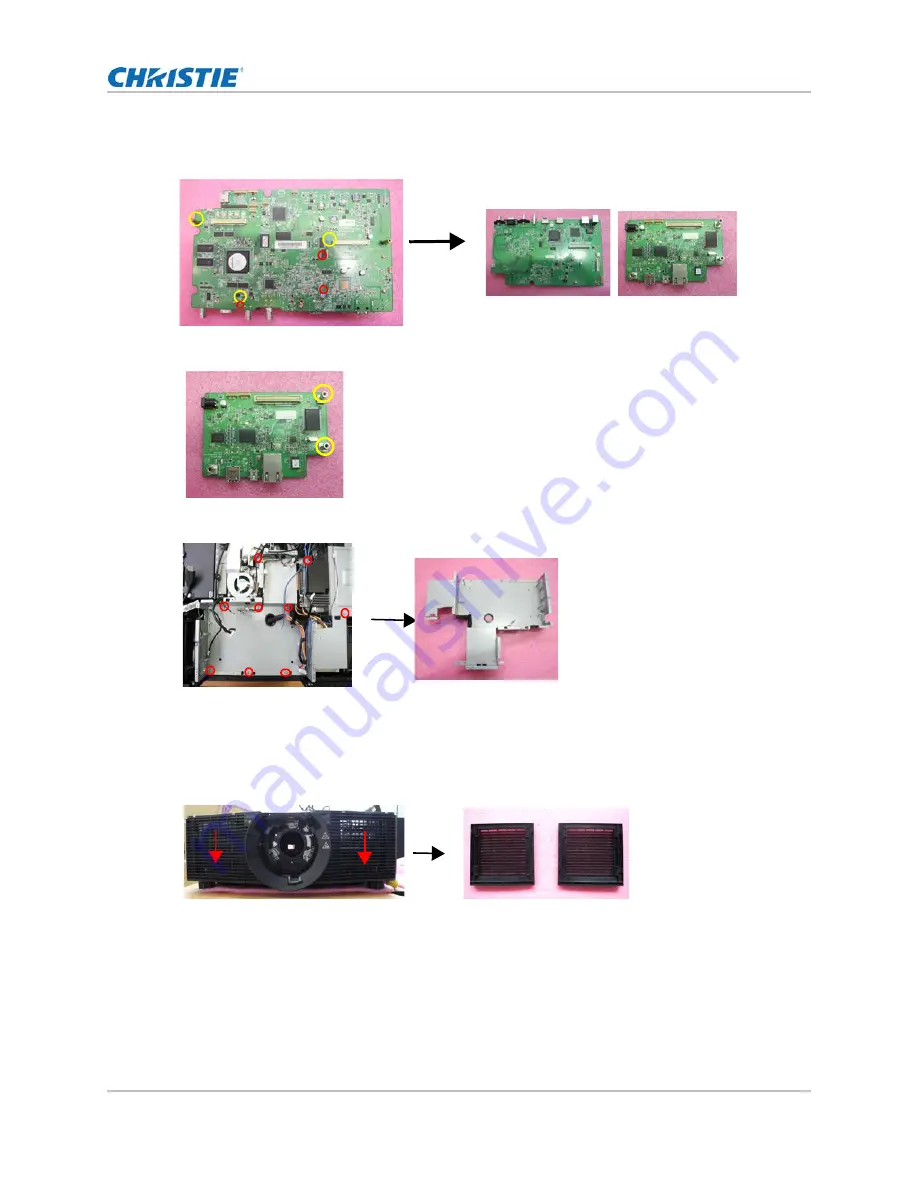
8. Loosen three screws (red) and Remove three standoffs (yellow) with a M3 screwdriver to 

separate the scalar board and PW808 media board.                                                                                             

9. Remove two hex standoffs with a M3 socket driver.

10. Remove nine screws with a M3 screwdriver, securing the main board bottom shielding.

Removing the


front cover and components 

1. Pull down the filter cover then take out it.

Содержание D12HD-H

Страница 1: ...H Series D12HD H D12WU H Service Manual 020 000802 03 ...

Страница 2: ...ian manufacturing facility is ISO 9001 and 14001 certified GENERAL WARRANTY STATEMENTS For complete information about Christie s limited warranty please contact your Christie dealer In addition to the other limitations that may be specified in Christie s limited warranty the warranty does not cover a Problems or damage occurring during shipment in either direction b Projector lamps See Christie s ...

Страница 3: ... service mode 9 Performing a factory reset 9 Resetting the lamp projector hours 9 Test inspection 10 PC mode 11 Frequency and tracking boundary 11 Color performance 12 Performing an ABC calibration 12 Calibrating the lens 13 Calibrating the G sersor 14 ADC calibration 14 PC calibration 14 Video calibration 15 Calibrating the fan and auto waveform 16 Adjusting the ROD assembly 16 Adjusting the focu...

Страница 4: ...ion 28 Check external appearance 28 Firmware 29 System firmware upgrade 29 Updating the Windows setting 29 Installing the firmware upgrade utility 29 Upgrading the firmware 30 Performing a firmware recovery 30 Recovering when the LAN firmware upgrade fails 31 Troubleshooting 32 LED status indicators 32 Main procedure 33 Verify power connection 34 Verify power functionality 35 Verify image performa...

Страница 5: ...ight engine 65 Removing the dynamic aperture lamp housing 67 Removing the DMD DMD board 68 Removing the color wheel docking board 69 Removing the power supply 70 Removing the fans 7 and 10 71 Removing the projector feet 71 Removing the base shielding 72 Removing the HDMI extend board 72 Specifications 73 Serial number definition 75 Service parts 76 Main projector 77 Engine 79 Top cover 80 Left cov...

Страница 6: ...echnicians only Refer to this manual for technical information required to service and maintain this product i Every effort has been made to ensure the information in this document is accurate and reliable however due to constant research the information in this document is subject to change without notice Graphics included in this publication are for illustration purposes only ...

Страница 7: ...ould result in death or serious injury Use only Christie approved power cords Do not attempt operation if the AC supply and cord are not within the specified voltage and power range Refer to the license label on the back of the projector for rated voltage and power The projector is equipped with a three wire plug with a grounding pin This is a safety feature If you are unable to insert the plug in...

Страница 8: ...ns on page 73 The American Conference of Governmental Industrial Hygienists ACGIH recommends occupational UV exposure for an 8 hour day to be less than 0 1 microwatts per square centimeters of effective UV radiation An evaluation of your workplace is advised to make sure employees are not exposed to cumulative radiation levels exceeding the government guidelines for your area Be aware that some me...

Страница 9: ... as indicated on the license label Not all parts are available separately In addition some parts stocked as inventory are available only until the current supply lasts All part numbers are subject to change Replacing modules To ensure you have the correct module and the projector module is replaced correctly check module markings parts lists and the relevant disassembly and replacement procedures ...

Страница 10: ...ith WUXGA 1080p resolution DVD player with Multi system equipped Component S Video Composite and HDMI HDTV Source 480P 720P 1080P Quantum Data 802B or CHROMA2327 Color Video Signal and Pattern Generator CL200 HD BaseT extender CH 506TX Voltage test meter VGA cable power cord component cable audio cable HDMI cable RJ45 cable and RS232 cable M3 screwdrivr M2 6 screwdrivr M4 allen key M2 socket drive...

Страница 11: ...ypad press 4 7 5 3 buttons sequentially or on the keypad press left down right input 6 Select OK and press Enter Performing a factory reset Use this procedure to erase all end user settings and restore the default on screen display setting 1 Enter Service Mode as described in Entering service mode on page 9 2 Select Factory Reset Resetting the lamp used hours Use this procedure to reset the lamp h...

Страница 12: ...oard Scalar board Lan board Color wheel DA Firm ware DMD board DMD Engine Fan Lamp Firmware version update V V Color wheel index V V V Reset lamp hour V V V DA calibration V V V Factory reset V V Fan calibration V V ABC calibration V V V V ROD Adjustment V Focus adjustment V V V Re write serial number V V Lens calibration V V ADC calibration V V G sensor calibration V V Network test V V HDBaseT fu...

Страница 13: ... left arrow keys to minimize video flicker 2 Select Menu Size Position 3 Adjust Horz Position and Vert Position to the inner screen Warning Failure to comply with the following could result in death or serious injury Do not stare into beam when the projector is on The bright light may result in permanent eye damage 1 Test equipment Video generator 2 Test signal D12HD H Analog 1920 x 1080 60Hz D12W...

Страница 14: ...ious injury Do not stare into beam when the projector is on The bright light may result in permanent eye damage 1 Test equipment Video generator 2 Test signal 480p 720p 1080p 3 Test pattern Master 64 grays RGBW or SMPTE BAR 256 grays 4 Inspection items Check if each color level Red Green Blue Gray appears normal Check the color saturation 5 Criteria Screen appears normal It should not have any abn...

Страница 15: ...tment tighten the screw on the side of the gear as indicated by the yellow circle Calibrating the lens To preform the lens calibration complete the steps below 1 Place the projector on a clean horizontal surface 2 On the IR remote keypad press Menu Configuration Lens Setting 3 Select Lens Calibration 4 Press Enter i Always perform a lens calibration after repairing the main board or replacing the ...

Страница 16: ... IR remote keypad press Menu Size Position Size Presets Full Size 2 Enter Factory Mode see Entering factory mode on page 9 3 Select ADC Calibration Help i Always perform a G sensor calibration after repairing the projector or replacing the main board i If the color appears abnormal after upgrading the scalar firmware perform an ADC calibration Warning Failure to comply with the following could res...

Страница 17: ...w 1 On the IR remote keypad press Menu Size Position Size Presets Full Size 2 Enter Factory Mode see Entering factory mode on page 9 3 Select ADC Calibration Help After a few seconds the ADC calibration status will change from Doing to Done 1 Test equipment Video generator output level 700 mv 2 Test signal 720P 3 Test pattern SMPTE BAR 4 Inspection items Check if the ADC calibration status has cha...

Страница 18: ...is Dual 16 6 Select DA 7 Press Select following Open Close Open to check whether DA is operating correctly i Always perform an F type fan calibration after replacing an F type fan Fan 5 Fan 6 Fan 7 Fan 8 Fan 10 If the fan calibration failure or the fan RPM does not meet the RPM range change the corresponding fan Fan 5 3300 3700 Fan 6 2500 2700 Fan 7 3300 3700 Fan 8 3400 3700 Fan 10 3400 3700 Warni...

Страница 19: ... followed by the X and Y screws Adjusting the focus i Avoid over adjusting the ROD to prevent ROD damage The top cover must be removed during the adjustment Must hold on the interlock switch on the left cover to power on with the top cover removed Warning Failure to comply with the following could result in death or serious injury Do not see the lamp module to avoid the eyes are injured during the...

Страница 20: ...fuzzy as possible and measure the minimum imaging distance Confirm whether the distance values are within the lens specification The allowed tolerance is 3 cm If the value does not meet the lens specification adjust the three set screws with a M4 hex key If the value does meet the lens specification do a boresight adjustment 2 Environment of adjustment Projects an image of 100 inches Must be done ...

Страница 21: ...osition 2 is also in focus If not repeat steps 1 and 2 4 If the projector is still not in focus reset the set screw position a Turn the set screws counterclockwise until tight b Turn the set screws 1 5 turns in the clockwise direction back to their factory default setting c Check that the alignment of the set screws matches what is shown in the image below Notice Failure to comply with the followi...

Страница 22: ...al CVBS 3 Inspection item Video performance test 4 Inspection distance 1 8 to 2 2 m 5 Criteria Check for abnormal color performance line distortion or noise on the screen 1 Test equipment DVD player 2 Test signal S Video 3 Inspection item Video performance test 4 Inspection distance 1 8 to 2 2 m 5 Criteria Check for abnormal color performance line distortion or noise on the screen 1 Test equipment...

Страница 23: ...1080p 3 Inspection item HDMI performance test 4 Inspection distance 1 8 to 2 2 m 5 Criteria Check for abnormal color performance line distortion or noise on the screen 1 Test equipment Video generator 2 Test signal General 1 1024 x 768 60Hz 3 Inspection item DVI Port performance test 4 Inspection distance 1 8 to 2 2 m 5 Criteria Check for abnormal color performance line distortion or noise on the ...

Страница 24: ...oller 2 Test signal None 3 Inspection item Wired remote port performance test 4 Inspection distance 1 8 to 2 2 m 5 Criteria Press the ON button on the remote controller to confirm that it can power on off the projector 1 Test equipment U disk 2 Test signal 64 Grays 3 Inspection item USB A port performance test 4 Inspection distance 1 8 to 2 2 m 5 Criteria Check for abnormal color performance line ...

Страница 25: ...mote keypad press Menu Input Switching PIP Menu 2 Set PIP PBP Enable to On 3 Check whether each item is functioning normally Split Screen Compatibility Matrix PIP PBP 3G SDI VGA BNC DVI CVBS Display Port HDMI1 HDMI2 HDBaseT USB A Mini USB RJ 45 SG SDI V V V V V V V V VGA V V V V V V V V BNC V V V V V V V V DVI V V V V V V V V CVBS V V V V Display Port V V V V HDMI1 V V V V HDMI2 V V V V HDBaseT V ...

Страница 26: ...ult The Subnet Mask 255 255 255 0 default 2 Set the projector IP address in the network settings a On the PC double click the Local Area Connection b Click Properties c Select Internet Protocol TCP IP d Click Properties e Set the IP Address to 192 168 0 240 f Set the Subnet Mask to 255 255 255 0 The Host ID 192 168 0 XXX of the PC IP Address must be different from the projector IP address g Click ...

Страница 27: ...68 0 100 default The Subnet Mask 255 255 255 0 default 2 Set the projector IP address in the network settings See Set the projector IP address in the network settings on page 24 3 Read the projector information See Read the projector information on page 24 Performing a RS232 and video function test on HDBaseT port To preform the RS232 and video function test complete the following steps 1 Connect ...

Страница 28: ...Fi SSID from the on screen display menu Main Menu Configuration Communications WLAN d Connect your PC device to the wireless SSID for the selected projector Example Christie 0111000123 2 Download Christie presenter a Use Internet Explorer to navigate to http 192 168 1 100 b Select Administrator for access type c Enter the password admin d Click Login e Click Download f Click Save 3 Install the Chr...

Страница 29: ...k Install i Select I want to manually reboot later j Click Finish 4 Perform wireless testing a Select Christie Presenter b Select Search c Click OK d Enter the password what you want to set e Click OK i Before using this function a USB dongle is needed to connect projector and PC Host directly When the connection is OK the PC shows a USB device disk ...

Страница 30: ...modes shall expand to full screen size using on screen display Horizontal and Vertical Size controls 4 Display data channel The purpose of the DDC test is to verify the DDC DDC1 DDC2B operation of the projector and to verify Plug Play function 5 Acoustic High pitch sounds from cooling fans and color wheel are unacceptable ID Check item Check point 1 Labels Missing letters and blurry print are unac...

Страница 31: ...are upgrade utility To install the firmware upgrade utility on your PC complete the following steps i The firmware upgrade procedure for D12WU H is the same as D12HD H D12HD H is used as the example ID Equipment Needed 1 Software OPFU One package firmware upgrade 2 Hardware Projector Power cord provided with the projector and appropriately rated for you region LAN cable CAT 5e PC or Laptop with Wi...

Страница 32: ...jector For example if the projector IP address is 192 168 000 100 then set computer IP address to 192 168 000 xxx where xxx is not 100 c Enter the projector s IP address d Click Next 7 Click Next 8 Click the correct model name then click next 9 Choose the firmware version that you want to upgrade to then click next The firmware upgrade procedure runs automatically and takes two hours to complete 1...

Страница 33: ...he projector by pressing the power button 4 Connect the projector with a Mini USB cable to the PC 5 Download the latest firmware program file from website unzip the firmware file and save it to the desktop a Double click the firmware folder b Choose the upgrade file based on the capability of the PC 64 bit system execute FlashUpgrader_x64 exe 32 bit system execute FlashUpgrader_x32 exe 6 To execut...

Страница 34: ... blink Lamp time has expired and lamp should be replaced projector also begins to display the replace lamp OSD message at startup Green no blink Lamp is on and operating correctly Green short blink Projector lamp is switching on Off Lamp is off STATUS LED Off AC power is off without AC plug in Blue solid AC has been applied projector is in standby mode Blue solid Projector is cooling down Green fl...

Страница 35: ... to verify image performance No Is the IR remote keypad working Refer to verify the IR remote keypad operation No No fault found Yes No End Is the network connection functioning Refer to verify the network connection No Yes Yes Is the correct PIN code Refer to verify PIN protection section Is the power button backlit Refer to verify power connection No Press the power button to turn on the project...

Страница 36: ...the power source providing AC voltage Yes No Properly connect the power cord at The projector and AC power source Supply AC voltage 100 120V or 200 240V Is the interlock switch closed Yes Ensure the interlock switch is in the closed position Measure the voltage of J2 pins 1 13 and 15 Is the output 5V Yes Replace the LVPS Replace the main board and the keypad board No fault found End Yes No No No N...

Страница 37: ...he voltage test meter to test the voltage of J2 of Main Board Pin 1 5V Check if J2 Main Board Pin16 24 is 12 V output Change LVPS Check if J17 J18 Main Board Pin3 5V 0 25 output Change Formatter board Change lamp driver Yes No No Yes Yes No Change LVPS 5V 0V 0V 5V 0V Yes 12V Make sure all connectors are connected proprely Pin 20 Pin 2 Pin 1 Pin 19 Pin 1 Pin 5 Pin 1 Pin 5 J2 J17 J18 ...

Страница 38: ...ge output J24 J28 J29 J30 J23 J3 2 Pin3 5V 5V 12V Replace the Format board No Yes Yes Yes Is problem solved Is problem solved Replace the Format board Replace the thermal switch No Replace connect board Check Fan connect board is OK烎 Test voltage J24 J28 J29 J30 J 23 J32 Pin2 2 5V 10 No Replace according fan or blower Yes Replace the Scalar board Yes 1 3 No No No Pin 1 Pin 3 Pin 1 Pin 3 Pin 3 Pin ...

Страница 39: ...tput Change lamp Does lamp LED flash red Is the lamp OK Check if J2 Pin 1 13 15 5V output Check if J17 J18 Pin 3 5V 0 25 output Change color wheel module Change LVPS No Fault Found End No Yes Yes Yes Yes No No No Yes No Change connect board Change lamp Change lamp driver No Yes Pin 10 Pin 1 J46 Pin 20 Pin 2 Pin 1 Pin 19 Pin 1 Pin 5 Pin 1 Pin 5 J2 J17 J18 ...

Страница 40: ...e DMD board Replace format board Ensure signal cable and signal source work fine Does PC image show on the screen Replace format board Yes Yes No Yes No No Yes 1 2 No Yes No Does PC image show on the screen Replace the scalar board No Yes Does Image flick or flash烎 Yes Yes Re assemble format board to engine connector Is the problem solved No Replace lamp Is the problem solved No Replace lamp drive...

Страница 41: ...cedure Does the color appear normal Yes No No 1 2 1 3 Replace the main board Does the color appear normal Replace the color wheel module No No Does the Video image show on the screen Ensure that the signal cable and signal source are working Does the Video image show on the screen Replace the Main board No No Yes Does Video image show on the screen Replace the IO board No Yes Replace scalar board ...

Страница 42: ...odule and light engine module Ensure there is no dust on the socket and LVDS bus to DMD gold finger and this need to be done in a clean room Is there noise in the image Ensure that the signal cable and signal source are working Adjust the pixel phase by selecting 1 Size Position 2 Pixel phase to adjust phase in the Menu Has the Image noise been resolved Replace the main board Yes No No Yes Yes No ...

Страница 43: ...ace the horizontal lens motor Is the vertical lens shift working correctly Replace the vertical lens motor Replace the light engine Yes Yes Replace the light engine Yes Is the image uniformity good No Is the image uniformity good No Yes Yes Is the horizontal lens shift working correctly Is the vertical lens shift working correctly No No No Yes Yes Is the horizontal lens shift working correctly Is ...

Страница 44: ...he unit powered on Is the unit power on Check the IR board connections in the remote Does the OSD menu show up on screen Press the menu button on the IR remote keypad No No No Fault Found Yes Plug in signal cable and power cord then press the power button on the remote Are the other functions on the IR remote keypad working End Yes Replace the IR remote keypad No No Yes Yes Yes Yes ...

Страница 45: ...w Enter PIN dialog Box on the screen Yes Is the PIN correct Yes Does forget the PIN code Start No Turn off the unit then Hold the power Button and press the Enter button at the same time PIN will be reset to default Default PIN Sequentially press these keys 1 2 3 4 5 Enter into main menu to turn PIN protection on No Yes Yes No Enter the PIN code ...

Страница 46: ...e Network settings of the unit correct Is the Network functioning correctly Yes No Yes No Fault Found End Yes Is the Internet source on the PC working Yes Replace the LAN cable Use an alternate PC Change the Network setting Refer the Chapter about Network setting No No Is the RJ45 connector LED green No Replace the LAN board Yes Replace the main board Replace the main board Is the RJ45 connector L...

Страница 47: ...serious injury OBSERVE ALL ELECTROSTATIC PRECAUTIONS Use a grounded wrist strap when handling electronic assemblies NON INSULATED DANGEROUS VOLTAGES MAY BE EXPOSED Always power down and disconnect disengage all power sources to the projector before servicing or cleaning CHRISTIE ACCREDITED SERVICE TECHNICIANS REQUIRED All module replacement procedures must be performed by qualified service technic...

Страница 48: ...release the lock b Remove the lens 4 Install the new lens a Fully insert the lens assembly straight into the lens mount b To lock the lens in place rotate the lens cap clockwise Removing and installing the fuse 1 Turn off the projector Warning Failure to comply with the following could result in death or serious injury Be careful not to dirty the glass of the lens module Be careful not to touch th...

Страница 49: ...ojector to cool down into standby mode 3 Take off rear fan cover by releasing 1 screw on the cover 4 Remove the screw on the fuse 5 Release the fuse and replace the new one Removing the fans 1 and 2 1 Open the trap door to loosen one captive screw with a M3 screwdriver 2 Remove the lamp cover module ...

Страница 50: ...connectors to remove the fans 4 Disconnect the extend wire then separate the outlet vent cover and fan 5 Tear off two rubbers to separate fans fan 1 and 2 6 Unscrew two screws with a M3 screwdriver to remove the fan docking board 7 Unscrew two screws with a M3 screwdriver to remove the cover rear fan button 8 Replace the rear cover if required ...

Страница 51: ...hree captive screws with a M3 screwdriver to remove lamp 1 module 2 Loosen three captive screws with a M3 screwdriver to remove lamp 2 module Removing the color wheel 1 Loosen one screw with a M3 screwdriver to open the color wheel cover 2 Loosen three captive screws with a M3 screwdriverto take out the color wheel module ...

Страница 52: ... the top cover 1 Loosen three captive screws first 2 Slide the top cover ahead and lift it off of the projector 3 Remove ten screws with a M3 screwdriver securing top shielding Removing the main board 1 Remove eight hex screws with a M3 socket driver and one hex screw with a M14 socket driver ...

Страница 53: ... 3 Remove nine screws with a M3 screwdriver indicated by the circle in the graphic below and disconnect the twenty one connectors on the main board indicated by the square Item Male connector on connector board Description Figure A J67 FAN1 FAN2 FAN3 White connector and black wire tube 12 pin A B C D E F G H J K L I M N O P Q R S T U ...

Страница 54: ...of white Connector and black wire tube 20 pin F DA SENSOR Composed of red black white and blue wire white connector and black wire tube 3 pin G J35 DA MOTOR Composed of brown black yellow and green wire white connector 4 pin H J53 TO FAN BD White connector and black wire tube 30 pin I J18 LAMP2 White connector and black wire tube 5 pin J J17 LAMP1 White connector and black wire tube 5 pin K J40 H ...

Страница 55: ... of red black wire white connector 2 pin P J38 SHUTTER Composed of red yellow white and blue wire white connector 4 pin Q J14 LENS MEM Z F White connector and black wire tube 10 pin R J62 DET Composed of red black white and blue wire white connector and blue wire tube 4 pin S J63 DET Composed of black blue white and blown wire white connector and blue wire tube 4 pin T J64 DET Composed of red blac...

Страница 56: ...tly from the front to disconnect the J27 connector on the bottom to release the main board 5 Remove two connectors securing main board module then separate the input cover 6 Loosen three screws with a M3 screwdriver and unplug two connectors to separate format board 7 Remove the sponge securing the format board ...

Страница 57: ...ve three standoffs yellow with a M3 screwdriver to separate the scalar board and PW808 media board 9 Remove two hex standoffs with a M3 socket driver 10 Remove nine screws with a M3 screwdriver securing the main board bottom shielding Removing the front cover and components 1 Pull down the filter cover then take out it ...

Страница 58: ...river and three connectors securing the LED board 3 Remove six screws with a M3 screwdriver tear off 3M tape and take out the cable from wire mount then securing the shielding 4 Remove eleven screws with a M3 screwdriver securing the front cover module 5 Remove four screws with a M3 screwdriver then separate two switchs ...

Страница 59: ...e replacement H Series Service Manual 57 020 000802 03 Rev 1 12 2016 6 Take out two IR sensor boards from the front cover 7 Loosen two screws with a M3 screwdriver securing the lens holder button 8 Remove the IR lens ...

Страница 60: ...al 58 020 000802 03 Rev 1 12 2016 Removing the rear cover 1 Remove ten screws with a M3 screwdriver securing the back shielding 2 Remove twelve screws with a M3 screwdriver 3 Remove the fuse holder by rotating it counter clockwise 4 To replace the fuse ...

Страница 61: ...6 5 Remove two screws with a M3 screwdriver and one connector 6 Take out the back cover module upward 7 Unplug two connectors and remove two screws with a M3 screwdriver to take out the rear cover connector board 8 Remove two screws with a M3 screwdriver securing the interlock switch ...

Страница 62: ...ws with a M3 screwdriver and two connectors then take out rear status led board and IR 10 Loosen two screws with a M3 screwdriver to separate the fan 3 module and back cover 11 Separate the rubber and fan 3 Removing the left cover 1 Remove six screws with a M3 screwdriver securing the left cover module ...

Страница 63: ...over Removing the right cover 1 Remove metal shield covering power supply for visibility and access to right cover screws 2 Loosen two screws with a M3 screwdriver to separate right cover and keypad board module 3 Remove six screws with a M3 screwdriver and two connectors to separate keypad board keypad panel and enter key ...

Страница 64: ...e lamp driver 1 Cut off the cable tie red remove seven connectors from the fan driver 2 Remove six screws with a M3 screwdriver for the screen four for the plate 3 Pull out the lamp driver 2 module then remove three connectors 4 Loosen four screws with a M3 screwdriver to remove fan driver board ...

Страница 65: ...our spacer supports 6 Loosen the four screws with a M3 screwdriver and unplug three connectors to remove the light cut module 7 Loosen four standoffs yellow with a M3 socket driver and separate the lamp driver 1 from four spacer supports blue Removing the fan 4 1 Loosen three screws with a M3 screwdriver to remove the fan 4 module ...

Страница 66: ...emove four screws with a M3 screwdriver and rubbers to separate the fan 4 and bracket 3 Loosen four screws two terminal screws with a M3 screwdriver and one ground terminal screw to release cables and remove bracket 4 Separate the cable and fuse holder 5 Separate the bracket and AC inlet ...

Страница 67: ...h a M3 screwdriver and unplug one connector to remove the thermal switch 2 Remove five screws with a M3 screwdriver securing the fan 8 module and duct blower module 3 Remove three screws with a M3 screwdriver to separate the fan 8 and bracket 4 Remove five screws with a M3 screwdriver securing the fan 5 module and duct blower module ...

Страница 68: ...hree screws with a M3 screwdriver to separate the fan 5 and bracket 6 Remove six screws with a M3 screwdriver securing the fan 6 module and bracket 7 Remove three screws with a M3 screwdriver to separate the fan 6 and bracket 8 Loosen six screws with a M3 screwdriver to remove the engine module ...

Страница 69: ... 1 Remove three screws with a M2 6 screwdriver and two connectors securing the dynamic aperture module 2 Then remove two screws with a M2 6 screwdriver securing the dynamic aperture 3 Remove one screw with a M2 6 screwdriver securing the photo sensor board 4 Remove four screws with a M2 6 screwdriver securing the lamp housing ...

Страница 70: ... DMD DMD board 1 Remove four screws with a M3 screwdriver securing the thermal module 2 Remove four screws with a M3 screwdriver securing the DMD board Notice Failure to comply with the following may result in property damage Must paste a new thermal pad evenly when replacing the DMD module Must paste a new thermal pad when assemble the heat sink ...

Страница 71: ... board 4 Take out the DMD module then separate the DMD from DMD bracket 5 Take out the DMD mask then loosen four screws with a M3 screwdriver to remove the thermal module Removing the color wheel docking board 1 Remove two screws with a M3 screwdriver and unplug one connector securing the color wheel docking board ...

Страница 72: ...nt H Series Service Manual 70 020 000802 03 Rev 1 12 2016 Removing the power supply 1 Remove nine screws with a M3 screwdriver securing the power supply 2 Unplug four connectors red securing the power supply 3 Remove two cables ...

Страница 73: ...7 and 10 1 Remove five screws with a M3 screwdriver securing the duct blower module and fan 10 2 Remove six screws with a M3 screwdriver and one extend wire securing the duct blower module and fan 7 Removing the projector feet 1 Unplug HDMI cable 2 Remove four safety nuts then remove the projector feet ...

Страница 74: ...oving the base shielding 1 Remove nineteen screws securing the base shielding Removing the HDMI extend board 1 Loosen two screws with a M3 screwdriver to remove the HDMI extend board module 2 Remove two screws with a M3 screwdriver and one hex to separate the bracket and HDMI extend board ...

Страница 75: ...1 nominal 6 Uniformity Full white ANSI 13 point Nominal 15 15 Maximum 25 25 Lens center position Full black ANSI 13 Point Maximum 65 50 Lens center position 7 Projection lens Standard lens A21 TR 1 5 2 0 WUXGA Zoom Ratio 1 33X Optional lens A20 TR 1 2 1 5 WUXGA Zoom Ratio 1 25X Optional lens A22 TR 2 0 4 0 WUXGA Zoom Ratio 2 0X 8 Lamp specification Type Philips 465W E21 9 arc1 2 mercury lamp 465W ...

Страница 76: ...nalog RGBHV Component HDTV input signal Display Port x1 version 1 1a Mini USB x1 Type B mini USB 2 0 Device USB x1 Type A RJ45 1 HDBaseT input Transmits uncompressed high definition video by HDMI Tx interface Ethernet 100BaseTx control signals including RS 232 and Infrared through a single 100M Cat5e 6 LAN Cable RJ45 2 Presenter an AP which is used to transfer Host PC NB image to Projector Web con...

Страница 77: ... Example shown Description 1 H1 Model name for example H1 D12HD H H2 D12WU H 2 15 Year for example 15 2015 16 2016 19 2019 3 23 Manufacturing week for example 23 The 23th week 4 008 Serial numbers i This label represents the serial number for D12HD H Projector It is produced on the 23th week of 2015 Its serial number is 008 ...

Страница 78: ...H Series Service Manual 76 020 000802 03 Rev 1 12 2016 Service parts This chapter shows the exploded image of the projector ...

Страница 79: ...Service parts H Series Service Manual 77 020 000802 03 Rev 1 12 2016 Main projector 1 2 3 4 5 6 7 8 9 10 11 12 ...

Страница 80: ...3 005353 01 IO cover module white 4 003 005280 01 Right cover 003 005344 01 Right cover white 5 003 005307 01 Front cover 003 005351 01 Front cover white 6 003 005279 01 Left cover 003 005343 01 Left cover white 7 003 005286 01 Rear cover 003 005348 01 Rear cover white 8 003 005288 01 Rear fan cover 9 003 005308 01 Power supply 10 003 005305 01 Bottom cover 003 005350 01 Bottom cover white 11 003 ...

Страница 81: ...3 005299 01 Color wheel 2 003 005310 01 DA module A70 3 003 005324 01 Light engine module D12HD H 003 005300 01 Light engine module D12WU H 4 003 005323 01 DMD 95 D12HD H 003 005276 01 DMD 96 D12WU H 5 003 005321 01 PCB DMD board 6 003 005298 01 Housing lamp 7 003 005278 01 Motor stepping DC 12V 1 2 3 4 5 6 7 ...

Страница 82: ...Service parts H Series Service Manual 80 020 000802 03 Rev 1 12 2016 Top cover Item Part number Description 1 003 005301 01 Top cover 003 005352 01 Top cover white 1 ...

Страница 83: ...parts H Series Service Manual 81 020 000802 03 Rev 1 12 2016 Left cover Item Part number Description 1 003 005279 01 Left cover 003 005343 01 Left cover white 2 003 005241 01 Coarse dust filter 3PK H Series 1 2 ...

Страница 84: ...es Service Manual 82 020 000802 03 Rev 1 12 2016 Right cover Item Part number Description 1 003 005280 01 Right cover white 003 005344 01 Right cover white 2 003 005283 01 Keypad cover 003 005346 01 Keypad cover white 1 2 ...

Страница 85: ...rt number Description 1 003 005302 01 PCB format board D12WU H 003 005325 01 PCB format board D12HD H 2 003 005500 01 PCB scalar board D12WU H 003 005303 01 PCB scalar board D12HD H 3 003 005318 01 PCB PW808 board 4 003 005304 01 IO cover module 003 005353 01 IO cover module white 1 2 3 4 ...

Страница 86: ...Service parts H Series Service Manual 84 020 000802 03 Rev 1 12 2016 Lamp driver Item Part number Description 1 003 005309 01 Lamp driver 465W 1 ...

Страница 87: ...020 000802 03 Rev 1 12 2016 Bottom cover Item Part Number Description 1 003 005305 01 Bottom cover 003 005350 01 Bottom cover white 2 003 005311 01 PCB HDMI extend board 3 003 005306 01 Foot adjust 4 003 005296 01 Blower 70 X 70 X 25mm 1 2 3 4 ...

Страница 88: ...020 000802 03 Rev 1 12 2016 Front cover Item Part Number Description 1 003 005307 01 Net iron front module 003 005351 01 Net iron front white 2 003 005284 01 IR lens button 003 005347 01 IR lens button white 3 003 005313 01 PCB IR board 1 3 2 ...

Страница 89: ...ver Item Part Number Description 1 003 005286 01 Rear cover 003 005348 01 Rear cover white 2 003 005315 01 PCB LED board rear 3 003 005314 01 PCB fan connector board 4 003 005269 01 Fuse 10A 250V 003 005270 01 Fuse 20A 250V 5 003 005277 01 Fan axial 120 X 120 X 38 mm 5 4 1 2 3 ...

Страница 90: ...s H Series Service Manual 88 020 000802 03 Rev 1 12 2016 Rear fan cover Part Number Description 1 003 005277 01 Fan axial 120 X 120 X 38 mm 2 003 005288 01 Cover rear fan 3 003 005316 01 PCB fan docking board 2 1 3 ...

Страница 91: ...kaging Item Part Number Description 1 003 005293 01 Carton 784 x 660 x 387 mm prime 2 003 005294 01 Cushion bottom EPE 3 003 005295 01 Cushion top EPE 4 013 102446 01 Bag EPE 1000 mm x 700 mm 5 013 102445 01 Bag PE 1000 mm x 730 mm 6 003 005238 01 Remote control 1 5 4 2 3 6 ...

Страница 92: ... Seoul ph 82 2 702 1601 Japan Tokyo ph 81 3 3599 7481 India ph 91 080 6708 9999 Germany ph 49 2161 664540 France ph 33 0 1 41 21 44 04 Eastern Europe and Russian Federation ph 36 0 1 47 48 100 China Shanghai ph 86 21 6278 7708 China Beijing ph 86 10 6561 0240 Brazil ph 55 11 2548 4753 Australia ph 61 0 7 3624 4888 Worldwide offices Italy ph 39 0 2 9902 1161 Consultant offices Canada Kitchener ph 5...

Отзывы: