


- 30 -
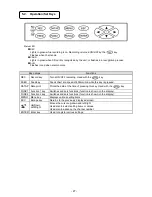
6-2. Basic Operation
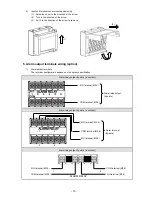
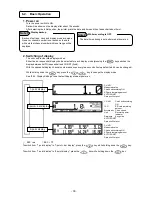
1. Power on
Turn the power switch to ON.
Data will be shown on the display after about 10 seconds.
After detecting the initial position, the printer prints the date and time and then feeds chart about 5mm.
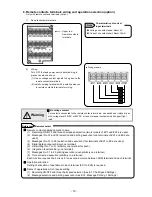
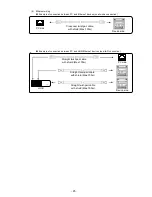
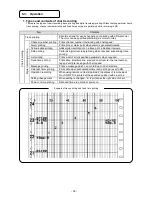
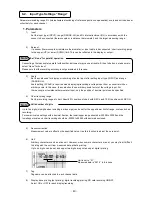
2. Switching of display
The unit can provide three display modes.
Either fixed or sequential display can be selected for each display mode (pressing the
key switches the
display between AUTO (sequential) and CONST (fixed).
With the sequential display, channel number advances every two seconds (factory default which can be changed).
While holding down the
key, press the
/
key to change the display mode.
See
“8-24. Display Settings” to set default display mode at power-on.
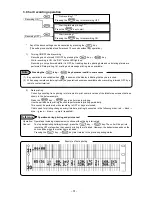
CH NO.
Measured value
Chart end/recording ON
SD card remaining amount
AUTO/CONST
Data print/list print
CH NO.
Chart end/recording
ON
TAG
SD card remaining
amount
Measured value Chart speed
Unit
Recording point
indicator
Date/time
Key guide
AUTO/CONST
Data print/list print
CH NO.
Measured value
Chart end/recording ON
SD card remaining amount
AUTO/CONST
Data print/list print
↓: ESC +
▲
↑: ESC + ▼
To switch from “1-point display” to “1-point + bar display”, press the
key while holding down the
key.
To switch from “1-point display” to “6 point display”, press the
key while holding down the
key.
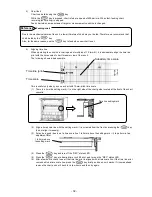
The date/time printing is not performed at power-on.
Note 2
While recording is OFF
Backup of settings, clock and display mode are made.
However, channel number is not saved so the data
with smallest channel number within set range will be
dsplayed.
Display backup
Note 1
6-point display
1-point display
1-point + bar display


