


チコーエアーテック株式会社
Copyright CHIKO AIRTEC CO., LTD. 2013
20
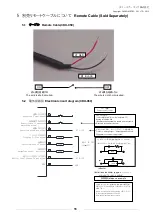
5.4
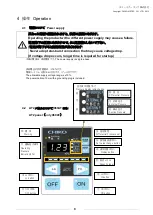
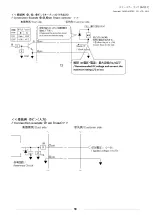
遠隔操作と本体操作について
Remote operation and operation from main body
遠隔操作で
ON/OFF
する場合は、④と⑧を短絡させておきます。
①を短絡→
ON
①を短絡しない→
OFF
(「各線の色と信号について」の表を参照ください)
Short-circuit between pin
①
and pin
④⑧
for remote ON/OFF.
Pin
①
is short-circuited.
→
ON
Pin
①
is not short-circuited.
→
OFF
(Refer to the table, “ Wire colors and signals”)
Pin
①
Pin
⑧
Pin
④
Keep pins
④
and
⑧
short-circuited.
Short-circuit pin
①
and pins
④⑧
for ON/OFF
本体操作で
ON/OFF
して信号を取り出す場合は、④と⑧を短絡させないでください。
「
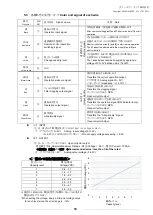
5.3
各線の色と信号について」の説明に従い、必要な出力信号を取り出して下さい。
Do not short-circuit the wires [4] and [8] each other when transferring signals by turning ON and OFF
the dust collector from the main body.
Transfer required output signals in accordance with the explanation in
“5.3 Color and signal of each wire”
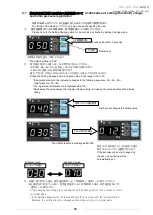
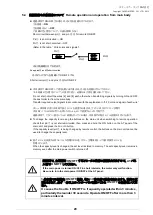
リモート操作移行中に本体側で能力レベルを変更する場合は、⑦ピンに印加していない状態で
本体
AT
パネルの
ON
ボタンを押しながら
Lo, Hi
で変更することが可能です。
遠隔操作で、(⑦ピン)能力レベルの変更を行っている場合、本体側での能力レベル変更は不可となります。
To change the capacity level using the buttons on the main unit when switching to remote operation,
check that pin
⑦
is not shorted-circuited, then press and hold the ON button on the AT panel of the
main unit, and press the Lo or Hi button.
If the capacity level (pin
⑦
is being changed by remote control, the buttons on the main unit cannot be
used to change the capacity level.
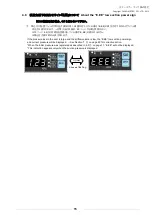
能力レベルを変更する時にレベルが記憶される為、万が一主電源を切っても前回使用レベルを
記憶しています。
When the capacity level is changed, the set level is stored in memory. The set capacity level remains in
memory even after the main power switch is turned off.
短時間で、主電源を
ON/OFF
するとモータの故障の原因となりますので、
AT
パネ
ル側で
ON/OFF
してください。
If the main power is turned ON/OFF in short intervals, the motor may malfunction.
Be sure to turn the main power ON/OFF at the AT panel.
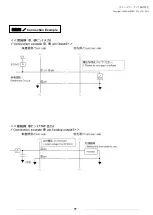
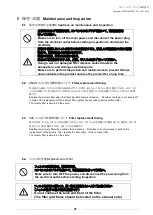
3
分未満での頻繁な
ON/OFF
操作、特に
30
秒未満で操作をされますと、故障の原
因となります。必ず
3
分以上のインターバルを置いてから
ON/OFF
の操作をしてくだ
さい。
It causes the trouble if ON/OFF is frequently operated within 3 minutes,
particularly thereunder 30 seconds. Operate ON/OFF after more than 3
minutes interval.
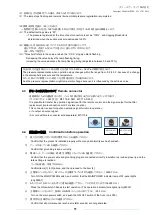
①ピン
④⑧ピンに①ピンを短絡して
ON/OFF
する
④と⑧を短絡させておきます。
④ピン
⑧ピン