Chapter 5
Maintenance and Checkup
56
5.3
Errors/Warnings
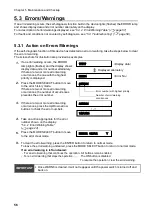
If an error/warning occurs, the self-diagnosis function built-in the device lights (flashes) the ERROR lamp
and shows display data and error number alternately on the display.
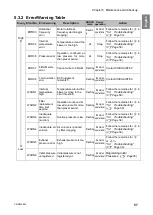
For a description of errors/warnings displayed, see
“5.4.2
Error/Warning Table” (
page 57)
For faults and conditions not covered by self-diagnosis, see
.
5.3.1
Action on Errors/Warnings
If the self-diagnosis function of this device has detected an error or warning, take the steps below to clear
the error or warning.
The screenshots for illustration are provided as examples.
1.
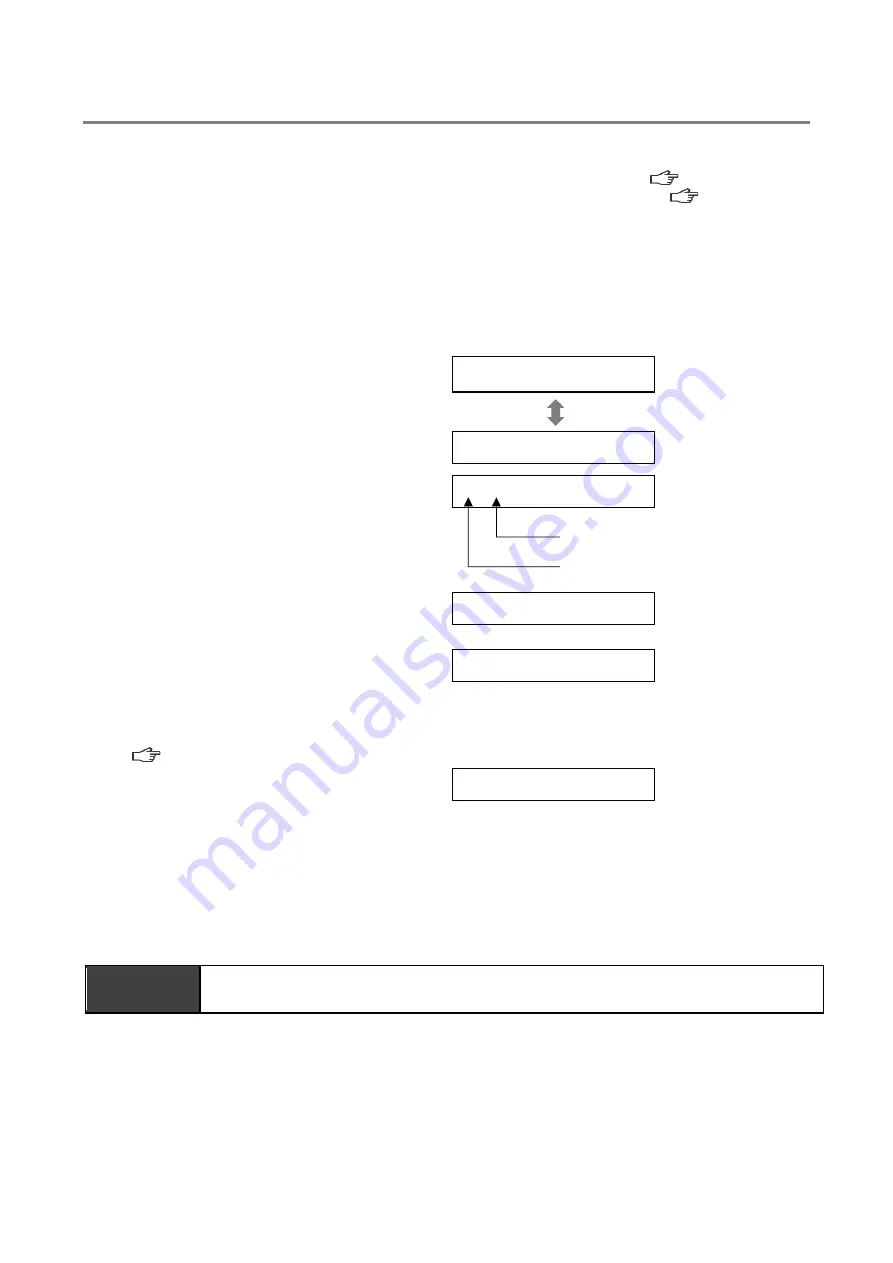
If an error/warning occurs, the ERROR
lamp lights (flashes) and the display shows
display data and error number alternately.
If there are two or more error/warning
occurrences, the one with the highest
priority is displayed.
(
Display data
)
Displayed alternately
(
Error No.
)
2.
Press the MODE SELECT button to move
to the error history mode.
If there are two or more error/warning
occurrences, the number of occurrences
precedes the error number.
3.
If there are two or more error/warning
occurrences, press the Up/Down arrow
buttons to check the error numbers.
↑
/
↓
4.
Take an action appropriate for the error
number shown on the display.
“
5.4.2
Error/Warning Table
”
(
page 24).
5.
Press the MODE SELECT button to move
to the error clear mode.
9.
To clear the error/warning, press the ENTER button to return to normal mode.
To leave the error/warning uncleared, press the MODE SELECT button to return to normal mode.
If an error/warning is left uncleared:
- For an error/warning that continues the operation .. All buttons remain enabled.
-
For an error/warning that stops the operation……… The ON button is disabled.
To resume the operation, clear the error/warning.
IMPORTANT
•
Once WARN6 is cleared, it will not reappear until the power switch is turned off and
back on.
ERR04
?????
2:ERR04
Error number with highest priority
Number of error/warning
occurrences
1:WARN4
2:ERR04
ERROR CLEAR Y
Содержание CMP-2500AT3-A
Страница 3: ......
Страница 6: ...2 6 1 2 28 6 1 3 29 6 2 29 6 2 1 RS485 29 6 2 2 29 7 30 7 1 30 7 2 30 7 3 31 7 3 1 CMP 2500AT3 A 31...
Страница 7: ...1 CMN209 006 3 1 1 1 1 2 10 60 80 1 3 0 40 80 100 1 000...
Страница 8: ...1 4 1 4 2 OFF NV63 SVF 3P 30A 1 5...
Страница 10: ...2 6 2 2 1 4 HEPA V1 1 1 1 1 AWG14 2 08...
Страница 11: ...2 CMN209 006 7 2 2 2 2 1 CMP 2500 AT3 A V1 AT3 BOX HEPA V1...
Страница 12: ...2 8 2 3 AT3 EL OLED No 1 7 2 4 9 4 15 1 1 1 1 OFF 3 3 14 ON ENTER 3 3 3 14 4 15 MODE SELECT 4 15...
Страница 13: ...2 CMN209 006 9 2 4 2 4 1 2 4 2 ON OFF 15 14 ENTER 3 ON 14 OFF 3 16 Ver ID Battery Date Time RS485 17...
Страница 14: ...2 10 2 4 3 OP kPa SP kPa DP kPa EP kPa Blower Motor rpm Runtime h 17 Total h...
Страница 15: ...3 CMN209 006 11 3 3 1 3 1 1 0 40 80 RH...
Страница 16: ...3 12 3 1 2 200 230V 1 BOX 2 3...
Страница 17: ...3 CMN209 006 13 1 2 8 3 2 1 RS485 ID 2 AT3 ON 3 4 1 7 3 ON OFF 3 30 ON OFF Ver ID...
Страница 23: ...5 CMN209 006 19 5 OFF 2...
Страница 24: ...5 20 5 1 WARN2 1 5 1 1 1 1 2 2 3 4 5 2...
Страница 25: ...5 CMN209 006 21 5 1 2 1 1 1 2 2 2 3 4 1 5 6 2...
Страница 26: ...5 22 5 1 3 V1 1 4 2 3 4 5 2 1 1 1 1...
Страница 29: ...5 CMN209 006 25 5 4 EL 1 2 3 4 1 4 30 1 1 5 1 20 5 1 20 5 1 20 5 1 20...
Страница 30: ...6 26 6 6 1 6 1 1 ON AT 33 0 1 F DC 50V 100mA GND DC 1 5V 33 0 1 F LOAD LOAD DC 0 5V GND LOAD LOAD LOAD...
Страница 31: ...6 CMN209 006 27 1 5V 0 2V B C ON HIGH LOW OFF LOW HI Z LOW DC 1 2...
Страница 35: ...7 CMN209 006 31 7 3 7 3 1 CMP 2500AT3 A...
Страница 36: ...32 12 7 2 7 2 30...
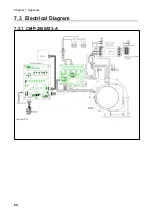
Страница 68: ...Chapter 7 Appendix 64 7 3 Electrical Diagram 7 3 1 CMP 2500AT3 A Internal terminal...

