background image

チコーエアーテック株式会社 

Copyright CHIKO AIRTEC CO., LTD. 2009 


  8


4


操作 

Operation


4.1 

電源について 

Power supply 


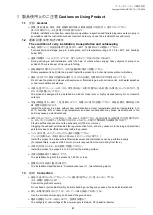
本機の電源は、単相電源です。

The power supply is single-phase, 

 
CBA-1300AT2-HC


  :

100V

115V


50/60Hz 

CBA-1300AT2-HC-T

  :

200V

240V


50/60Hz 

CBA-1300AT2-HC

200V

):

200V

240V


  50/60Hz 


供給電圧の許容範囲は、±

10

%です。


電源コード(コード長さ

3m

)付きです。(アース付プラグ)


The allowable supply voltage range is ±10%. 
The power cable of 3 m with a grounding plug is included. 


4.2 

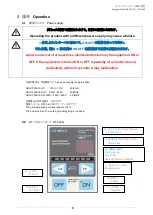
AT

パネルについて 

AT panel 


異なった電源で運転されますと、故障の原因になります。


Operating the product with a different power supply may cause a failure. 


3

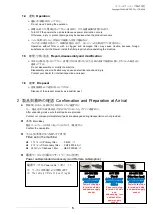
分以上のインターバルをおいて、

ON/OFF

の操作を行ってください。


それ未満、特に

30

秒未満の

ON/OFF

を繰り返すと故障の原因となります。


Allow an interval of at least three minutes before turning the equipment ON or 

OFF. If the equipment is turned ON or OFF repeatedly at a shorter interval, 

particularly within 30 seconds,it may malfunction. 


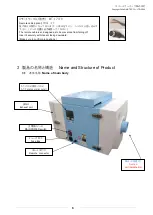
④  圧力不足

Insufficient Pressure 

    Pressure down 
 

⑤  風量不足 

Insufficient Airflow 

    Volume down


⑥  運転圧力表示 
Static pressure 
Level(KPa) 

Operating Pressure Indication 


⑦  能力レベル Volume 

Capacity Level 

③  Hi ボタン 

Hi button 

①  ON ボタン 

ON button 


③  Lo ボタン 

Lo button 
 

②  OFF ボタン 

OFF button 

Содержание CBA-1300AT2

Страница 1: ...d this instruction manual thoroughly and handle this CBA Series machine correctly so that you can use it safely for a long time and enjoy its full performance Symbols used in this manual WARNING This...

Страница 2: ...osene paint etc Explosive dust Aluminum magnesium titanium zinc epoxy etc Dust containing sparks Dust containing sparks generated by high speed cutters grinders welding machines etc Fire sources Cigar...

Страница 3: ...8 4 2 AT AT panel 8 4 3 Remote connector 9 4 4 Confirmation before operation 10 4 5 Operation procedure 10 5 Remote Cable Sold Separately 11 5 1 Electrical circuit diagram 11 5 2 Color and signal of e...

Страница 4: ...t outdoors 0 40 80 Install the product in a place without dew condensation at room temperature ambient temperature 0 to 40 C humidity 80 or less High temperature and dew condensation may cause electri...

Страница 5: ...ternal inspection and repair 1 6 Disposal Dispose of the product properly as industrial wast 2 Confirmation and Preparation at Arrival After unpacking make sure that all parts are provided Contact our...

Страница 6: ...xhaust port AT AT Panel operation panel MAIN POWER switch BOX Fuse Box Remote connector MT 173 8 Remote cable option The remote cable is so designed as to be prevented from falling off Insert it secur...

Страница 7: ...ion flange Detachable flange If th flange diameter needs to be changed to match usage conditions the installed flange can be changed without having to use any tools Replacement flanges are sold separa...

Страница 8: ...4 2 AT AT panel Operating the product with a different power supply may cause a failure 3 ON OFF 30 ON OFF Allow an interval of at least three minutes before turning the equipment ON or OFF If the equ...

Страница 9: ...r decreases due to a factor such as an open front door a clogged exhaust filter or a blocked exhaust duct The lamp turns off when the cause of the problem is corrected Insufficient Airflow Red LED Ale...

Страница 10: ...en it is over 4 0 kPa lower it under 4 0 kPa by adjusting the suction hose Using the suction hose which is too thin and is clogged may cause failure by the load too much Confirm that abnormal sounds s...

Страница 11: ...Temperature correction is not provided Reference example 3 5 6 33 0 1 F Attach a noise limiter Approximately 33 0 1 F to the output terminals Nos 1 2 and 3 When adding inductors such as relays 1 2 3 5...

Страница 12: ...operation The AT panel is disabled while the wires 4 and 8 are short circuited Yellow Change capacity level 0 5 The capacity level can be changed by applying a voltage of 0 to 5V between pins 7 and 8...

Страница 13: ...wire AT ON Lo Hi To change the capacity level using the buttons on the main unit when switching to remote operation check that pin is not shorted circuited then press and hold the ON button on the AT...

Страница 14: ...filter grid frame should be located on the exhaust side Make sure to turn OFF the main power and disconnect the power plug from the electrical outlet to cut off the electricity before starting inspec...

Страница 15: ...s into the clearance on the left and right sides between the filter case and the filter to remove the filter easily Remove the primary filter from the filter case The paper packing of the primary filt...

Страница 16: ...ion level correct Filter installation status Once month Are the filters installed securely Filter clogged status Suction force check During operation Does the suction hose end offer proper suction for...

Страница 17: ...ing 1 to 3 above remove the cause of error and press the RESET switch Or turn OFF and ON the MAIN POWER switch to reset the error status Start the operation 30 minutes later Fuses are blown out 6 5 Re...

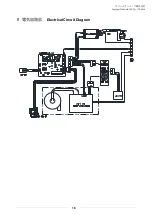
Страница 18: ...Copyright CHIKO AIRTEC CO LTD 2009 18 8 Electrical Circuit Diagram...

Страница 19: ...onths CBA 1300AT2 FB 30 CHF 3030 50 HEP 3030 69 Note The life above varies depending on the use frequency and suction density Note The contents of this manual are subject to change without prior notic...

Страница 20: ...emo about purchase Model Manufacturer s serial number Date of purchase Start of operation Your name Address Phone Person in charge LTD 562 0012 2 27 24 2 27 24 Hakushima Minoh City Osaka apan 562 0012...

Отзывы: