background image

5

5

ZEPHIRO 600 SPARK User Manual

Eng

1.4. Disclaimer

The information and specifications contained in this User Manual are subject to 

change without notice. CENTOLIGHT assumes no responsibility or liability for any 

errors or omissions and reserves the right to revise or to create this manual at any 

time.

Copyright© 2021 CENTOLIGHT. All rights reserved.

2 -  s

afeTY

 i

nsTruCTions


y

Read these instructions


y

Keep these instructions


y

Heed all warning


y

Follow all instructions

2.1. Symbols Meaning

The symbol is used to indicate that some hazardous live termi-

nals are involved within this apparatus, even under the normal 

operating conditions, which may be sufficient to constitute the 

risk of electric shock or death.

The symbol is used to describe important installation or config-

uration problems. Not following advice and information on how 

to avoid such problems may lead to product malfunction.

Caution! This symbol indicates high temperature parts! In partic-

ular, the nozzle of the ZEPHIRO 600 SPARK can cause burns. Pay 

attention to high temperatures and avoid touching the nozzle.

Eye protection - This warning symbol reminds the operator to 

protect their eyes when the ZEPHIRO 600 SPARK is operating, 

and they are less than 3m (about 10ft) away. 

This symbol indicates a protective grounding terminal.

WARNING:

Describes precautions that should be observed to prevent the 

danger of injury or death to the operator.

To protect the environment, please try to recycle packing materi-

al and exhausted consumables as much as possible.

Содержание ZEPHIRO 600 SPARK

Страница 1: ...ual and properly take care of it Leggete questo manuale e conservatelo per future consultazioni User Manual Manuale Utente 600W Spark Machine with DMX Remote Control Macchina per Scintille da 600W con DMX Telecomando ENG ITA ...

Страница 2: ...ver closer to professional s real requirements The CENTOLIGHT Team Gentile Cliente Grazie per aver scelto un prodotto CENTOLIGHT La nostra missione è quella di soddisfare ogni possibile richiesta da parte di light designers e professionisti dell il luminotecnica per l intrattenimento offrendo una vasta gamma di apparecchiature basate su tecnologie di ultima generazione Speriamo di aver soddisfatto...

Страница 3: ...Fuse 10 4 2 AC Cable 11 4 3 Dmx Connection 11 4 4 DMX Terminator 12 4 5 3 Pin vs 5 Pin DMX cables 13 5 Front Panel Description 13 6 Initialization 14 7 Ready Indicator 15 8 Heat Indicator 15 9 Menu Operation 15 9 1 Set DMX Address 16 9 2 DMX Channel Assignments and Values 16 9 3 Wireless Remote Control 16 9 4 Manual Jet Activation 18 10 Preparing For Operation 18 10 1 Spark Seed Filling Refilling ...

Страница 4: ...on If the box or the contents the product and included accessories appear damaged from shipping or show signs of mishandling notify the carrier or dealer seller imme diately In addition keep the box and contents for inspection If the fixture must be returned to the manufacturer it is important that it is returned in the original manufacturer box and packing Please do not take any action without fi...

Страница 5: ...nt to constitute the risk of electric shock or death The symbol is used to describe important installation or config uration problems Not following advice and information on how to avoid such problems may lead to product malfunction Caution This symbol indicates high temperature parts In partic ular the nozzle of the ZEPHIRO 600 SPARK can cause burns Pay attention to high temperatures and avoid to...

Страница 6: ...uring heating up and operation the housing will get hot do not touch y The product is very hot during operation and it remains hot for a long time after operation has stopped Do not touch the product s nozzle y Keep a minimum distance of 3m about 9 5ft from the machine to the nearest human or flammable material The output spark from the nozzle must be in the air but not reaching any object and min...

Страница 7: ...tic etc y Do not use in a confined space Always install the product in a location with adequate ventilation at least 20 in 50 cm from adjacent surfaces y Be sure that no ventilation slots on the product s housing are blocked 3 Power and Wiring y Always make sure that the voltage of the outlet to which you are connecting the product is within the range stated in paragraph 12 Specification on page 2...

Страница 8: ... parts recommended by the manufacturer 3 Introduction ZEPHIRO 600 SPARK is a device that creates fountains of cold sparks from 2 to 5m high 6 5 16 5 ft and controlled via DMX 512 or wireless remote The consumable based on Titanium powder does not contain gunpowder so it is absolutely safe does not produce toxic fumes and is not harmful to the environment Therefore it offers an effect comparable to...

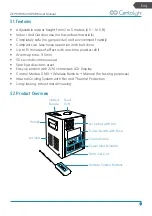
Страница 9: ...fect with one time powder refill y Warm up time 3 5 min y 30 seconds continuous jet y Spark jet direction erect y Easy operation with 2x16 characters LCD Display y Control Modes DMX Wireless Remote Manual for testing purposes y Internal Cooling System with Fan and Thermal Protection y Long lasting robust metal Housing 3 2 Product Overview Output Noozle Air Outlet with Fan Feed Port Power Switch wi...

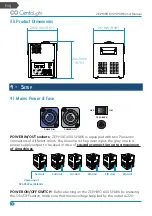
Страница 10: ...OWN UP ENTER DMX Address 1 592 READY DMX FAULT HEAT DMX IN DMX OUT POWER IN POWER OUT POWER IN OUT sockets ZEPHIRO 600 SPARK is equipped with two Powercon connectors of different colors the blue one is the power input the gray one is a power supply output to be used in case of cascade connection up to a maximum of 6 machines 1st Unit 6th Unit 5th Unit 4th Unit 3rd Unit 2nd Unit Power Input 220 250...

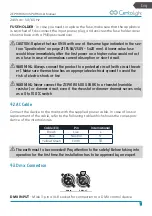
Страница 11: ...te electrical ground to avoid the risk of electric shock or fire WARNING Never connect the ZEPHIRO 600 SPARK to a rheostat variable resistor or dimmer circuit even if the rheostat or dimmer channel serves only as a 0 to 100 switch 4 2 AC Cable Connect the device to the mains with the supplied power cable In case of loss or replacement of the cable refer to the following table which shows the corre...

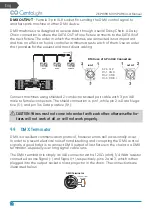
Страница 12: ...onductor twisted pair cable with 3 pin XLR male to female connectors The shield connection is pin 1 while pin 2 is Data Nega tive S and pin 3 is Data positive S CAUTION Wires must not come into contact with each other otherwise the fix tures will not work at all or will not work properly 4 4 DMX Terminator DMX is a resilient communication protocol however errors still occasionally occur In order t...

Страница 13: ...t standards 5 Pins XLR plug Pin 1 GND Screen Pin 2 Signal Pin 3 Signal Pin 4 N C Pin 5 N C 3 Pins XLR socket Pin 1 GND Screen Pin 2 Signal Pin 3 Signal 5 Pins XLR socket Pin 1 GND Screen Pin 2 Signal Pin 3 Signal Pin 4 N C Pin 5 N C 3 Pins XLR plug Pin 1 GND Screen Pin 2 Signal Pin 3 Signal 5 Front Panel Description MENU DOWN UP ENTER DMX Address 1 592 READY DMX FAULT HEAT 2 3 4 5 6 7 9 8 1 The op...

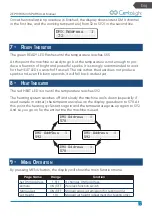
Страница 14: ...MX If a DMX controller is connected to DMX Input connector this red LED will flash frequently 7 READY LED During warm up this green LED flashes Once the minimum working temperature from 32 to 555 is reached it is on See paragraph Ready Indicator on page 15 for further details 8 MENU BUTTON Short press it to switch the setting pages 9 DOWN BUTTON It scrolls down individual items in the selection me...

Страница 15: ... fall back as dust yet 8 Heat Indicator The red HEAT LED is on until the temperature reaches 592 The heating system switches off and slowly the machine cools down especially if used outside in winter the temperature value on the display goes down to 578 At this point the heating cycle starts again and the temperature goes up again to 592 And so you go on for the entire time the machine is used DMX...

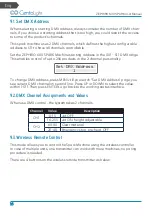
Страница 16: ...Set DMX Address 1 To change DMX address press MENU till you reach Set DMX Address page you see current DMX channel on second line Press UP or DOWN to select the value within 1 511 Then press ENTER to go back to the working status interface 9 2 DMX Channel Assignments and Values When use DMX control the system takes 2 channels Channel Value Description CH1 0 15 Jet OFF 16 255 Jet ON height adjustab...

Страница 17: ...emote Function Activation If the remote control cannot work red LED lits but machine does not operates please check whether wireless function is turn on Press MENU button till you reach Remote page Then press UP or DOWN to change current value to ON Press ENTER to confirm the display comes back to main page Remote OFF Remote ON 2 Battery Replacement If the remote control cannot work red LED does n...

Страница 18: ...ss MENU button until you reach Manual Jet page Then press UP or DOWN to select the ON OFF When the display shows ON press ENTER and the machine will spray sparks To stop spraying press UP or DOWN again The display shows OFF and then press ENTER 2 Jet Height It is possible to adjust the height of the spark fountain also in manual mode To adjust height press MENU button until you reach Jet Height pa...

Страница 19: ... a bottle or bag instead of discarding Always connect the product to a grounded circuit Before power on make sure it is connected with the rated voltage Turn on the machine it will immediately start heating up 10 2 Cleaning After operation run the machine to generate sparks till out of spark seed You can also run Consumable Cleaning Up procedure DMX channel 2 values from 60 to 80 to completely cle...

Страница 20: ...e product for maximum usage The recommended procedure is as follows y After a period of using check if there is any consumable inside the nozzle Do necessary cleaning up if there has some or it may affect spark performance even damage the machine y Test run your spark machine on a monthly basis to achieve the best perfor mance y Spark seed would easily get damp in the open air and deliver poor spa...

Страница 21: ... LCD control board Wireless Control 4 Button Remote Control A B C D UHF 433 92 MHz Remote Control Battery 12V 23A Type Alkaline Control Protocol DMX 512 DMX Channel range 2 CH DMX Connectors 3 Pin XLR In Out Mains Power AC220V 240V 50 60Hz Fuse 250V 6 3A Power Consumption 650W Protection Electronic Thermo Control Power Input Connector Lockable PowerCon Power Output Connector Lockable PowerCon Mach...

Страница 22: ...E CENTER Via Enzo Ferrari 10 62017 Porto Recanati Italy In order to send a product to service center you need an RMA num ber Shipping charges have to be covered by the owner of the product For further information please visit www centolight com 14 Warning PLEASE READ CAREFULLY EU and EEA Norway Iceland and Liechtenstein only This symbol indicates that this product is not to be disposed of with you...

Страница 23: ...Cavo di Rete 31 18 3 Connessioni DMX 31 18 4 Terminatore DMX 32 18 5 Cavi DMX 3 Poli 5 Poli 33 19 Descrizione del Pannello Frontale 33 20 Inizializzazione 34 21 Indicatore Ready 35 22 Indicatore Heat 35 23 Funzionamento del Menu 35 23 1 Modifica dell Indirizzo DMX 36 23 2 Funzioni e valori dei canali DMX 36 23 3 Controllo con Telecomando 36 23 4 Attivazione del Getto Manuale 38 24 Preparazione per...

Страница 24: ...i che tutte le parti siano nella confezione e siano in buone condizioni Se la confezione o il contenuto il prodotto e gli accessori inclusi risultano danneg giati dalla spedizione o mostrano segni di maltrattamento avvisare immediata mente il vettore o il rivenditore Inoltre conservare la scatola e il contenuto per una eventuale ispezione Se l apparecchiatura dovesse essere restituita al produttor...

Страница 25: ...te le istruzioni 16 1 Significato dei simboli Questo simbolo viene utilizzato per indicare che all interno di questo apparecchio sono presenti terminali sotto tensione anche in condizioni operative normali che possono essere suffi cienti a costituire il rischio di scosse elettriche o morte Questo simbolo è usato per descrivere importanti problemi di installazione o configurazione Il mancato rispet...

Страница 26: ...rezza Leggere attentamente le seguenti note sulla sicurezza prima di usare il prodotto Sono riportate importanti informazioni su installazione utilizzo e manutenzione 1 Sicurezza Personale y Collegare sempre il prodotto a un circuito con messa a terra per evitare il rischio di scosse Durante il riscaldamento e il funzionamento l alloggiamento si surri scalda Non toccare y Il prodotto è molto caldo...

Страница 27: ...a ballo calda e umida potrebbe formarsi condensa all interno del prodotto Per evitare di provocare guasti consentire al prodotto di acclimatarsi completamente all ambiente circo stante prima di collegarlo all alimentazione y Non montare il prodotto su una superficie infiammabile linoleum moquette legno carta cartone plastica ecc y Non utilizzare in uno spazio ristretto Installare sempre il prodott...

Страница 28: ...nti di assistenza diversi da quelli descritti nel manuale Affi dare tutte le riparazioni solo a personale qualificato Utilizzare solo accessori collegamenti o parti raccomandati da CentoLight 17 Introduzione La ZEPHIRO 600 SPARK è un dispositivo controllabile via DMX 512 o radiocomando che crea fontane di scintille a freddo alte da 2 a 5m Il materiale consumabile a base di polvere di Titanio non c...

Страница 29: ...oni compatte funzionamento silenzioso con trasmissione a cinghia y Fino a 15 minuti di effetto con una ricarica di polvere una tantum y Tempo di riscaldamento 3 5 min y Getto continuo di 30 secondi max y Direzione del getto della scintilla eretta y Funzionamento semplice con display LCD 2x16 caratteri y Modalità di controllo DMX telecomando wireless manuale a scopo di test y Sistema di raffreddame...

Страница 30: ...DOWN UP ENTER DMX Address 1 592 READY DMX FAULT HEAT DMX IN DMX OUT POWER IN POWER OUT Prese POWER IN OUT La ZEPHIRO 600 SPARK è dotato di due connettori Powercon di diverso colore quello blu è l ingresso di alimentazione quello grigio è un uscita di alimentazione da utilizzare in caso di collegamento in cascata fino ad un massimo di 6 macchine 1a Unità 6a Unità 5a Unità 4a Unità 3a Unità 2a Unità...

Страница 31: ... di una messa a terra adeguata per evitare il rischio di scosse elettriche o incendi ATTENZIONE Non collegare mai ZEPHIRO 600 SPARK a un reostato resistenza variabile o a un circuito dimmer anche se il reostato o il canale dimmer serve solo come interruttore da 0 100 18 2 Cavo di Rete Collegare il dispositivo alla rete con il cavo di alimentazione in dotazione In caso di smarrimento o sostituzione...

Страница 32: ... utilizzando un cavo bipolare schermato a 2 conduttori con connettori XLR maschio femmina a 3 poli La connessione dello schermo è il piedino 1 mentre il piedino 2 è negativo S e il piedino 3 è positivo S ATTENZIONE I fili non devono entrare in contatto l uno con l altro altrimenti i dispositivi non funzioneranno affatto o non funzioneranno correttamente 18 4 Terminatore DMX DMX è un protocollo di ...

Страница 33: ...ondenza di cablaggio tra gli standard di spina e presa a 3 e 5 poli 5 Pins XLR plug Pin 1 GND Screen Pin 2 Signal Pin 3 Signal Pin 4 N C Pin 5 N C 3 Pins XLR socket Pin 1 GND Screen Pin 2 Signal Pin 3 Signal 5 Pins XLR socket Pin 1 GND Screen Pin 2 Signal Pin 3 Signal Pin 4 N C Pin 5 N C 3 Pins XLR plug Pin 1 GND Screen Pin 2 Signal Pin 3 Signal 19 Descrizione del Pannello Frontale MENU DOWN UP EN...

Страница 34: ...l unità 6 Led DMX Se un controller DMX è collegato al connettore di ingresso DMX questo LED rosso lampeggerà a intermittenza 7 Led READY Durante il riscaldamento questo LED verde lampeggia Una volta raggiunta la temperatura minima di lavoro si accende fisso Vedere il paragrafo 21 Indicatore Ready a pagina 35 per ulteriori dettagli 8 Tasto MENU Premere ripetutamente per cambiare le varie pagine del...

Страница 35: ...intille e anche se soffiata verso l alto ricada sotto forma di polvere 22 Indicatore Heat Il LED rosso HEAT è acceso fino a quando la temperatura non raggiunge 592 Arrivato a 592 il sistema di riscaldamento si spegne e lentamente la macchina si raffredda soprattutto se utilizzata all aperto in inverno Il valore di temperatura sul display scende fino a 578 A questo punto ricomincia il ciclo di risc...

Страница 36: ...tti nella personalità a 2 canali Set DMX Address 1 Per modificare l indirizzo DMX premere MENU fino a raggiungere la pagina Set DMX Address il canale DMX attuale è visualizzato sulla seconda riga Premere SU o GIÙ per selezionare il valore compreso tra 1 511 Quindi premere INVIO per tornare all interfaccia dello stato di lavoro 23 2 Funzioni e valori dei canali DMX Quando si utilizza il controllo D...

Страница 37: ...tivazione del Telecomando Se il telecomando non funziona il LED rosso si accende ma la macchina non funzio na controllare se la funzione wireless è stata attivata Premere il pulsante MENU fino a raggiungere la pagina Remote Quindi premere SU o GIÙ per modificare il valore corrente in ON Premere INVIO per confermare il display torna alla pagina principale Remote OFF Remote ON 2 Sostituzione della B...

Страница 38: ...e assicurarsi che nessuno sia vicino al dispositivo 1 Getto Manuale ON OFF Manual Jet OFF Premere il pulsante MENU fino a raggiungere la pagina Manual Jet Quindi pre mere UP o DOWN per selezionare ON OFF Quando il display mostra ON premere INVIO e la macchina emetterà scintille Per interrompere l emissione premere nuova mente UP o DOWN Il display mostra OFF quindi premere ENTER 2 Altezza del Getto...

Страница 39: ...m3m 10ft distance Donotpourpowderinhole Usesafetyglasses Ugello di Uscita Ingresso di Alimentazione AVVISO CENTOLIGHT ZEPHIRO 600 SPARK supporta materiali di consumo fino a 130 g circa 4 5 once Conservare il materiale di consumo in eccesso in una bottiglia o in un sacchetto invece di gettarlo Collegare sempre il prodotto a una presa con messa a terra Prima dell accensione assicurarsi che la tensio...

Страница 40: ...ioni ottimali Tuttavia sono necessari alcuni passaggi per pulire e mantenere il prodotto per il miglior utilizzo La procedura consigliata è la seguente y Dopo un periodo di utilizzo controllare se sono presenti materiali di consumo all interno dell ugello Eseguire periodicamente la pulizia una scarsa manuten zione potrebbe influire sulle prestazioni negativamente o persino danneggiare la macchina ...

Страница 41: ... Telecomando a 4 Tasti A B C D UHF 433 92 MHz Batteria Telecomando Tipo 12V 23A Alcalina Protocollo di Controllo DMX 512 Intervallo Canali DMX 2 CH Connettori DMX XLR 3 Pin Maschio In e Femmina Out Alimentazione 220 240Vac 50 60Hz Fusibile T6 3A 250V 5x20 mm Consumo in Potenza 650W Protezione Protezione Termica Elettronica Connettore di alimentaz in Ingresso PowerCon Blu con Blocco Connettore di a...

Страница 42: ...0 62017 Porto Recanati Italia Per inviare un prodotto al centro di assistenza è necessario un numero di RMA Le spese di trasporto devono essere coperte dal proprietario del prodotto Per ulteriori informazioni visitate il sito www centolight com 28 Avviso UE e SEE Norvegia Islanda Liechtenstein LEGGETE ATTENTAMENTE Questo simbolo indica che il prodotto non deve essere smaltito con i rifiuti domesti...

Страница 43: ...otto viene importato nella UE da FRENEXPORT SPA Via Enzo Ferrari 10 62017 Porto Recanati Italy www centolight com CentoLight is a registered trademark of FRENEXPORT SPA Italy CentoLight è un marchio di fabbrica registrato di FRENEXPORT SPA Italia ...

Страница 44: ...Ver 1 0 Feb 2021 www centolight com ...

Отзывы: