Hardware
1 x
Top End Nest 1 x 4 x 29-3/4”
1 x
End Nest Top 5/4 x 4 x 29-3/4”
1 x
Bottom Nest End 5/4 x 4 x 29-3/4”
Wood Parts
2505
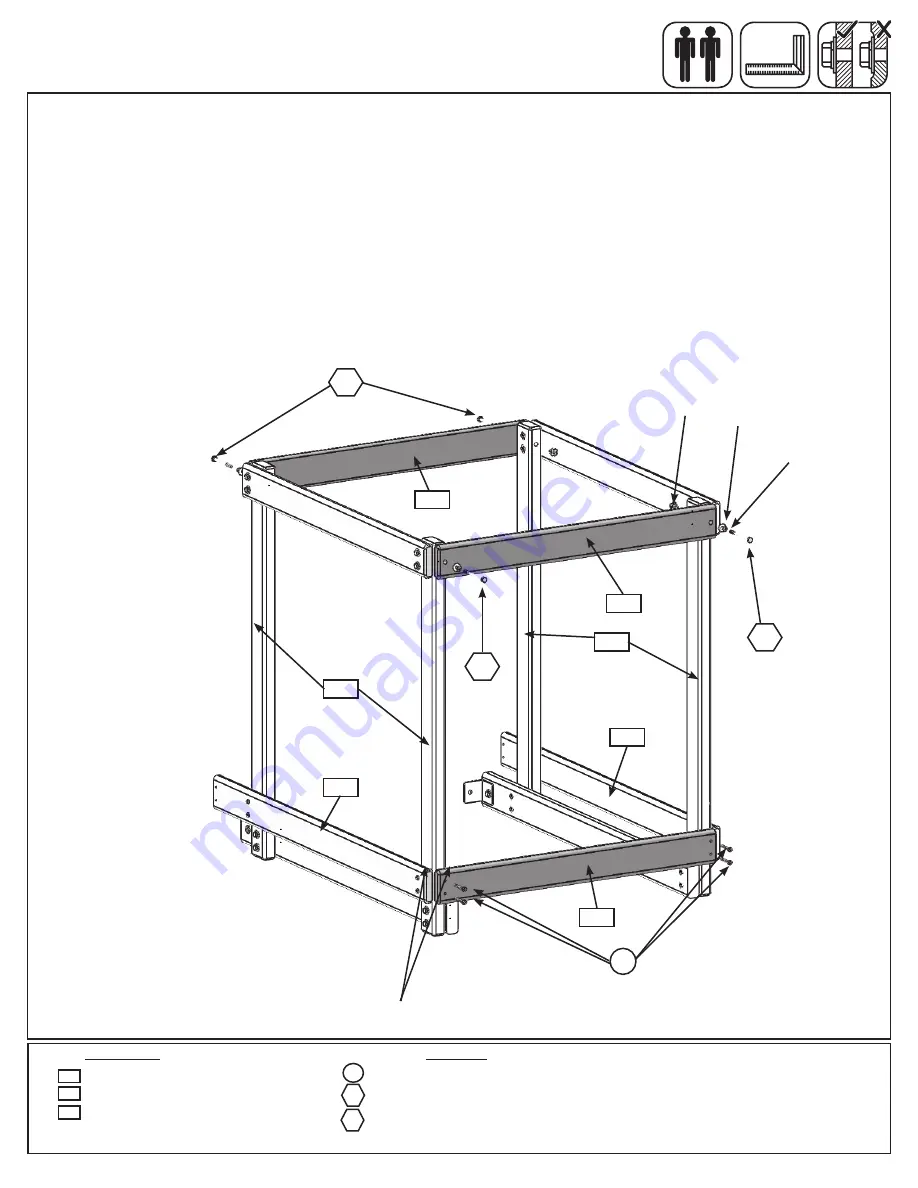
Step 25: Side Nest Assembly
Part 2
G:
Stand both Side Nest End Assemblies with the extensions facing the same way and the Swing Brackets
facing in. Loosely attach (2505) Top End Nest to the top of both (2511) Nest Posts on the extended side with 2
(H12) 1/4 x 3” Hex Bolts (with lock washer, flat washer and t-nut). (fig. 25.3)
H:
Loosely attach (2520) End Nest Top to the top of both (2511) Nest Posts, on the opposite side with 2 (H13)
1/4 x 3-1/2” Hex Bolts (with lock washer, flat washer and t-nut). (fig. 25.3)
I:
Make sure the assembly is square then tighten all bolts. (fig. 25.3)
J:
Flush to the top of both (2509) Lower Sides attach (2506) Bottom Nest End to both (2511) Nest Posts with 4
(S7) #12 x 2” Pan Screws. (fig. 25.3)
2520
Fig. 25.3
2520
2506
2505
2509
2511
2509
2511
2506
4 x
#12 x 2” Pan Screw
2 x
1/4 x 3” Hex Bolt (1/4” lock washer, 1/4” flat washer, 1/4” t-nut)
2 x
1/4 x 3-1/2” Hex Bolt (1/4” lock washer, 1/4” flat washer, 1/4” t-nut)
S7
1/4” Flat
Washer
1/4” Lock
Washer
1/4”
T-Nut
Flush
H12
H13
S7
H12
H13
H13
63
Содержание Abbeydale Clubhouse F23920
Страница 90: ...NOTES 90 support cedarsummit com ...
Страница 91: ...NOTES ...


