E:
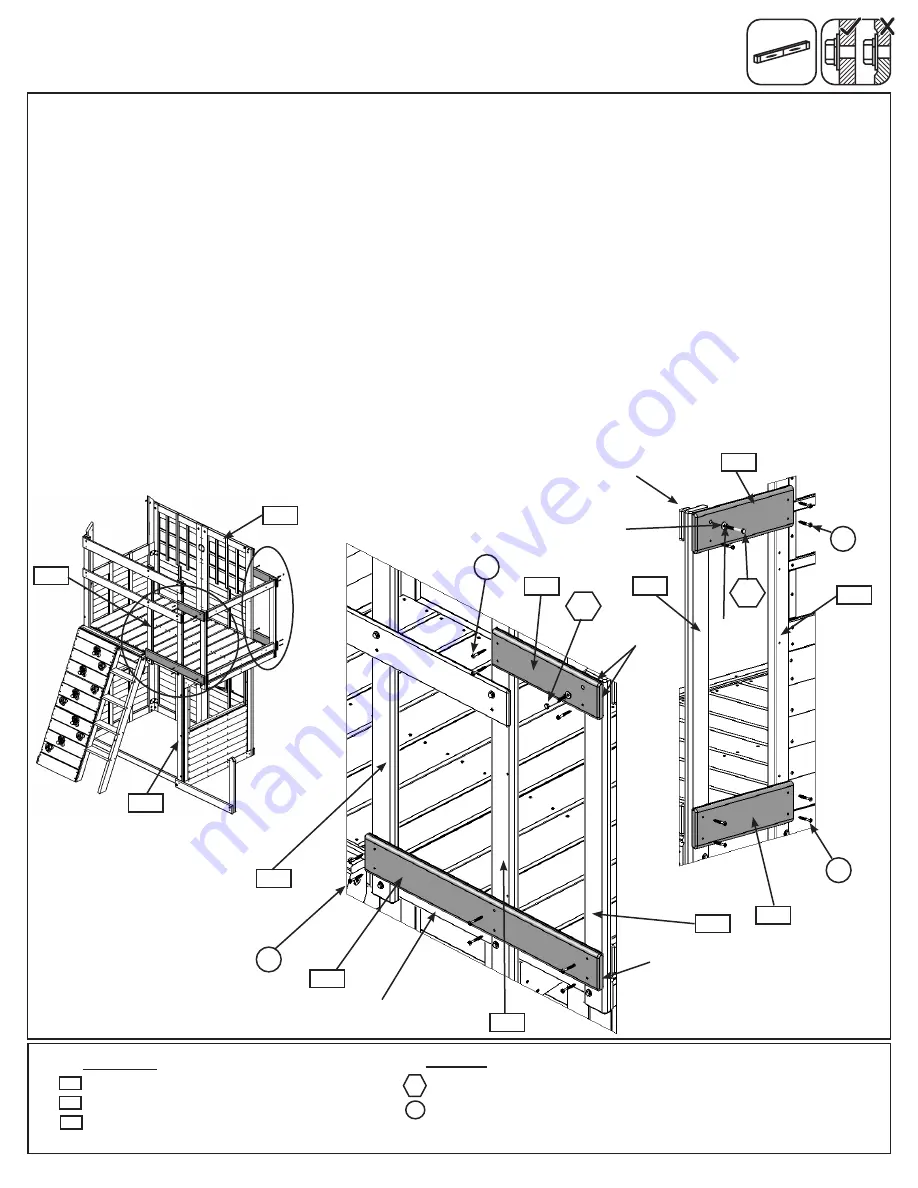
Flush to the top of the floor and flush to the end of (2500) Crowsnest Post on the Back of the assembly attach
(2481) Lower Back to (2500) Crowsnest Post, (2473) Post and (2482) Back Wall Support with 6 (S7) #12 x 2”
Pan Screws. (fig. 15.4 and 15.5)
F:
Flush to the top and end of (2500) Crowsnest Post on the Back of the assembly attach 1 (2488) Crowsnest
Top Front with 1 (H10) 1/4 x 2-1/4” Hex Bolt (with lock washer, flat washer and t-nut). (fig. 15.4 and 15.5)
G:
Make sure (2488) Crowsnest Top Front is level then attach to (2500) Crowsnest Post and (2473) Post with 3
(S7) #12 x 2” Pan Screws. (fig. 15.4 and 15.5)
H:
Repeat Steps F & G for the Front of the assembly attaching (2488) Crowsnest Top Front to (2500) Crowsnest
Post and (2527) Chalkwall Panel. (fig. 15.4 and 15.6)
I:
Flush to the top of the floor and flush to the end of (2500) Crowsnest Post on the Front of the assembly attach
(2487) Crowsnest Bottom Front to (2500) Crowsnest Post and (2527) Chalkwall Panel with 4 (S7) #12 x 2” Pan
Screws. (fig. 15.4 and 15.6)
Hardware
Fig. 15.4
2481
H10
H10
2482
2482
2487
2488
2473
Wood Parts
Step 15: Crowsnest Assembly
Part 2
1 x
Lower Back 5/4 x 5 x 34-1/8”
2 x
Crowsnest Top Front 5/4 x 5 x 15-5/8”
1 x
Crowsnest Bottom Front 5/4 x 5 x 15-5/8”
2481
2488
2 x
1/4 x 2-1/4” Hex Bolt (1/4” lock washer, 1/4” flat washer, 1/4” t-nut)
16 x
#12 x 2” Pan Screw
S7
2487
H10
1/4” Flat
Washer
1/4” Lock
Washer
1/4” T-Nut
(hidden)
Flush
Front
Back
2527
Flush
Flush to Floor
Boards
S7
x 6
S7
x 3
S7
x 4
2500
2473
2488
S7
x 3
2500
2527
Fig. 15.5
Fig. 15.6
45
Содержание Abbeydale Clubhouse F23920
Страница 90: ...NOTES 90 support cedarsummit com ...
Страница 91: ...NOTES ...


