background image


CHAPTER 5 - APPENDIX

REMOTE CONTROL KEY FUNCTIONS

Detailed View

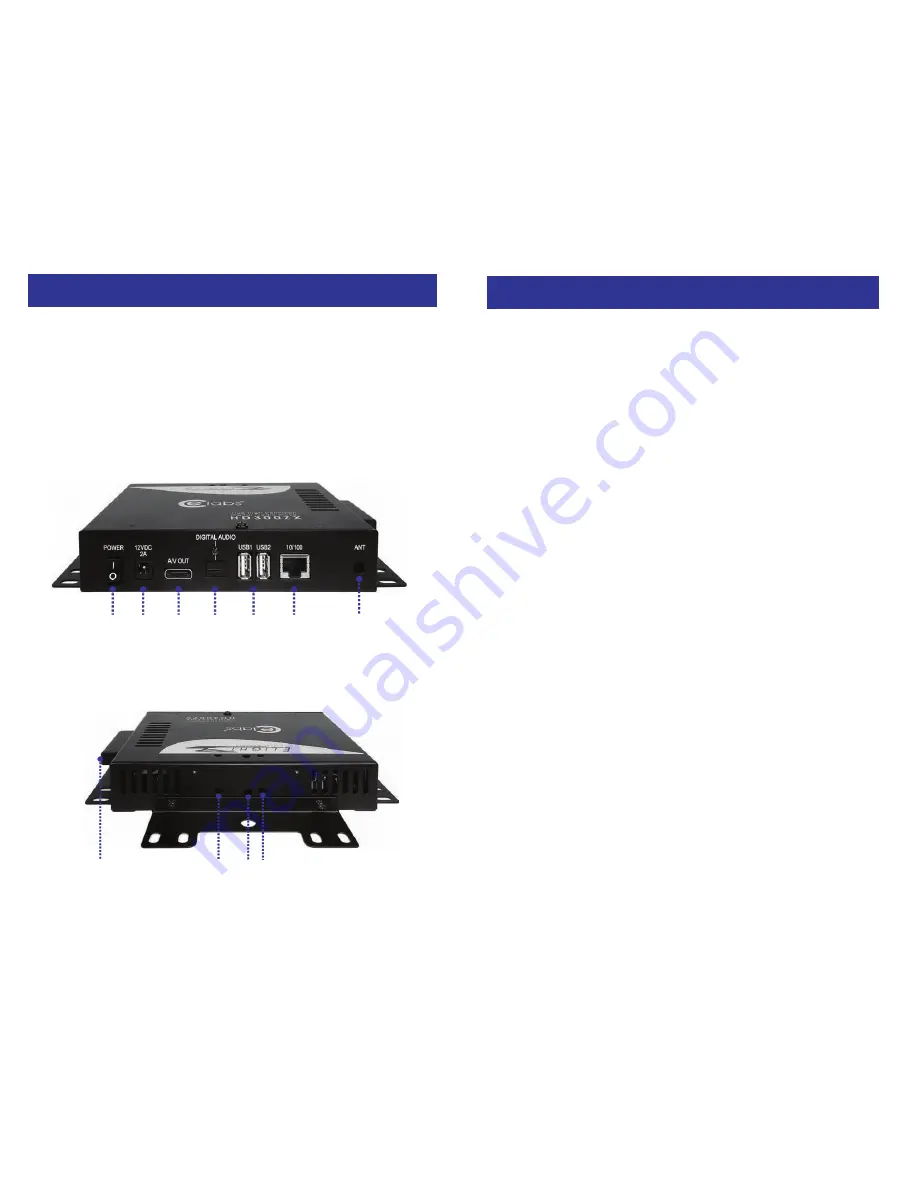
The images below depict the standard HD-300ZX device showing the 

front view with its connections and the rear view with the LED lights.

Front View


1. ON/OFF switch


2. Power receptacle


3. A/V multi connector


4. SPDIF audio output


5. USB ports


6. Ethernet RJ-45 port


7. 802.11b/g antenna

Rear View


1. CF card slot


2. LAN Access LED


3. Infrared Receiver


4. Power LED

Note: These images are for reference only. Your model may come in a 

different color and with the 802.11b/g antenna installed already.


FAQ

If your display is blank and you can not see the HD-300ZX menu, press the TV 

Mode button on your remote control to toggle between the different video 

outputs. Once you can see the main screen, go to the setup menu, select 

the Audio Video tab and set the correct tv / monitor type and resolution.  

Next press the SETUP button to save your video output settings.

Q: I’ve modified some of the settings but there seems to be no change!
A: Make sure you have saved the new settings by pressing the SETUP button.  

Next, restart the unit by turning off the power switch. Turn it back on a few 

seconds later.

Q: Why are some of the functions in this manual not the same as on my 

HD-300ZX?
A: The functions may change with every firmware update. Please contact CE 

Labs for information about downloading the latest manual and firmware from 

our website. 

Q: Can I turn off the messages like “Loading File” as an example?
A: Yes, you can turn off the on-screen messages in the setup menu. Go to the 

MISC2 category and turn off the OSD messages.

Q: I’ve enabled the Manual/Standby Play Mode and now it shows “NO TITLE 

FILES”!
A: This message will appear if there is no 000.avi or 000.jpg & 000.mp3 file on 

the local drive. It will also appear if a numeric button is pressed but there is no 

such a file. Make sure to rename your files properly and store them on the 

local drive, then try again.

A free 15 day trial of Quicksign 300 is available at 

http://www.celabs.net/sw/qs300/

Содержание HD300ZX

Страница 1: ...the purchase by the original purchaser If this product is defective or malfunctions Cable Electronics will replace or repair this unit at their option within a reasonable time No expressed or implied...

Страница 2: ...tandard Repeat Manual Standby Auto ON OFF CHAPTER 5 APPENDIX FAQ REMOTE CONTROL KEY FUNCTIONS ABOUT THIS MANUAL TABLE OF CONTENTS This manual covers all versions for the HD 300ZX and some of its optio...

Страница 3: ...pact Flash Card 2 5 Hard Disk Drive 802 11b g Wireless Kit Package Contents HD 300ZX External Power Adapter Input 110 240V auto switching Output 12V 2A Component and VGA AV cables Remote Control Manua...

Страница 4: ...output settings Q I ve modified some of the settings but there seems to be no change A Make sure you have saved the new settings by pressing the SETUP button Next restart the unit by turning off the...

Страница 5: ...o turn OFF again 1 Press SETUP on your remote control to enter the HD 300ZX s setup menu 2 In the MISC2 category turn on the Auto ON OFF function 3 Select the ON OFF Time and enter a time for each opt...

Страница 6: ...on and plays them continu ously The playback sequence will be according to the file name and in following order from HDD to USB1 and USB2 Reboot the device after you have enabled this function To tur...

Страница 7: ...SB drive to the CF card 4 Reboot your device and automatic playback will start immediately 5 To turn off the playlist press STOP to halt the playback press SETUP to enter the setup menu go to the MISC...

Страница 8: ...e are flexible some are passive and some require active user input Single Plays according to one single playlist If no playlist is found it stops at the library screen Requires play lst Repeat Plays a...

Страница 9: ...you can configure how the HD 300ZX is connected to the local network Use the arrow keys on your remote control for navigation and the ENTER button to configure the settings Network Type Select betwee...

Страница 10: ...playlist modes from the list Once it is enabled you can set the path to your playlist Reboot the unit and make sure the corresponding playlist is stored in the right location to start using the playl...

Страница 11: ...or navigation and press the ENTER button to configure the settings File Copy Use this to easily and quickly copy new files to or from your local drive This will copy all files found in the root direct...

Страница 12: ...less and try again Misc3 Category In this category you can disable the onscreen messages OSD and configure the options for the scrolling text message Use the arrow keys on your remote control for navi...

Страница 13: ...set up set this to 2 Channels if you are only using 2 speakers or to 5 1 Channels if you are using digital audio with 5 speakers and surround sound TV Standard Select your TV system from the list You...

Страница 14: ...e the SSID is correct otherwise select it again and enter the right name 6 Press the SETUP key on your remote control to exit the setup menu and then reboot the unit by switching off the power switch...

Отзывы: