background image

User Manual and Reference Handbook for the CC Pilot™ XS 


37 

Selecting video channel 

To select which camera channel to display, press the desired channel button or select 
the desired channel from the view menu. 

Changing video display size 

The size of the video window is changed by selecting from the predefined sizes using 
the pop up menu or the view menu. The size can also be changed to any size by 
dragging the window border. 

Hiding toolbars and buttons 

To hide the toolbar and menus and provide maximum space for the video feed, 
uncheck the show menu and show buttons alternatives from the view menu. Use the 
pop-up menu and check respective alternative to get the menu and toolbar back. 

Changing camera settings 

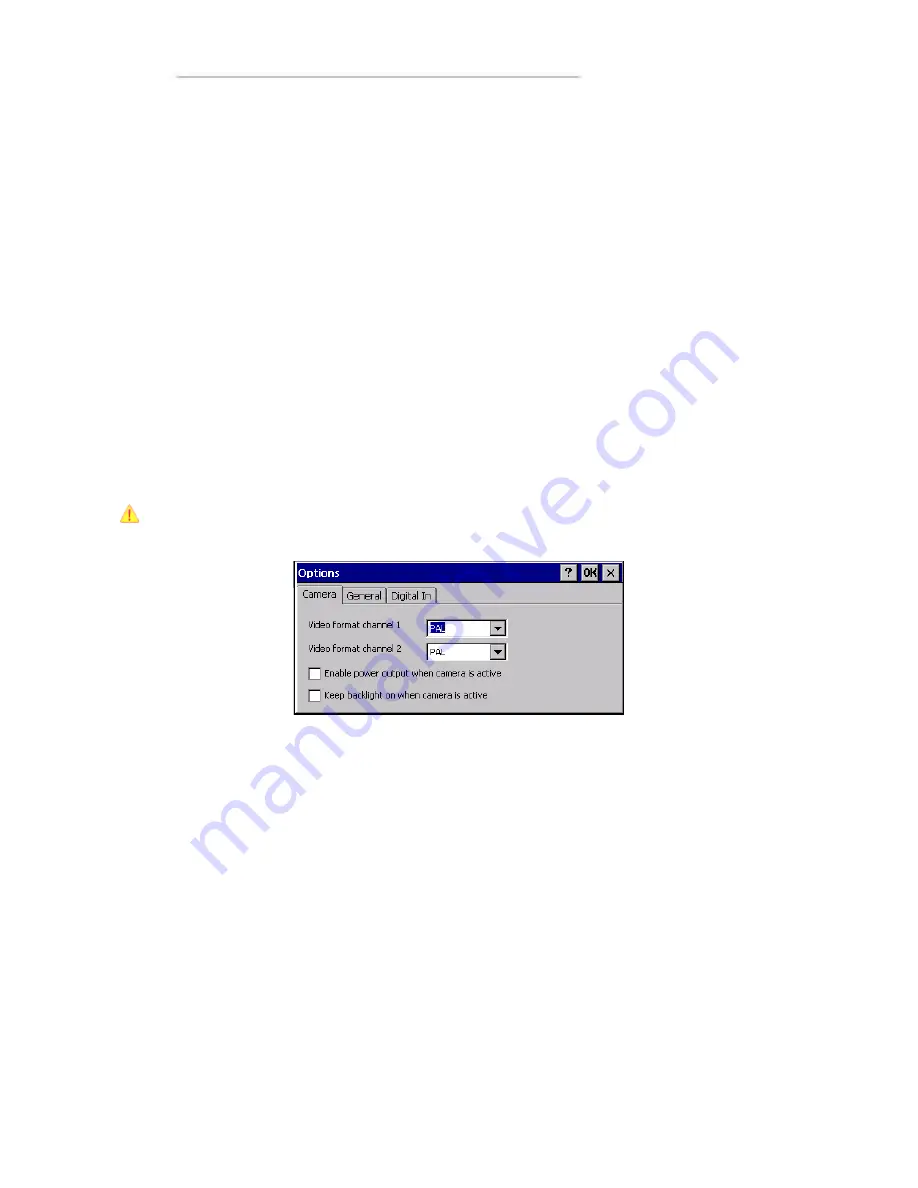
CC Pilot™ XS supports PAL and NTSC cameras. Select the format according to your 
camera by accessing the options dialog from the view menu of CC Video. The format 
can be set for each camera channel. 
 
The cameras can be powered directly from CC Pilot™ XS by enabling the 12 V output 
power within the camera connector. 
 
Using the camera power output may increase the unit temperature. Also note that the 
signal from the 12V power out is not filtered. 


Using digital in to control video display 

The video application can be controlled using the digital input signals optionally 
available in the X9 connector of CC Pilot™ XS. The behaviour of CC Video when these 
signals are changed is controlled from the Digital In settings, accessed from CC Video 
by selecting options from the View menu and in the options dialog selecting Digital In. 
 
Select the desired behaviour from the list of functions then select if this should be 
activated when the signal goes high or low. 
 
For example, one digital input can be connected to go high when a vehicle starts to 
reverse. By using the function Full screen Ch1 – Minimize the video display will show 
up in full screen when the vehicle starts to reverse and when finished the video window 
will go back to minimized mode. 
 

Содержание CC Pilot XS All-Integrated

Страница 1: ...CC Pilot XS rev 1 3 080812 CC Pilot XS User Manual and Reference Handbook CC Pilot XS Basic CC Pilot XS Extended CC Pilot XS All Integrated...

Страница 2: ...9 Function of the Display s Push buttons 9 Starting Up 9 Status Indicating Function 10 Shutting Down 10 Touch screen 10 Reset of the unit 11 Module description 12 Storage memory 12 CAN 12 Ethernet 12...

Страница 3: ...al up connection with the GSM GPRS modem 40 Using the FTP server 42 Using Telnet server 42 Specifications 43 Computer Core 43 Interfaces 43 Power Supply 44 Display 44 GPS 44 GSM GPRS 45 Bluetooth 45 E...

Страница 4: ...ct with the supplier it is important to be able to provide these numbers Care During welding or other service on the vehicle or machine where the CC Pilot XS is installed which can damage your CC Pilo...

Страница 5: ...ectations of a rugged unit Much work has been performed to choose and design internal components so that they in the best possible way and under all circumstances provide you with a dependable and use...

Страница 6: ...ration in proportion to its performance Together with a non rotating hard disc the CC Pilot XS is completely without fans or other moving parts With this solution the CC Pilot XS becomes nearly insens...

Страница 7: ...adapting the screen s brightness level CC Pilot XS Rear Side On the rear side of the CC Pilot XS there are the external connectors which are described in more detail in the chapter entitled Connectors...

Страница 8: ...er software which has not been recommended by CC Systems AB or your supplier Furthermore CC Systems AB can not guarantee the functionality of external devices connected to your CC Pilot XS Preliminary...

Страница 9: ...re information about starting up and shutting down the CC Pilot XS see the chapters called Starting Up and Shutting Down Brightness There are two buttons to gradually increase or decrease the display...

Страница 10: ...connectors On Off signal i e using the turn key functionality When performing any of above the system will CC Pilot XS start to shut down In order to help prevent data loss when the CC Pilot XS is shu...

Страница 11: ...any critical data before performing the steps below Clear the registry 1 Turn off the unit 2 Press the Power On button 3 Press the backlight increase key for about 2 seconds and the LED turns red 4 P...

Страница 12: ...t down The Kernel Flash memory is where the operating system is loaded which differs from ordinary computers where the operating system is stored on the hard disc CAN It is possible to connect two CAN...

Страница 13: ...Inputs available on the CC Pilot XS Extended and All Integrated The voltage range for a logic Lo signal is 0 0 8 V and logic Hi is between 2 36 V There is no direct sampling of these inputs instead th...

Страница 14: ...PRS modem has a lower maximum operating temperature than the other components in the on board computer When the temperature goes beyond the operating range for GSM GPRS the modem will automatically sh...

Страница 15: ...st case the onboard computer or other equipment may be damaged The connector legend describes where the connectors are located on your unit On the top of the unit there are also connectors for the GPS...

Страница 16: ...onnector is used to take in video signals of the type composite video They are PAL and NTSC compatible The video connector can be used to power external using the the12V unfiltered supply The output h...

Страница 17: ...the cable The CAN connectors can be used to supply power to external units using pin 2 and 3 The output has a current limit that depends on the internal unit temperature The current is limited to 0 3...

Страница 18: ...the RS232 standard so peripherals which follow this standard can be connected The supported communication speed for these ports is 2 4 to 115 2 kbps COM Pin Signal Description 1 DCD Data Carrier Detec...

Страница 19: ...voltage of 5 V and maximum current of 0 5 A per port Note that if too much current is drawn the built in safety will shut off the USB port s GSM GPRS antenna Marking GSM Connector Type SMA female Thi...

Страница 20: ...na to the GPS receiver The cable which is used to connect the GPS antenna to the computer shall be a 50 O coaxial cable which has low attenuation at high frequency 1 5 GHz The voltage supported for ac...

Страница 21: ...can lead to overheating consequently causing permanent damage to the unit When the CC Pilot XS or any device is installed it is important to do so in such a way that the installation is traffic safe O...

Страница 22: ...rque is 2 5 N m If the surface against which the unit will be fastened is not flat one must be careful so that so that one does not expose the unit to mechanical stress due to tightening This is suita...

Страница 23: ...User Manual and Reference Handbook for the CC Pilot XS 23 Display Panel Dimensions for 10 4...

Страница 24: ...User Manual and Reference Handbook for the CC Pilot XS 24 Display Panel Dimensions for 6 5...

Страница 25: ...antennas e g FM antenna Cables Cables shall be installed so that they don t run the risk of being damaged pinched or worn Avoid bending and twisting cables Strain relief on cable assemblies shall be a...

Страница 26: ...nnect the on board computer before any main switch as per the illustration above ON OFF pin 2 i e the computer s on off signal is connected though a 5 A fuse F2 to the battery If the vehicle has a mai...

Страница 27: ...C running windows won t work on Windows CE There are several versions of Windows CE and for several different processor families In order for third party products to function on the CC Pilot XS the ap...

Страница 28: ...n about the network connection and access to network settings 5 Volume control Access to the volume control 6 Input language selection Information about what input language is used 7 Status for Power...

Страница 29: ...trast to the Pocket PC handheld computers the CC Pilot XS works more like a personal computer When the computer is shut down all applications shut down and data that has not been saved is lost Therefo...

Страница 30: ...ate The Control Panel is activated from the start menu by clicking on the Start Button then choosing settings and then Control Panel Calibrate the Touch screen If the touch screen needs to be calibrat...

Страница 31: ...l to chose which energy profile to be used by your CC Pilot XS in different situations For example the brightness of the screen can be reduced when the unit is not being used In the example below Wind...

Страница 32: ...onnect with a network it may be necessary to configure the network settings The default configuration is to obtain settings using DHCP To manually configure the network settings open Network Settings...

Страница 33: ...closed then click Connect to establish a connection The connection procedure can take up to several minutes When connected the Info panel will give following information Software information of curre...

Страница 34: ...PIN code and click Apply To be able to change the security level you always need to have the valid PIN code entered in the PIN code field before clicking Apply Power From the Power tab it is possible...

Страница 35: ...B memory units Select the name to use from the folder name drop down list box Backlight From the backlight tab it is possible to enable and adjust settings for the automatic backlight control To enabl...

Страница 36: ...media files and other video streams To enable usage of the video application in many environments the CC Video can be controlled in several ways by the tool bar buttons the menus the pop up menu or by...

Страница 37: ...be set for each camera channel The cameras can be powered directly from CC Pilot XS by enabling the 12 V output power within the camera connector Using the camera power output may increase the unit t...

Страница 38: ...nership which must be done though a COM connection To connect the CC Pilot XS via the COM port use a null modem cable Note that from version 4 0 of ActiveSync the possibility to synchronise using Ethe...

Страница 39: ...time has passed after you pressed OK on the CC Pilot XS in the previous step until you press Next in this stage If possible it is recommended that that these buttons are pressed simultaneously If the...

Страница 40: ...ion chapter Occasionally depending on the time of day and visibility against the sky there can be problems with the signal reception from GPS satellites and the receiver then needs time to position it...

Страница 41: ...In the CC Pilot XS there is a Siemens AC45 modem Contact your cellular network provider for information on issuing the right AT command Press Next Type in the telephone number which you would like to...

Страница 42: ...ess which gives the connecting entity possibilities to upload files delete files and rename files without authorization Anyone can log in using the username anonymous and any password to gain access B...

Страница 43: ...S may not be equipped with all interfaces Interface Description Comments CAN 2 pcs 2 0B ISO 11898 24V Controller Intel 82527 Driver Philips 82C251 USB 2 pcs Ver 2 0 Video in 2 pcs Zoomed composite vid...

Страница 44: ...3 Light intensity can be regulated in 32 steps GPS GPS Description Comments Type of receiver L1 frequency C A code 12 channel Max update frequency 4 Hz 1 Hz default Accuracy SA off Position 3m CEP see...

Страница 45: ...GSM1800 GPRS GPRS multi slot class 8 GPRS mobile station class B DATA GPRS max download speed 85 6 kbps GPRS upload speed max 21 4 kbps CSD transfer speed 2 4 4 8 9 6 14 4 kbps V 110 SMS MO CB Text a...

Страница 46: ...068 2 1 Ad Operating 40 C 24h Storage 40 C 24h Enclosure EN 60529 IP67 EMC Directive 2004 108 EC EN 61000 6 2 2001 EN 61000 6 4 2001 EMC Immunity Transient EN 61000 4 4 Burst EN 61000 4 5 Surge 2 kV 2...

Страница 47: ...ght and Dimensions 10 4 Description Comments Enclosure size Display size Weight 285 5 x 217 x 58 4 mm W x H x D 210 6 x 159 x 53 8 mm W x H x D ca 1 7kg Depending on configuration 285 5 217 58 4 40 2...

Страница 48: ...User Manual and Reference Handbook for the CC Pilot XS 48...

Страница 49: ...6 5 Description Comments Enclosure size Display size Weight 210 8 x 172 9 x 58 4 mm W x H x D 198 x 163 x 53 8 mm W x H x D ca 1 3 kg Depending on configuration 210 77 58 3 172 87 17 2 8 5 3 5 210 78...

Страница 50: ...User Manual and Reference Handbook for the CC Pilot XS 50...

Страница 51: ...following information before you contact support Part number and serial number of the unit which you find on the brand label Date of purchase which is found on the invoice The conditions and circumsta...

Страница 52: ...d is the most widespread LAN technology GPRS General Packet Radio Service GPRS is a standard accepted by the European Standardisation Organisation ETSI for packet data in GSM and 3G networks GPRS has...

Страница 53: ...llel ports on PC units with a faster more uniform standard Many different devices can be attached to the USB port such as a keyboard mouse camera and memory to name only a few examples The Explorer th...

Страница 54: ...roperty of Intel Corporation in the USA and or other countries Linux is a registered trademark of Linus Torvalds Microsoft and Windows are registered trademarks which belong to Microsoft Corporation i...

Страница 55: ...on 40 Digital In 15 Digital Input 43 Digital Inputs 13 Display 44 Display size 10 4 47 Display Size 6 5 49 Dynamic 44 E ELFA 52 EMC 46 Enclosure 46 Enclosure size 6 5 49 Enclosure size 10 4 47 Environ...

Страница 56: ...log 39 Reset the unit 11 RS232 18 43 S Sensitivity 44 Settings 32 Setting up CC Pilot XS 8 Shock 46 Shutting Down the CC Pilot XS 10 SIM 53 SMS 45 Software 27 Software installation 8 Specifications 43...

Страница 57: ...CC Pilot XS 57 Sales contact productsales cc systems com Phone 46 0 271 193 80 Address CC Systems AB Fax 46 0 271 193 89 Box 83 Web www cc systems com SE 822 22 Alfta General contact info cc systems c...

Отзывы: