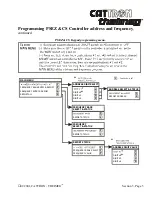
Section 5, Page 10
01/2001, CATTRON
- THEIMEG
TM
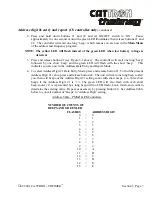
Address digit #3 entry and report (PSEZ and CS controllers)
, continued.
4. To select Digit #3 (‘High’ digit on PSEZ controllers) Data Entry Mode, press and release
button #3. To find the present Address Digit #3 value, press and release button #4. The unit
will emit one long beep to alert you, then will beep out the Address Digit #3 setting count
with short beeps. (i.e., five short beeps if the Digit is ‘5’). The green LED will also flash with
each short beep/count. (‘0’ is represented by a long beep with no LED flash). Look, listen,
and count to determine the existing value. Repeat as necessary by pressing button #4. See
Address Table on page 7 of this section to convert number of ‘Beeps’ to ‘Address Digit’
setting.
5. To increment the Address Digit #3 press and release button #1. Each depression will
increment the Address Digit #3 by one, continuing from its present value until it reaches 15,
then will roll over to zero and start again. (The unit will beep each time button #1 is
depressed).
6. Press button #4 to confirm your desired setting.
7. Once you have entered the desired Address Digit #3, set the ON/OFF switch on the PS
EZ
or
CS
controller to ‘OFF’ to permanently store the Address Digit #3.
Address digit #4 entry and report (PSEZ and CS controllers).
NOTES: (1) On the PSEZ Controller, address codes 00 and FF are not valid.
(2) On the PSEZ Controller, Digit #3 is the ‘High’ Digit and Digit #4
is the ‘Low’ Digit.
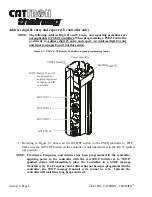
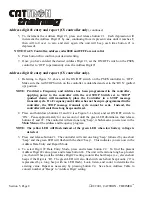
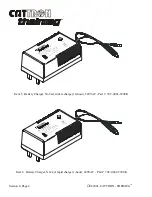
1. Referring to Figure 5-1 above, set the ON/OFF switch on the PS controller to ‘OFF’. Make
sure the red STOP Switch on the controller is unlatched and set to the ‘RUN’ (pulled up)
position.
NOTE: Provided a Frequency and Address has been programmed in the controller,
applying power to the controller with the red STOP Switch set to ‘STOP’
(pushed down) will immediately place the Controller in a STOP message
transmit cycle. If a Frequency and Address has not been pre-programmed in the
controller, the STOP message transmit cycle cannot be sent. Instead, the
controller will emit three long beeps and reset.
2. Press and hold down buttons #1 and #2 (see figure 5-1 above) and set ON/OFF switch to
‘ON’. Pause approximately for one second or until the green LED illuminates, then release
buttons #1 and #2. The controller will emit one long ‘beep’, which means you are now in the
Main Menu
of the address and frequency program.
NOTE: The yellow LED will flash instead of the green LED when low battery voltage is
detected.
Содержание i-Key
Страница 2: ......
Страница 14: ...Page xii 01 2001 CATTRON THEIMEG TM EZ CS AT Rx Rx Tx Tx Tx Rx Rx Rx ...
Страница 20: ...Section 1 Page 6 01 2001 CATTRON THEIMEG TM This page intentionally left blank ...
Страница 44: ...Section 4 Page 4 01 2001 CATTRON THEIMEG TM ...
Страница 52: ...Section 4 Page 12 01 2001 CATTRON THEIMEG TM This page intentionally left blank ...
Страница 68: ...Section 5 Page 16 01 2001 CATTRON THEIMEG TM This page intentionally left blank ...
Страница 75: ... 01 2001 CATTRON THEIMEG TM Section 6 Page 7 Item 7 Carrying strap shoulder Part 42C 0057 ...
Страница 89: ......

