Casio QV-700 Скачать руководство пользователя страница 5

17

1

.

2.

3.

4.

5.

Eject button

Note

To ensure proper performance, be sure to use only CASIO brand
memory cards: CF-2V (2MB), CF-4V (4MB), CF-10V (10MB), or CF-
15V (15MB).

Important!

• Insert only memory cards into the memory card slot. Inserting any

other type of card can cause malfunction.

• Should water or any other foreign matter get into the memory card

slot, immediately turn off power, unplug the AC adaptor, and con-
tact your original retailer or nearest CASIO Service Provider.

To remove a memory card from the camera

1.

Open the memory card slot cover.

2.

Unfold the eject button.

3.

Press the eject button straight down.

4.

Remove the memory card.

5.

Close the memory card slot cover.

Memory Cards

Getting Acquainted

18

Formatting a Memory Card

You can format a memory card to delete all of the data stored on it.

Important!

Data deleted by a memory card format operation cannot be recov-
ered! Be sure to carefully check and confirm that you no longer need
the data stored in a memory card before formatting it.

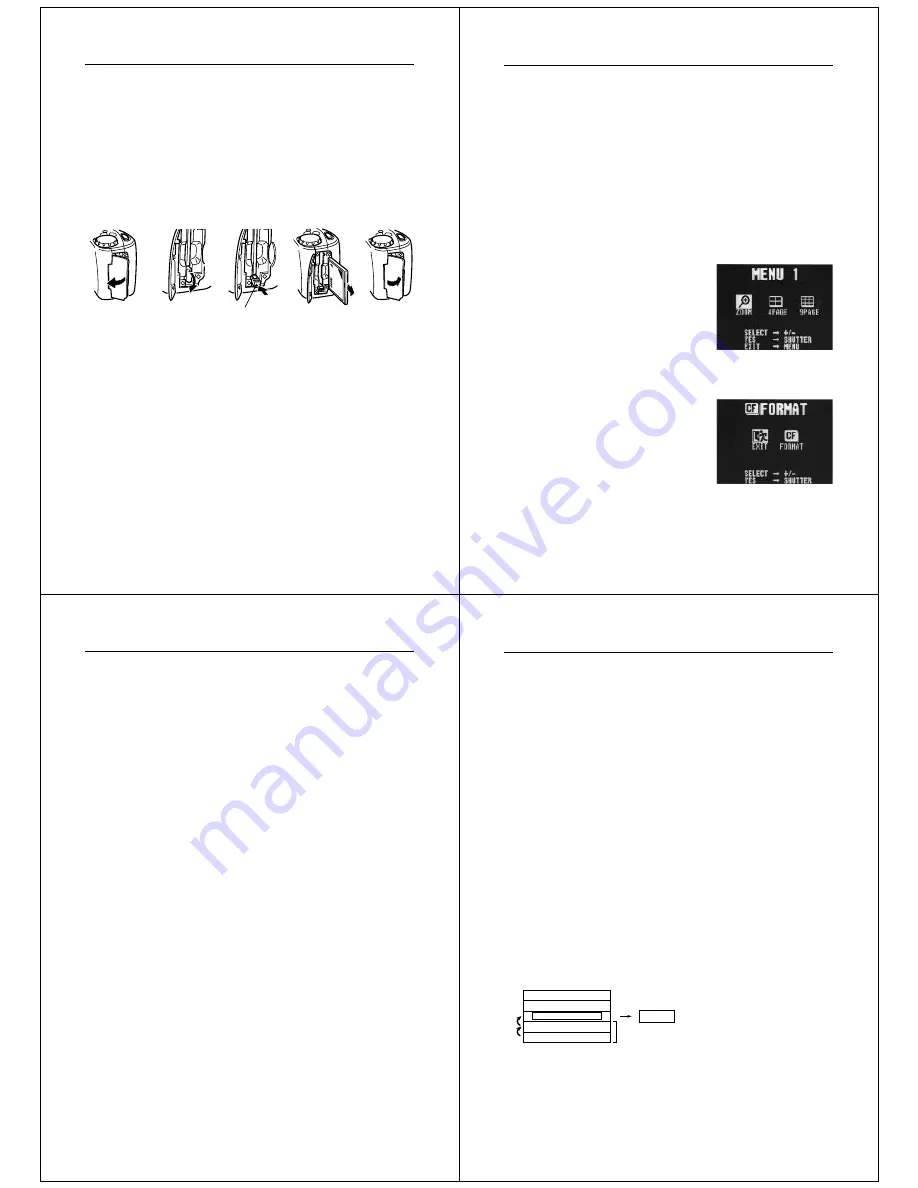
To format a memory card

1.

Slide the function switch to the PLAY position.

2.

Press MENU.

When there are no images on the
memory card, the display shows
MENU in place of MENU 1.

3.

Use [+] and [–] to select FORMAT, and then press the shut-

ter button.

FORMAT is located in MENU 3.

4.

Use [+] and [–] to select FORMAT, and then press the shut-

ter button.

19

Memory Card Precautions

• Images cannot be recorded with this camera unless a memory card

is installed in it.

• Be sure to use only CASIO memory cards. Proper operation with

other memory cards is not guaranteed.

• Static electricity, electrical noise, and other electrical phenomena

can cause corruption or even total loss of the data stored on a
memory card. Because of this, you should always make backup
copies of important images on other media (magnetic optical disk,
floppy diskette, computer hard disk, etc.).

• Memory  card  problems  can  be  corrected  by  reformatting  the

memory card (page 18). Reformatting a memory card deletes all
images stored on the card, but you can use a computer to copy the
images  you  want  to  keep  to  the  computer’s  hard  disk  before
reformatting your card. If you plan to be recording images where
you do not have access to a computer, it is a good idea to take
along an extra memory card or two just in case you experience an
unexpected memory card problem.

Memory Card Folder Precautions

• The folders (directories) (page 20) are automatically created if the

card you are using does not already have similarly named folders
(page 68).

• Any folders (created on the memory card by a personal computer)

other than those shown on page 20 do not appear on the camera’s
display.

• You can store up to 250 images in a single folder. Any images

above this number (placed in the folder using a personal computer)
are not displayed by the camera.

Memory Cards

Getting Acquainted

20

CAMER001.CAM

CAMER002.CAM

CAMER003.CAM

CAMER004.CAM

CAMER005.CAM

CAMERA

Renamed

Delete

• When calculating remaining memory capacity, the camera com-

pares the total capacity of the memory card with the number of im-
ages that can be stored in each folder. The value indicating the
number of images that still can be recorded is the lower of these two
values.

• Images in camera memory are assigned names that are generated

according to the following format:

<First 5 characters of folder name> + <3-digit number> + .CAM

The 3-digit number starts with 001 and is incremented for each ad-
ditional image. Deleting or moving images causes all following im-
ages to be renamed (renumbered) so there are never any breaks in
the sequential numbering.

Folder Names

Folders are named: CAMERA, BUSINESS, PRIVATE,

AAAAA, BBBBB, CCCCC.

Renaming After Deletion

Содержание QV-700

Страница 1: ...ing Images on the Camera s LCD 51 Playback Mode Displays 52 Producing a Multi Page Display 53 Using the Zoom Function 55 Superimposing a Title on an Image 57 Rotating an Image 61 Filtering an Image 62...

Страница 2: ...memory card Removal of camera batteries disconnection of the AC adaptor or removal of the memory card while a record or data communication operation is taking place Disconnection of the cable while a...

Страница 3: ...ate the equipment Properly shielded cables with ferrite core must be used for con nection to host computer and or peripherals in order to meet FCC emission limits THE SPECIAL VIDEO CABLE THAT COMES WI...

Страница 4: ...own in the illustration Important Be sure to keep the wrist strap around your wrist whenever using the camera to protect against accidentally dropping it Using the Soft Case Keep the camera in its sof...

Страница 5: ...ake backup copies of important images on other media magnetic optical disk floppy diskette computer hard disk etc Memory card problems can be corrected by reformatting the memory card page 18 Reformat...

Страница 6: ...lways make sure that the positive and negative ends of the bat teries are facing correctly as noted by the markings on the camera itself Improper loading of batteries can re sult in bursting or leakin...

Страница 7: ...amaged AC adaptor cord creates the danger of fire or electrical shock Caution AC outlet AC adaptor 27 Always be sure to use the AD C620 AC adaptor only Using any other AC adaptor can cause damage to t...

Страница 8: ...tion indicated by the arrow The POWER switch automatically slides back to its original position when you release it When power comes on the image of the object that is in front of the camera s lens ap...

Страница 9: ...towards the front Rotates up to 180 towards the back 35 Recording Images Any images recorded while the lens body is rotated so the lens is pointed from the back of the camera are stored as mirror imag...

Страница 10: ...name Battery indicator Low Battery Indicator A low battery indicator appears on the monitor screen when ever remaining battery capacity drops below a certain level Appear ance of this indicator tells...

Страница 11: ...sed and three images 0 05 0 1 and 0 15 seconds before the shutter button is pressed TIME Recording Future With this method the camera records a series of four shots based at intervals of about 0 05 se...

Страница 12: ...interval of from 1 to 60 minutes in 1 minute steps 7 Use and to select the start time of the record opera tion and then press the shutter button You can specify any amount of time up to 24 hours from...

Страница 13: ...k Images Playing Back Images This section describes how to recall and view images stored in cam era memory Displaying Images on the Camera s LCD The following procedure describes how to display images...

Страница 14: ...an use the following procedure to select one of the memory pages in a multi page display Then when you return to the 1 page display the memory page you selected will be the one displayed The following...

Страница 15: ...tle on a rotated image page 61 The recording date of an image remains as that when the image was recorded even if you superimpose a title on the image 1 Slide the Function switch to the PLAY position...

Страница 16: ...message You cannot filter on a rotated image page 61 To filter an image 1 Slide the function switch to the PLAY position 2 Use the and buttons to scroll through the images in memory until the one you...

Страница 17: ...a do not operate while a page change operation is in progress Make sure that an image is shown on the display when you press a button to stop the auto play operation 1 second 1 second 2 Start the auto...

Страница 18: ...ed here tell you how to protect images against accidental deletion You can protect a single image all the images in a particular folder or all images currently stored on the memory card Note that you...

Страница 19: ...cannot protect or unprotect pages pages 73 74 while pro tected pages are hidden To unhide protected memory pages While holding down the button turn on the camera 75 Deleting Memory Pages Deleting Memo...

Страница 20: ...Menu 3 Select ALL Use and to select ALL and press the shutter button 4 Select ALL Use and to select ALL To clear the selection screen and quit this procedure select the EXIT icon 5 Press the shutter...

Страница 21: ...en after the original image is cleared Be sure not to leave an image on a TV or CRT screen for long periods 83 Using the Camera with a Connected Device After connecting the camera and TV use the same...

Страница 22: ...utter button receives the selected image from the other camera You can receive only one image at a time To send more images repeat steps 2 through 5 Important Never disconnect the cable turn power off...

Страница 23: ...rd Adaptor to read memory card contents See the instructions that come with the PC card reader writer and the PC Card Adaptor for details on using this type of configuration 91 Troubleshooting No powe...

Страница 24: ...of con nected camera are disabled 1 Correct the situation and try again 2 Correct the situation and try again 3 C h a n g e f u n c t i o n switch setting of re ceiving camera to PLAY page 51 4 The s...

Страница 25: ...W Battery Life The values noted below indicate the number of hours before battery failure under normal operating temperature 25 C as estimated by battery manufacturers These values are for reference...

Отзывы: