background image

E-17

Part 5 Character Attributes and Text Effects

The operations in this part of the manual explain how to change fonts and charac-
ter styles. These characteristics are called “character attributes.” It also tells you
how to assign such text effects as underlining, shading, and box printing to text.

Important!

Character attributes you specify affect printed text only. The characters on
the display do not change.

Remember that character attributes are assigned to specific characters. When-
ever you replace a character with another one, the new character also picks
up the attributes of the original character.

Text effects are applied to both displayed text and printed text.

Fonts

This label printer gives you a choice of 10 different fonts. See page E-42 for
examples of each type of font.
The following sections describe how to change the default font setting (the font
that is automatically used whenever you input text), how to change the font for
displayed text, and how you can find out what the font setting is for text on the
display.

Important!

Built-in fonts are provided for numbers, alpha-characters, European language
characters, and some symbols ([Space], [ , ], [ . ], [ : ], [ ; ], [ ? ], [ ! ], [ ‘ ], [ ’ ],
[ “ ], [ ” ], [ „ ], [ ¿ ], [ ¡ ], [ ~ ]).

You cannot change the font for symbols other than the 15 noted above or for
illustrations.

When the SIZE setting is 12pt or 9pt,
superscripted or subscripted charac-
ters are not affected by FONT settings.

Changing the FONT setting also affects the print length.

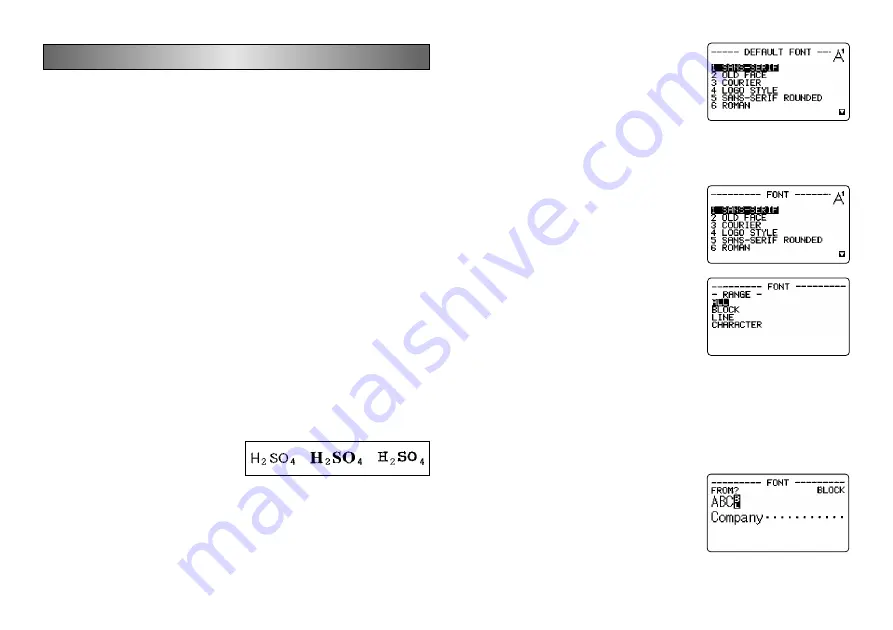
To change the default font setting

1. Press SET UP to display the SET UP menu.

2. Highlight “DEFAULT FONT” and then press

SET.

3. Use 

u

 and 

i

 to highlight the font you want  to set as the default and then

press SET.

To change the font for displayed text

1. While there is text on the display, press

FONT.

2. Use 

u

 and 

i

 to highlight the font you want

to change to and then press SET.

What you should do next depends on the
range you want to use.

To change the font for all the text

1. After performing the two steps under “To change the font for displayed text”,

use 

u

 and 

i

 to highlight “ALL” and then press SET.

2. Press SET to change the font for all the text on the display.

At this point, the label printer returns to the text input screen.

Pressing ESC returns to the RANGE menu without changing anything.

To change the font for blocks of text

1. After performing the two steps under “To

change the font for displayed text”, use 

u

and 

i

 to highlight “BLOCK” and then press

SET.

See page E-25 for details about how to use
blocks.

Содержание KL-C500

Страница 1: ...KL C500 User s Guide...

Страница 2: ...a strange odor is coming from it creates the danger of electrical shock Immediately turn power off and unplug the power cord from the wall outlet Request servicing from your original dealer AC power c...

Страница 3: ...ld liquid ever spill onto the unit immediately turn off power and unplug the power cord from the wall socket Request servicing from your original dealer Never allow metal objects or combustable materi...

Страница 4: ...ollowing items included with your label printer Included Items AC power cord Tape cartridge XR 18WE PC link cable PC Link software CD ROM Peeler This makes it easy to remove the backing paper from the...

Страница 5: ...n of character sizes E 22 To change character size using direct specification E 23 Specifying Character Sizes for Lines of Text Using Preset Formats E 23 About the format menu E 23 To specify characte...

Страница 6: ...This part of the manual provides you with important information you need to know in order to use the label printer to its full potential Be sure to read it carefully before using the label printer for...

Страница 7: ...n in the illustration nearby Take care to avoid damaging the tabs and hinges when installing the cover Letter keys Handle Liquid crystal display LCD Cover release Press to open the cover Tape outlet P...

Страница 8: ...at you started from Part 2 Getting Ready This part of the manual tells you how to load the tape cartridge and perform other basic setups for the label printer Important Be sure to read this section be...

Страница 9: ...ter before using it for the first time after you have not used it for a long time or if nothing happens when you turn power on Important Resetting label printer memory clears its memory of all input d...

Страница 10: ...ely into place 9 Close the cover 10 Turn on label printer power and press FUNCTION and then PRINT FEED two or three times to make sure that the tape comes out without any problem If the tape does not...

Страница 11: ...etting you want ON or OFF and then press SET Unit of Measurement This label printer can use either centimeters cm or inches inch as the unit of measurement To set the unit of measurement 1 On the SET...

Страница 12: ...E 17 for the character where the cursor is located 3 3 3 3 3Function indicator F This indicator appears when you press the FUNCTION key Pressing a key while this indicator is on the display causes th...

Страница 13: ...haracter where the cursor is currently located When a size error occurs the label printer automatically adjusts the character size to fit the tape you are using The character size indicator be comes h...

Страница 14: ...print the text that you input press PRINT For details on printing see page E 29 If your input exceeds the maximum number of lines the message LABEL HAS TOO MANY LINES appears in the case of normal pr...

Страница 15: ...to the input screen with the symbol dingbat or char acter you selected input at the location where the cursor was located when you displayed the SYMBOL menu See page E 41 for a complete list of symbol...

Страница 16: ...sor jump to the first character of the text Press FUNCTION and then i to make the cursor jump to the end of the text Holding down the t or y cursor key moves the cursor at high speed Deleting Individu...

Страница 17: ...nything Text Editing You can set up the label printer so it either overwrites existing characters with new input or inserts new input between existing characters Note the following example Example Exi...

Страница 18: ...language characters and some symbols Space You cannot change the font for symbols other than the 15 noted above or for illustrations When the SIZE setting is 12pt or 9pt superscripted or subscripted...

Страница 19: ...the t and y cursor keys to move the cursor around the display The font indicator shows the current font setting for the character where the cursor is located Important Neighboring characters with diff...

Страница 20: ...ange for your text effect specifications The following shows an example for each of the ranges avail able for text effects BLOCK This range specifies application of a text effect for all the text in a...

Страница 21: ...ffect and then press SET to register your selection 3 Move the cursor to the end character up to which you want to change the text effect and then press SET to register your selection and change the t...

Страница 22: ...rdance with the tape width and the num ber of lines Normal Justified Printing Auto Sizing Frame Justified Printing Auto Sizing Manual Sizing Your label printer provides you with two different ways to...

Страница 23: ...nter Direct specification of character sizes You can specify the character size in points to any one of 14 sizes from 9pt to 119pt A character size change is indicated on the display by a character si...

Страница 24: ...u want to change the character size and then press SET to register your selection and change the character size At this point the label printer returns to the text input screen Specifying Character Si...

Страница 25: ...n image of what the block where the cursor is located will look like when you print it See page E 32 for more information Part 7 FORM Menu Functions This part of the manual describes how to use the FO...

Страница 26: ...mark To delete a block mark use the procedures for DEL as described under Deleting Individual Characters page E 15 You cannot use BS for deleting block marks Important You can input up to 15 block mar...

Страница 27: ...ail DIRECTION HORIZONTAL VERTICAL Switching between HORIZONTAL andVERTICAL also affects the print length ALIGNMENT LEFT EQUAL JUSTIFY EQUAL RAGGED CENTER RIGHT PITCH CHARACTER PITCH This is the relati...

Страница 28: ...T menu has six pages Press SET while the first page is displayed to change to the second page Pressing SET while the sixth page is displayed registers any settings with the menu and returns to the tex...

Страница 29: ...MANUAL This setting doesn t provide any side spaces of the printed text If you per form two consecutive print operations without manually feeding between prints the last character of the first print...

Страница 30: ...de a leading zero 01 02 03 etc 3 Use i to select the AUTO CUT menu 4 Use t and y to turn on AUTO CUT 5 After making sure there is nothing blocking the tape outlet press PRINT or SET Each label is cut...

Страница 31: ...s not Tape cut No tape cut Certain feed settings can disable tape cutting In such a case use scissors to cut the tape The following shows how printing is performed in accordance with the AUTO CUT sett...

Страница 32: ...rmed with a manual cut You cannot perform the cut operation alone FUNCTION IMAGE CUT does not work while a print operation is in progress while colored tape is loaded or when there is no tape cartridg...

Страница 33: ...he print density setting controls how darkly figures are printed on your tapes To adjust the print density 1 Turn power on 2 Press SET UP to display the SET UP menu 3 Use u and i to highlight DENSITY...

Страница 34: ...To Display the PRESETS Menu 1 Press PRESETS Note that PRESETS menu functions are normally used when there is no text on the input screen If there is text on the screen when you press PRESETS the messa...

Страница 35: ...the following conditions can cause printing to take a long time Very wide tape A large number of pieces A large number of characters Certain fonts Many illustrations Such conditions can cause the mes...

Страница 36: ...CODE39 and CODABAR bar codes To print a bar code 1 While the PRESETS menu is on the display use u and i to move the highlighting to BAR CODE and then press SET 2 Use u and i to move the highlighting...

Страница 37: ...ers in memory To store data 1 Input the text you want to store and then press MEMORY 2 Use u and i to move the highlighting to STORE and then press SET 3 Press SET to store the text in memory or ESC t...

Страница 38: ...inside the item 4 Continue from step 4 under To recall memory text using sequential search You cannot input or print superscripted or subscripted symbols SYMBOL in response to the LOOK FOR prompt To f...

Страница 39: ...he label printer and your PC 2 Use the cable to connect to the label printer 3 Turn on the power of the label printer and the PC To send data from the PC to the label printer 4 Recall the data you wan...

Страница 40: ...rinter whenever you turn it power on or reset the unit Item Power On Reset Display Cleared Cleared Memory Retained Cleared ab CAPS OFF AB CAPS ON Retained ab Pressing SET when the message PRESS SET TO...

Страница 41: ...Just Fit Auto Sizing 1 to 8 lines Example 4 lines in a block cursor located in line 4 Format Indicator for Selected Format Example 3 line B format selected cursor located in line 3 Format Indicator f...

Страница 42: ...E 41 Illustrations Symbols Dingbats and Special Characters SYMBOL DINGBAT NUMBER GREEK RUSSIAN SUPERSCRIPT SUBSCRIPT...

Страница 43: ...BOLD SCRIPT 10 BLACK LETTER Enlarged Label Measurements You cannot use 6mm 9mm 12mm 18mm 24mm or colored tapes Tape Item 2 Pieces 3 Pieces 4 Pieces Width 36mm Character Size 72mm 108mm 144mm Resultin...

Страница 44: ...ord is connected cor rectly Cannot input text Possible Cause Action FUNCTION key has been pressed Press ESC to clear FUNCTION key operation Bar Code Specifications 1 The check digit is automatically c...

Страница 45: ...e to another ink ribbon cassette Ink ribbon cassette loaded while the ink ribbon is slack Ink ribbon is being fed from the tape outlet along with the tape Possible Cause Action Tape cartridge compart...

Страница 46: ...ain Wait for a while Print ing will resume when temperature returns to normal If this problem hap pens often try mak ing the print density lighter lower Using Labels Data Communication Messages The me...

Страница 47: ...EL HAS TOO MANY LINES LABEL IS LONGER THAN TAPE LENGTH SET ESC LENGTH OF PRINT IS TOO LONG LOAD A TAPE CARTRIDGE THAT IS 18mm OR WIDER Message Possible Cause Action Page Attemptmadetoperform text save...

Страница 48: ...ape cutter Some foreign object or tape residue on the rubber roller Memory has not been initialized yet Attempt made to store data when the same data already exists in memory You did not perform sendi...

Страница 49: ...46mm 36mm 24mm 18mm 12mm 6mm 9mm Lines 1 7 types 2 8 types 3 11 types 20pt 20pt 20pt 20pt 17pt 17pt 17pt 34pt 17pt 17pt 34pt 17pt 17pt 34pt 17pt 17pt 34pt 17pt 17pt 17pt 17pt 17pt 17pt 17pt 14pt 14pt...

Страница 50: ...es 1 7 types 2 8 types 3 11 types 9pt 9pt 9pt 9pt 9pt 9pt 9pt 17pt 17pt 34pt 17pt 34pt 17pt 34pt 17pt 17pt 17pt 26pt 26pt 26pt 17pt 26pt 26pt 26pt 17pt 17pt 17pt 34pt 17pt 34pt 17pt 34pt 17pt 17pt 14p...

Страница 51: ...68pt 24mm 85pt 30mm 102pt 36mm 119pt 42mm Number of Lines Normal Printing 6mm tape 1 line maximum 9mm tape 1 line maximum 12mm tape 2 lines maximum 18mm tape 4 lines maximum 24mm tape 5 lines maximum...

Страница 52: ...CASIO COMPUTER CO LTD 6 2 Hon machi 1 chome Shibuya ku Tokyo 151 8543 Japan MO9911 000301A Printed in Japan A342888 11 Printed on recycled paper...

Отзывы: