background image

E-10

(a)

(b)

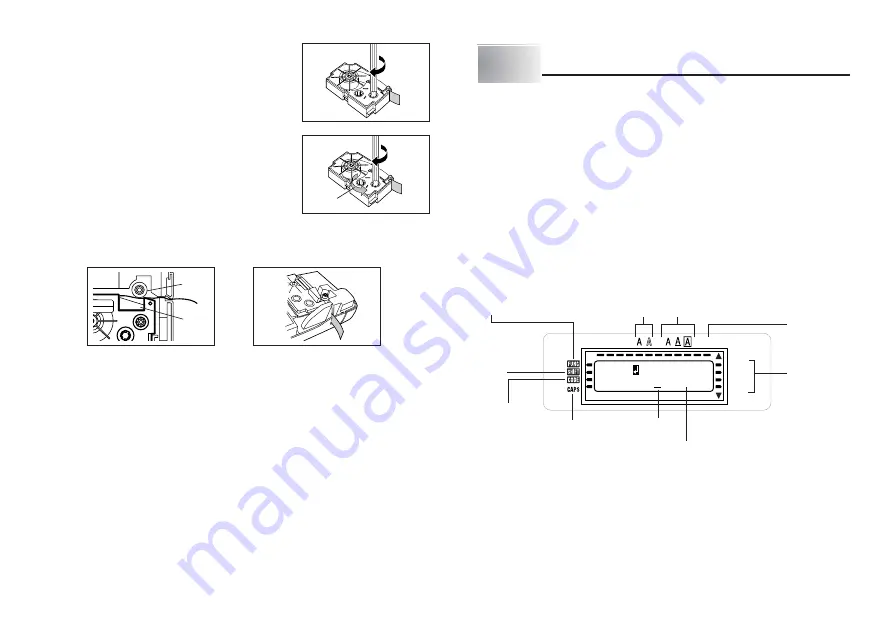
5. Use a pencil or some other thin object to take

up slack in the ink ribbon as shown in the
illustration. Note that the tape does not move at
this time.

If the ink ribbon is slack when you load it into the
Label Printer, it can break or cause some other
problem.

Be sure to turn the ink ribbon take up spool only
in the direction indicated by the arrow (a).

Turn  the spool until the other spool (b) starts
turning in the direction noted by the arrow. This
indicates there is no slack in the ribbon.

6. Load the tape cartridge into the Label Printer, making sure that the tape and

ink ribbon pass between the head and roller.

7. Close the back cover.
8. Turn on Label Printer power and press FUNC  and then 7  (FEED) two or

three times to make sure that the tape comes out without any problem.

If the tape does not come out normally, turn off power and start again from
step 1 above.

Part 3

Inputting Characters and Symbols

This part of the manual tells you how to input characters. To make things easier
to understand, we call everything you input a character, regardless of whether it
is actually a letter, number, or symbol. Explanations here all use the default
settings that are in effect from the initial power-on screen.
For information on using other character styles, effects and sizes, see page E-15.

Important!

You can input up to 80 characters per label. Further input becomes impossible
after you input the 80th character.

Display Symbols and Indicators

Before getting into actual input, you should first become acquainted with the
symbols and indicators used on the Label Printer display.

C A S O

I

T

U

P

M

O

C

E R

• • • • • • • •

18mm
12mm

MIRROR

9mm
6mm

Function indicator

This indicator appears when you press the FUNC key. Pressing a key while this
indicator is on the display causes the function marked above that key to be
executed.

Shift
indicator

Cursor

Caps indicator

Effect indicators

Function indicator

Character position marks

Style indicators

Code
indicator

Tape
indicator

Mirror image
printing
indicator

Roller

Head

Содержание KL-120

Страница 1: ...E RJA518623 001V01 KL 120 User s Guide...

Страница 2: ...he symbol shown here indicates you should not try to take the unit apart indicates something you should do Read This First CASIO COMPUTER CO LTD shall not be held liable for any loss or claims by you...

Страница 3: ...t comes packed over your head Doing so creates the risk of suffocation Particular care is required in households where young children are present Danger Alkaline Batteries Perform the following steps...

Страница 4: ...ct to fall creating the risk of personal injury Caution Location Avoid the locations listed below for the product Such locations create the risk of fire and electric shock Areas subject to high humidi...

Страница 5: ...n of power supply It is up to the user to keep backup records of important data Keep this manual on hand for future reference Operating Precautions Observe the following precautions to ensure that the...

Страница 6: ...ing Acquainted E 6 General Guide E 6 Label Printer Menus E 6 Part 2 Getting Ready E 7 Power Supply E 7 Replacing Batteries E 7 Turning Power On and Off E 8 Resetting the Memory E 8 Display Language Se...

Страница 7: ...n use to select the settings you need Each menu is described in detail in the sections that follow in this manual but note the following general points when using them The item that is underlined in a...

Страница 8: ...should replace batteries as soon as possible after the LOW BATTERY message appears Important All data stored in memory is deleted whenever batteries go dead and when you replace batteries Be sure to...

Страница 9: ...nter A loose tape cartridge can cause print quality problems Turning Power On and Off Press ON OFF to turn power on and off Turn on power and the tape width selection screen will appear When selecting...

Страница 10: ...function 3 Release the PRINT SPACE and ON OFF keys 4 Press SET to initialize the Label Printer or ESC to abort the reset operation without initializing anything The tape width selection screen appears...

Страница 11: ...and Symbols This part of the manual tells you how to input characters To make things easier to understand we call everything you input a character regardless of whether it is actually a letter number...

Страница 12: ...ndicators point to the character style that is currently in use You can select between normal bold and outline Effect indicators These indicators point to the character effect that is currently in use...

Страница 13: ...CODE 4 CAPS on CODE 5 CODE 6 CODE 7 CODE 8 CODE 9 CODE 0 Example To input 1 Press CODE 2 Press 1 3 Press A Special Symbols You can also access a menu of special symbols by pressing SYMBOL There are a...

Страница 14: ...t of a block P r o t m i o o n P l a n B Block mark Block marks appear on the display only They are not printed on the tape 3 Input the text for the next first block Here we will input Retail Package...

Страница 15: ...riginal text on the display use either the BS key or DEL key to delete the characters to be changed ABC 2 Input the new characters XYZ Part 4 Deleting and Inserting Characters This section describes e...

Страница 16: ...size changes are applied to printed text only The size of the displayed text does not change Important The character size setting is applied to all of the characters within the block You cannot make...

Страница 17: ...ne Horizontal 1 2 3 4 5 6 1 1 1 1 2 1 3 1 4 1 5 1 6 2 1 1 1 2 1 3 1 4 1 5 1 6 3 1 1 1 2 1 3 1 4 1 5 1 6 4 1 1 1 2 1 3 1 4 1 5 1 6 Vertical Horizontal 1 2 3 4 5 6 1 1 1 1 2 1 3 1 4 1 5 1 6 2 2 1 2 2 2...

Страница 18: ...then inputting the text Text Effects There are three text effects that you can assign shading underlining and boxed text The following shows examples of each Shading Underlining Boxed Text Text effec...

Страница 19: ...e information you need to print tapes Printing Precautions Never turn power off while printing is being performed Make sure that the tape outlet is not blocked before you start printing Never operate...

Страница 20: ...h press ESC Feeding the Tape While printing is paused between prints you can feed the tape to create a margin between prints 1 Press FUNC and then 7 FEED This will feed the tape approximately 20 5 mm...

Страница 21: ...mm NARROW 1 mm or WIDE 2 mm Changing this setting also causes the tape length to change accordingly This setting cannot be changed when EQUAL is selected for the ALIGN setting and when FIX is selected...

Страница 22: ...edure without storing anything If there is nothing in memory yet pressing SET stores your text If there is already text stored in memory the message OVERWRITE SET ESC appears when you press SET Press...

Страница 23: ...4 Use z and x to select the data you want to delete and then press SET This will display the message DELETE SET ESC to confirm 5 Press SET to delete the data Part 10 Configuring the Printer Setup The...

Страница 24: ...ter printing is complete use x and z to select EXIT and then press SET 11 In response to the confirmation message that appears press SET Part 11 Reference This section contains information about the L...

Страница 25: ...Release the PRINT SPACE and ON OFF keys 4 Press SET to initialize the Label Printer or ESC to abort the reset operation The tape width selection screen appears after initialization is complete 5 Use...

Страница 26: ...eload it correctly Clean the printer head and roller E 22 E 9 E 23 Tape comes out when PRINT is pressed but nothing is printed on it Possible Causes Action Page Only blank spaces were input Input the...

Страница 27: ...ing to perform printing without setting a tape cartridge Battery power is low This message appears when the length of the tape that will actually be printed is longer than the specified tape length Ac...

Страница 28: ...the printer and remove the tape cartridge Next remove the jammed tape If the steps described above do not clear the error message contact your retailer or your nearest CASIO service center Reduce the...

Страница 29: ...E 28 Alpha Characters Symbols...

Страница 30: ...NT2 TITLE TITLE COMMENT TITLE COMMENT1 COMMENT2 Maximum Number 25 25 25 16 16 16 24 36 36 15 13 13 17 17 17 10 6 6 21 21 21 12 8 8 TAPE Width mm 18 12 9 6 Format Layout Formats Type CASSETTE FILE Inpu...

Страница 31: ...Matrix 48 48 dot Character font Sans serif Character effects Shade underline box Character Styles Normal Bold Outline Character sizes 1 1 1 2 1 3 1 4 1 5 1 6 2 1 2 2 2 3 2 4 2 5 2 6 3 1 3 2 3 3 3 4 3...

Страница 32: ...CASIO COMPUTER CO LTD 6 2 Hon machi 1 chome Shibuya ku Tokyo 151 8543 Japan MO0805 A Printed in China Imprim en Chine...

Отзывы: