background image

10

.

Movie Recording

NOTE

• If you do not perform any operation for about three seconds during snapshot 

recording or movie recording, icons will become transparent.

.

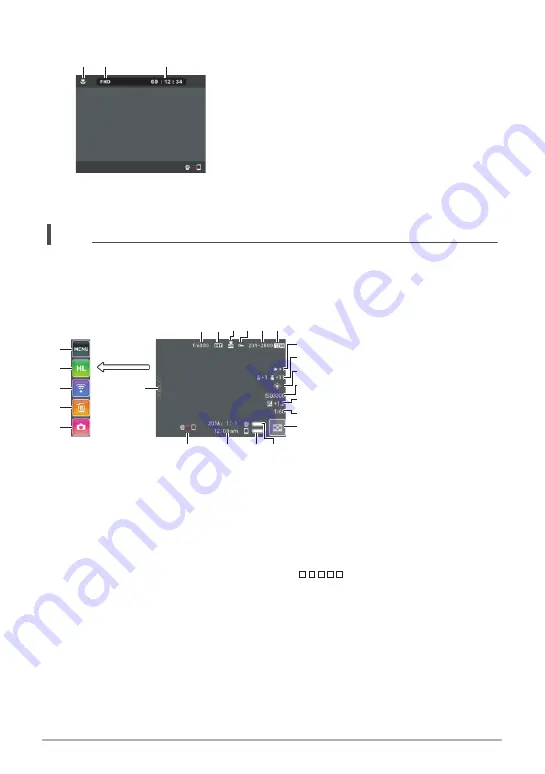
Snapshot Viewing

Movie quality (page 50)

Movie recording time (page 47)

2

1

3

bs

ck

bt

cl

cm

cn

5

4

3

6

bq

br

bp bo

7
9

8
bk

bl

bm

bn

2

1

Current image number/total number of 
grouped images (pages 42, 52)

Group images 
(High Speed CS (page 52)
Interval Shooting (page 42))

Auto Send (page 75)

Protect indicator

Folder name-file name (page 101)

Snapshot image size (page 146)

White Balance (page 54)



ISO sensitivity (page 55)



Brightness (page 53)



Shutter speed



Image menu icon (page 60)



Camera battery level indicator 
(page 25)



Controller battery level indicator 
(page 25)



Date/time (pages 28, 105)



Communication status between 
camera and controller (page 27)



” (Show Icons) icon



REC mode icon (page 28)



Delete icon (page 36)



Wireless mode icon (pages 68, 74)



Time Lapse icon (page 61)



Menu icon (page 63)

Содержание EX-FR200

Страница 1: ...CASIO product Before using it be sure to read the precautions contained in this User s Guide Keep the User s Guide in a safe place for future reference For the most up to date information about this product visit the official EXILIM Website at http www exilim com ...

Страница 2: ... of the power cord plug varies according to the country or geographic area where the camera is sold Accessories Camera EX FR200CA Controller EX FR200CT Hinge Unit The hinge unit comes pre attached to the camera Lens cap The lens cap comes pre attached to the camera Tripod nut Carabiner strap USB AC adaptor AD C53U Power cord Micro USB cable Basic Reference ...

Страница 3: ...or any damages lost profits or claims by third parties arising out of the use of the EXILIM Connect application software CASIO COMPUTER CO LTD shall not be held liable for any damages or lost profits caused by loss of memory contents due to malfunction repair or any other reason Note that the example screens and product illustrations shown in this User s Guide may differ somewhat from the screens ...

Страница 4: ...ing a Memory Card 30 Supported Memory Cards 30 To load a memory card 31 To format initialize a new memory card 32 Shooting a Snapshot 33 Selecting the Dome View Recording Mode 33 To shoot a snapshot 34 Viewing Snapshots 35 Deleting Snapshots and Movies 36 Snapshot Shooting Precautions 37 Recording Images 38 To configure REC mode settings 38 Selecting a Recording Mode and Shooting a Snapshot 39 Sho...

Страница 5: ...ewing a Movie 58 Viewing a Panorama Snapshot 59 Viewing the Image Menu 60 Zooming an On screen Image 60 Creating a Time Lapse Movie Time Lapse 61 Other Playback Functions PLAY 63 Using the PLAY Menu 63 Rotating an Image Rotation 64 Generating an Image from a Full View Image Generate Image 65 Connecting the Camera with a Smartphone Wireless Connection 66 Controlling Your Camera with a Smartphone 66...

Страница 6: ...Screen 85 Shooting with the Single Image Screen 88 Viewing Snapshots and Movies in the Multi Camera Mode 90 Multi Image Screen Operations 90 Single Image Screen Operations 92 Printing 93 Printing with a Computer 93 Using the Camera with a Computer 94 Things you can do using a computer 94 Using the Camera with a Windows Computer 94 Viewing and Storing Images on a Computer 95 Playing Movies 97 Using...

Страница 7: ... 107 Registering a Second Camera Multi Camera Mode 108 Appendix 109 Safety Precautions 109 Shock resistant Splashproof Dustproof 116 Precautions During Use 120 Power Supply 133 Charging 133 Battery Precautions 134 Using the Camera in another Country 134 Disposing of the Camera 135 Using a Memory Card 138 Reset Initial Default Settings 139 When things don t go right 141 Troubleshooting 141 Display ...

Страница 8: ...ction lamp page 71 Shutter button page 34 0 Movie page 47 Speaker Cover lens FREE lever page 15 USB port pages 19 22 USB cover pages 19 22 Strap holes Controller USB cover pages 19 22 RELEASE button page 14 RESET button page 141 USB port pages 19 22 Carabiner strap attachment bar page 17 Strap holes 0 Movie page 47 Shutter button page 34 Operation lamp pages 20 23 p Power page 26 Hinge unit slot p...

Страница 9: ... 8 bo bn bl bk bp bq bm 3 9 White Balance page 54 Digital zoom page 46 Auto Send page 75 Remaining movie memory capacity page 146 Remaining snapshot memory capacity page 146 Snapshot image size page 146 Movie quality page 50 Touch Shooting function page 50 Movie Anti Shake page 51 ISO sensitivity page 55 Brightness page 53 Date Time pages 28 105 Camera battery level indicator page 25 Controller ba...

Страница 10: ...2 Group images High Speed CS page 52 Interval Shooting page 42 Auto Send page 75 Protect indicator Folder name file name page 101 Snapshot image size page 146 White Balance page 54 ISO sensitivity page 55 Brightness page 53 Shutter speed Image menu icon page 60 Camera battery level indicator page 25 Controller battery level indicator page 25 Date time pages 28 105 Communication status between came...

Страница 11: ...d image file in the folder named 100CASIO Movie Playback NOTE If you do not perform any operation for about three seconds during snapshot viewing or movie playback icons will become transparent Movie recording time page 58 Movie quality pages 47 50 Image menu icon page 60 Date time pages 28 105 Movie play icon page 58 Show Icons icon 7 1 2 5 6 3 4 ...

Страница 12: ...sheye lens which lets you capture the entire scene before you with a single shot A variety of shooting styles The camera connects to the controller using Bluetooth wireless technology Bluetooth You can hang it from your neck mount it on a tripod and select the shooting style that suits current conditions Interval Shooting Shoot snapshots and or movies at fixed intervals It s a great way to chronic...

Страница 13: ...into a camera remote controller and allows you to select one or more snapshot and or movie file in camera memory and send a copy to a smartphone Multi Camera Mode You can register two cameras on the controller and operate them both at the same time or individually See page 61 for more information See page 66 for more information See page 79 for more information ...

Страница 14: ...f the camera Use a blower or other means to keep the lens and flash window free of dirt and dust and wipe gently with a soft dry cloth You can attach the controller to the camera and use the camera as a normal camera To attach the controller 1 With the camera lens pointed in the same direction as the controller s monitor screen slide the hinge unit into the controller s hinge unit slot 2 Push the ...

Страница 15: ...Align the A mark with the B mark on the hinge unit The positions on the microphones indicate the orientation of the image to be shot landscape in this case To remove the hinge unit from the camera 1 While pulling down on the camera s FREE lever rotate the camera counterclockwise about 15 degrees until the A mark is aligned with the C mark on the hinge unit Hinge Unit FREE lever Microphones A B C F...

Страница 16: ... 1 Align the A mark with the C mark on the hinge unit 2 Rotate the camera clockwise about 15 degrees until the A mark is aligned with the D mark on the hinge unit 1 Use the tripod nut to secure a tripod commercially available to the hinge unit Tripod nut C D A Tripod commercially available Tripod nut ...

Страница 17: ...PORTANT The carabiner strap is not intended for mountain climbing use It is designed only to support the camera NOTE When shooting hold the camera still Carefully press the shutter button and take care to avoid all movement as the shutter releases and for a few moments after it releases Take care that your fingers and the strap do not cover any of the areas indicated in the illustration Never swin...

Страница 18: ... scroll forward through images Spread Holding your thumb and forefinger against the screen as you spread them out Use spread to enlarge the screen image Squeeze Holding your thumb and forefinger against the screen as you bring them together Use squeeze to reduce the size of the screen image and to display multiple images IMPORTANT Never use a pointed or hard object to perform screen operations Doi...

Страница 19: ...controller are turned off connect in the sequence shown below When disconnecting the USB AC adaptor from the camera or controller be sure to disconnect from them first NOTE If you turn on the camera or controller while charging with the USB AC adaptor you will be able to perform normal recording operations In this case however charging of the camera will be stopped while it is turned on First char...

Страница 20: ... flashing In sleep state Charging High speed red green flashing Charging stopped due to abnormal internal temperature USB AC adaptor problem battery problem page 133 timer operation Slow green flashing Charging complete Operation Lamp Status Meaning Lit red Charging Slow red amber flashing Charging sleep state High speed green amber flashing Charging stopped due to abnormal internal temperature US...

Страница 21: ...function The shape of the power plug depends on each country or geographic area If the operation lamp is not lit or flashing during charging check the orientation of the USB cable connectors Make sure that you insert the cable connector into the USB port until you feel it click securely into place Failure to insert the connector fully can result in poor communication or malfunction Note that even ...

Страница 22: ...era will establish a USB connection with the computer Charging will continue Charging will also continue if you turn on the controller Note that certain types of computers or connection environments may stop charging if supply power is low Charging time Camera Approximately 2 hours 15 minutes Controller Approximately 2 hours 55 minutes USB 2 1 1 Micro USB cable included with camera USB port USB po...

Страница 23: ...g High speed red green flashing Charging stopped due to abnormal internal temperature USB AC adaptor problem battery problem page 133 timer operation Lit green Charging complete Operation Lamp Status Meaning Lit amber Charging Slow red amber flashing Charging sleep state High speed green amber flashing Charging stopped due to abnormal internal temperature USB AC adaptor problem battery problem pag...

Страница 24: ...e subject to fixed standards Use of an inferior device or a device that is not up to standard can cause malfunction and or failure of your camera Operation is not guaranteed in the case of a computer built or modified by you Even in the case of a commercially available computer certain USB port specifications may make it impossible to charge via the USB cable A battery that is still warm immediate...

Страница 25: ...indicator may change when you switch between the REC mode and PLAY mode Leaving the camera for about 8 days with no power supplied while the battery is dead will cause its date and time settings to be cleared A message telling you to configure time and date settings will appear the next time you turn on the camera after restoring power When this happens configure date and time settings page 105 Se...

Страница 26: ...button IMPORTANT Your camera has Bluetooth wireless technology communication functionality built in Avoid operating the camera including camera standalone operations inside of aircraft or anywhere else where wireless data communication is restricted To turn on power Both the camera and controller need to be turned on in order to use them Turning on the camera causes the camera and controller opera...

Страница 27: ... the controller at the camera Make sure there are no obstacles in the path between the camera and controller Sleep Mode If you press p Power on the controller or if you do not perform any controller operation for the time specified by the Sleep setting on the Setup menu page 106 while there is a Bluetooth wireless technology connection between the camera and controller the camera and controller wi...

Страница 28: ...graphic areas may not support display language selection 1 Turn on the camera and controller page 26 If this is the first time you are turning on power a language selection screen will appear If the screen does not appear check to make sure that the camera is turned on 2 Flick page 18 the controller screen upwards and downwards or touch until you find the language you want and then touch to select...

Страница 29: ...hour format select am pm 24h and then touch to change the setting 5 When the date and time settings are the way you want touch OK NOTE Each country controls its local time offset and the use of summer time and so they are subject to change If you make a mistake configuring display language date or time settings with the above procedure refer to the following pages for information about how to corr...

Страница 30: ...lowing types and capacities microSD memory cards up to 2GB microSDHC memory cards greater than 2GB up to 32GB microSDXC memory cards greater than 32GB up to 2TB Note that the ability to use any particular card with this camera even if it satisfies the above capacity and type requirements is not guaranteed Memory Card Handling Precautions Certain types of memory cards can slow down processing speed...

Страница 31: ...e of the camera slide it into the card slot all the way in until you hear it click securely into place 3 Close the CARD cover IMPORTANT Never insert anything besides a supported memory card page 30 into the memory card slot Should water or any foreign object ever get into the card slot immediately turn off the camera and contact your retailer or nearest CASIO authorized service center To load a me...

Страница 32: ...er files on it will delete its contents Normally you do not need to format a memory card again However if storing to a card has slowed down or if you notice any other abnormality re format the card Be sure to use the camera to format a memory card Formatting a card on a computer will result in a non SD standard format which can greatly slow down processing time and cause compatibility performance ...

Страница 33: ...overs a much wider area than a conventional camera The recorded image has a round shape 1 Turn on the camera and controller page 26 This causes the camera and controller to start up on the REC mode 2 Touch Show Icons 3 Touch the second icon from the top second icon from the right in the case of portrait display orientation Recording mode 4 Touch Full View Shooting a Snapshot Selecting the Dome Vie...

Страница 34: ... See page 47 for details NOTE You also touch a location on the screen to focus on it and then shoot the image page 50 With this mode the image size is fixed at 15M 3888x3888 The operation lamp flashes red while movie recording is in progress Shooting with the Camera Alone You can use the camera in a stand alone configuration without turning on the controller or otherwise establishing a connection ...

Страница 35: ... also can clear the information to view only the snapshot page 103 You can zoom the screen image by touching the monitor screen page 60 If you are recording a snapshot that is very important to you it is recommended that you zoom the image and check its details after recording it 2 Flick left or right across the screen image to scroll through the snapshots NOTE Pressing the controller shutter butt...

Страница 36: ...ingle file 1 Enter the PLAY mode 2 Touch Show Icons 3 Touch 4 Touch Delete 1 File 5 Flick the screen the left or right to scroll through images until the one you want to delete is displayed 6 Touch Delete This will delete the selected image To delete all files 1 Enter the PLAY mode 2 Touch Show Icons 3 Touch 4 Touch Delete All Files 5 Touch Delete This will cause the message There are no files to ...

Страница 37: ...urrently selected recording mode page 39 Shooting Indoors under Fluorescent Lighting Minute flickering of fluorescent lighting can affect the brightness or color of an image Other Precautions A noise reduction process is performed when ISO sensitivity is set to a high value This can cause the camera to take relatively longer to be ready to shoot again after you press the shutter button Do not perf...

Страница 38: ...EC mode If the camera is in the PLAY mode touch REC to enter the REC mode 2 Touch Show Icons 3 Touch the item whose setting you want to change To configure REC mode settings Menu page 49 Recording mode page 39 Wireless mode page 68 Interval Shooting mode page 42 PLAY mode page 28 Depending on the recording mode some of the items on the menu that appears may not be usable p Power 1 2 3 4 5 ...

Страница 39: ...tion to record the entire scene being picked up by the lens Images shot with this function are 3888x3888 in size and have an aspect ratio to 1 1 1 Select Full View as the recording mode 2 Press the shutter button This records the snapshot Selecting a Recording Mode and Shooting a Snapshot Full View Records the entire scene being picked up by the lens page 39 Panorama Pressing the shutter button wh...

Страница 40: ... point The size of the recorded image is 7456x1994 1 Select Panorama as the recording mode 2 Point the camera upwards The screen will show part of the final expanded panorama image 3 Flick the monitor screen to scroll through the panorama images until the one you want to appear at the far left is displayed 4 Press the shutter button This records the snapshot Shooting a Panorama Image Panorama ...

Страница 41: ...y cropping the center 4 3 aspect ratio of the scene being picked up by the lens The size of the recorded image is 3232x2424 1 Select Super Wide Angle as the recording mode 2 Press the shutter button This records the snapshot Shooting a 4 3 Aspect Ratio Image Super Wide Angle ...

Страница 42: ...ch scene Flick upwards or downwards on the monitor screen to scroll through scenes When the one you want is displayed touch its icon 4 Touch Shooting Scenes of an Activity at a Fixed Interval Interval Shooting Scene REC Screen Icon Display Description Standard Shoots at a fixed interval Hiking Shoots using a setup optimized for hiking Cycling Shoots using a setup optimized for cycling Snow Water S...

Страница 43: ...f 5 sec is selected for the Interval setting To recover from the sleep state press any controller button Next touching on the monitor screen will display the number of recorded images The maximum number of shots is 9 999 Interval Allows selection of one of the shooting intervals below 5 sec 15 sec 30 sec 1 min 2 min Shooting Style t Shoots five snapshots followed by a five second movie Only Shoots...

Страница 44: ...peration in this case hold down p Power on the camera for about two seconds If you are performing manual camera operations or if the camera is out of the sleep state when the Interval Shooting operation reaches a shooting interval Interval Shooting recording for that interval will be skipped Pressing the controller s p Power button while the camera is out of the sleep state will return to the slee...

Страница 45: ...n You can shoot snapshots and movies manually even while an Interval Shooting operation is in progress 1 On the controller press any button to recover from the sleep state 2 Perform the required controller or camera operation to shoot the image you want NOTE You can also press the camera s shutter button or 0 Movie button to shoot while the camera is in the sleep state You cannot shoot with High S...

Страница 46: ... NOTE Telephoto images are prone to blurring caused by camera movement when you press the shutter button Because of this stabilizing the camera by placing it on a level surface etc is recommended Zoom operations are disabled while shooting with Interval Shooting Zoom operations are disabled during movie recording Perform the zoom operation before you start recording Ù is displayed on the monitor s...

Страница 47: ...nimizing the Effects of Camera Movement during Movie Recording While the image quality setting is FHD 60p FHD 30p or STD you can reduce blur due to camera movement during movie recording by selecting the Standard or Strong setting for Movie Anti Shake page 51 Note however that image stabilization does not prevent image blur due to subject movement during movie recording Also image stabilization re...

Страница 48: ...n areas where temperature is relatively high can cause digital noise dots of light to appear in the movie image A rise in the camera s internal temperature also may force movie recording to stop automatically If this happens stop recording and allow the camera to cool down which should cause normal operation to resume Use of the camera s built in memory or certain types of memory cards can slow do...

Страница 49: ...o change To cancel and exit the menu touch or press the controller s shutter button 5 Touch the item 6 Configure the setting of the item in accordance with the screen contents To navigate back to the previous menu level touch NOTE Depending on the recording mode some of the items on the menu that appears may not be usable Nothing will happen if you touch an unusable item Menu Operations in This Ma...

Страница 50: ...ouching the Monitor Screen Touch Shooting Movie Image Quality Settings Movie Quality Movie Quality Recording speed frame rate Image size pixels Description 4K 30 fps 3840x2160 Use this setting to record 4K movies Shooting is performed using an aspect ratio of 16 9 FHD 60p 60 fps 1920x1080 Select this setting to record full high definition Full HD movies The aspect ratio of movies recorded with thi...

Страница 51: ...rong setting However image anti shake is not used Also Anti Shake results in a narrower angle of view during movie recording This function can be selected while shooting with one of the movie quality settings below FHD 60p FHD 30p STD Panorama Panorama 30 fps 2880x720 Reducing Blur Due to Camera Movement During Movie Recording Movie Anti Shake REC Mode Movie Quality Recording speed Movie size ...

Страница 52: ...lly updated until you press the shutter button To stop the pre record operation of images touch 3 Press the shutter button This will shoot 30 CS images NOTE High Speed CS image sizes are shown below Full View 1936x1936 Panorama 3480x960 Super Wide Angle 1920x1080 Shooting a Burst of Images High Speed CS Setting Description 30 fps High speed shooting of 30 images in one second PAST Pressing the shu...

Страница 53: ... Compensation Range 2 0 EV to 2 0 EV Unit 1 3 EV To cancel exposure compensation change the EV value to 0 0 NOTE When shooting under very dark or very bright conditions you may not be able to obtain satisfactory results even after performing exposure compensation Correcting Image Brightness Brightness Decreases the EV value A lower EV value is best for dark color subjects and for shooting outdoors...

Страница 54: ...e setting that matches your shooting conditions Daylight Overcast etc When shooting with Premium Auto Pro the white balance setting is fixed at Auto WB Adjusting White Balance White Balance Setting Description Auto WB Configures the camera to adjust white balance automatically Daylight For shooting outdoors on a clear day Overcast For shooting outdoors on an overcast rainy day in the shade etc Sha...

Страница 55: ...camera to finish recording an image after it is shot You will not be able to perform any operation while image recording is in progress When shooting a movie the ISO setting is fixed at Auto Specifying ISO Sensitivity ISO Setting Description Auto Adjusts sensitivity automatically according to conditions ISO80 Lower sensitivity Higher sensitivity Slow shutter speed Fast shutter speed Set for shooti...

Страница 56: ...tation not mirror imaged NOTE You can change an image displayed on the screen to a mirror image by flicking the image You cannot display a mirror image while the recording mode is Panorama Procedure Enter the REC Mode MENU r REC MENU Tab Wind Noise Cut Select On to reduce wind noise during movie recording Note however that this will also cause the sound quality to change Self shooting Mirror Image...

Страница 57: ... when On is selected for this setting a Full View version is not saved in the case of High Speed CS images and movies Turning on Image Review Review Type 1 Displays a full screen view of the image for about one second Type 2 Displays a review image in the lower left corner when the controller is in landscape orientation or the upper left corner in portrait orientation of the controller monitor scr...

Страница 58: ...ng the monitor screen again will cause the icons and information to reappear Touching mutes the audio NOTE Playback may not be possible for movies not recorded with this camera When a movie is played back on the camera the audio output from the camera speaker will be out of sync with the video image This does not indicate any problem with the movie file Also playback on the camera uses a low frame...

Страница 59: ...ayback of the panorama Panorama playback causes the image to scroll left or right To clear the icons and shooting information leaving only the image touch the screen where an icon is not located Touching the monitor screen again will cause the icons and information to reappear Viewing a Panorama Snapshot Current display position Touch Touch ...

Страница 60: ...g group To view the second and subsequent images in a group touch the group to switch to the normal display and then flick left or right to scroll through the group images A question mark will be displayed for images that cannot be displayed for some reason Snapshots can be zoomed on the monitor screen up to 2X 1 In the PLAY mode flick left or right to display the image you want to view 2 Touch th...

Страница 61: ...nt to use to create a Time Lapse Movie 8 Touch Yes This creates and displays the Time Lapse Movie Touching Cancel while creation of a Time Lapse Movie is in progress will cancel the creation process Creating a Time Lapse Movie Time Lapse Date Create a Time Lapse Movie for a specific date Interval Group Create a Time Lapse Movie for group of Interval Shooting images page 42 Playback Speed Specify t...

Страница 62: ...of images this function will stop processing when the Time Lapse Movie reaches a length of 10 minutes Subsequent images will not be converted to a Time Lapse Movie The types of images below cannot be included in a Time Lapse Movie Full View images saved using Double Save Images created using Generate Image Depending on the number of files and other factors when a Time Lapse Movie is being created ...

Страница 63: ...ode 3 Touch the tab where the menu item you want to configure is located 4 Touch the item whose setting you want to change 5 Configure the setting of the item in accordance with the screen contents To navigate back to the previous menu level touch Menu Operations in This Manual Menu operations are represented in this manual as shown below Touch the indicated icons and items and perform operations ...

Страница 64: ...the image you want to rotate 2 Touch This will rotate the image 90 degrees to the left 3 When the image is in the orientation you want touch NOTE Note that this procedure does not actually change the image data It simply alters how the image is displayed on the camera s monitor screen Rotating an Image Rotation ...

Страница 65: ...panded image in the size you selected 3 Touch This will save the generated image as a new image retaining the original Generating an Image from a Full View Image Generate Image Crops the center portion of the original image to generate an image with an aspect ratio of 4 3 Crops the center portion of the original image to generate an image with an aspect ratio of 16 9 Converts the original image in...

Страница 66: ...phone that supports Bluetooth Smart Note that the Bluetooth wireless technology that connects your camera with a smartphone is different from the Bluetooth wireless technology that connects the camera with the controller Controlling Your Camera with a Smartphone With this function You can do this Auto Send Images can be automatically sent as they are shot to a smartphone that has been Bluetooth pa...

Страница 67: ...layed by Gallery app Movies are stored in a folder named EXILIM Connect A separate movie player is required to playback movies whose files have the file name extension MOV Depending on your movie player you may not be able to playback movies and or audio Images recorded on another manufacturer s camera cannot be sent using this function NOTE Note that using wireless functions requires more battery...

Страница 68: ...Guide in your native language please use a version in another language Your camera has a variety of different wireless modes Select the wireless mode that suits your specific requirements 1 Touch Show Icons 2 Touch the Wireless icon This will display the wireless mode screen 3 Touch the wireless mode you want To exit the wireless mode touch Using a Wireless Mode Send to phone Select to view images...

Страница 69: ... particular smartphone or tablet IMPORTANT App functions and the required operating environment are subject to change without notice Android terminal 1 Open Google Play 2 In the search field type EXILIM Connect 3 Install EXILIM Connect iPhone iOS 1 Open App Store 2 In the search field type EXILIM Connect 3 Install EXILIM Connect Getting Ready to Establish a Connection between a Smartphone and Your...

Страница 70: ... unpair them and then pair again Re pairing the camera and smartphone will result in all pending unsent images to remain unsent Camera Controller Operation 1 Touch the Wireless icon This will display the wireless mode screen 2 Touch Pairing 3 Touch Start You can start pairing by performing an operation on the camera without using the controller On the camera hold down p Power for about two seconds...

Страница 71: ...he camera SSID and Password When the smartphone establishes a wireless LAN connection with the camera the camera s wireless LAN connection lamp lights blue and the message Start up the phone app appears on the controller s monitor screen Next start up the app on the phone What you need to do to establish a wireless LAN connection depends on the type of smartphone you are using For details about ho...

Страница 72: ...form one of the operations below Enter the sleep mode Turn on the camera and controller On the controller press p Power This will enter the sleep mode which is indicated by the camera s operation lamp slowly flashing green Display the wireless mode screen Touch Show Icons Touch the Wireless icon 2 On the smartphone start up the EXILIM Connect app 3 On the smartphone tap Remote Capture 4 Compose th...

Страница 73: ...tphone You can select up to 50 files totaling no more than 500MB for a single send After sending an image to a smartphone you can then upload it to a social networking service 1 Touch the Wireless icon 2 Touch Send to phone 3 Touch Send Selected Image 4 Touch the image you want to send to the smartphone Selecting the image of a file causes its check box to become selected To exit the send image to...

Страница 74: ...s wireless mode and display a menu of images in camera memory For information about how to use View on Phone refer to the EXILIM Connect manual page 68 Cannot Connect with Bluetooth Wireless Technology 1 Touch the Wireless icon 2 Touch Send to phone 3 Touch View on phone If there is a wireless LAN connection between the smartphone and camera advance to step 5 of this procedure 4 For the smartphone...

Страница 75: ...Wireless Wireless settings Auto Send While On is selected for this setting images are sent to the paired smartphone automatically Images are sent to the smartphone while the camera is in the sleep mode If there is no wireless connection between the camera and smartphone the images will be sent as soon as a connection is established The camera s wireless LAN connection lamp will be flashing or lit ...

Страница 76: ...ll unsent images Auto Send will be cancelled The next time the camera and smartphone are turned on and the camera enters the Sleep Mode the Auto Send operation will restart If you delete an image that has not yet been sent to the smartphone it will not be included in the next Auto Send Procedure Wireless Wireless settings Auto Send File Settings Specifies the files to be sent to a smartphone by Au...

Страница 77: ...edure Wireless Wireless settings WLAN password Use procedure to change the password you used when establishing a wireless LAN connection between the camera and a smartphone IMPORTANT Before changing the wireless LAN password unpair the camera from its paired smartphone page 78 1 Touch the password digit you want to change 2 Touch or to change the currently selected digit 3 When the password is the...

Страница 78: ...ng select the camera SSID again and input the new password Android terminal Tap the field where the SSID of the camera is displayed in the Wi Fi settings and select Forget Select the camera SSID again and input the new password Procedure Wireless Wireless settings Unpairing Unpairs the camera from a smartphone To use the camera with a different smartphone first unpair it from the current smartphon...

Страница 79: ...shooting with two cameras You could point one camera at yourself and the other camera at a scene and simultaneously record the scene and your reaction to it Possibilities are unlimited Switching between two cameras You can switch between the two cameras as desired Interval Shooting You can set up two cameras to shoot snapshots and or movies at fixed intervals Two camera playback You can simultaneo...

Страница 80: ...ou need to register it on the controller To register a second camera on the controller 1 If there is a memory card loaded in the second camera remove it 2 On the menu screen touch the Setup tab 3 Touch Multi Camera 4 Touch Add 5 Touch Start to start registration of the camera 6 While holding down the shutter button of the camera you want to register hold down p Power for at least one second This w...

Страница 81: ... button hold down the p Power button for at least one second While holding down the controller shutter button hold down the p Power button for at least six seconds This will cause the operation lamps of the camera and the controller to flash orange to indicate that camera registration has started To unregister a camera 1 On the menu screen touch the Setup tab 2 Touch Multi Camera 3 Touch Unregiste...

Страница 82: ... can also use the procedure below to define one of the cameras as Camera 1 main camera 1 On the menu screen touch the Setup tab 2 Touch Multi Camera 3 Touch Priority The names of the cameras registered on the controller will appear on the display in sequence 4 Touch the name of the camera you want to specify as the main camera 5 Touch Yes This will specify the camera you selected as the main camer...

Страница 83: ...will not be able to connect to the controller if it is not turned on The date and time settings of Camera 2 will automatically be synced with the date and time of Camera 1 In the case of portrait orientation the Multi Image screen will show images above and below instead of left and right Selecting the Multi Image Screen On the Single Image screen touch Multi Image icon Selecting the Single Image ...

Страница 84: ...her camera the one you did not select above NOTE Turning off a camera while in the Multi Camera Mode will cause that camera to be disconnected from the controller and will automatically cause the controller to exit the Multi Camera Mode At this time the monitor screen will show the image of the camera that is still turned on Establishing a USB connection between a connected camera and a computer p...

Страница 85: ...shoot simultaneously with both cameras while viewing their images on the Multi Image screen To shoot snapshots 1 Press the controller shutter button This records snapshots on both cameras simultaneously To shoot movies 1 On the controller press 0 Movie This starts movie recording on both cameras simultaneously Press 0 Movie again to stop recording NOTE Simultaneous shooting with both cameras is no...

Страница 86: ...ng on the camera whose button you pressed Press 0 Movie again to stop recording Interval Shooting with Two Cameras Use the procedure below to perform an Interval Shooting operation with two cameras 1 Touch This will displays the Interval Shooting setting screen 2 Configure Interval Shooting settings as desired and then touch Start This applies the settings to both cameras and starts simultaneous I...

Страница 87: ...uality or configure other REC menu settings while the Multi Image screen is displayed To configure such settings touch or to display the Single Image screen of the camera whose REC menu settings you want to configure and then touch MENU For information about the REC menu see page 49 After you are finished configuring settings touch to return to Multi Image screen You cannot perform zoom operations...

Страница 88: ...he currently displayed camera NOTE You can also record a snapshot on a particular camera by pressing the camera s shutter button To shoot a movie 1 On the controller press 0 Movie This starts movie recording on the currently displayed camera Press 0 Movie again to stop recording NOTE You can also record a movie on a particular camera by pressing the camera s 0 Movie button Press 0 Movie again to s...

Страница 89: ...onfigure for Camera 1 or Camera 2 on the Single Image screen are maintained when you return to Multi Image screen and even when you exit the Multi Camera Mode You cannot perform the operations below while the Single Image screen is displayed Interval Shooting page 42 Mirror Image page 56 Review page 57 High Speed CS page 52 Touch Shooting page 50 ...

Страница 90: ...cameras simultaneously Viewing Snapshots To scroll snapshots on a particular camera 1 If is on the display flick the Camera 1 or Camera 2 PLAY screen left or right If is on the display touch it to toggle to To scroll snapshots simultaneously on both cameras 1 If is on the display flick the screen left or right If is on the display touch it to toggle to Viewing Snapshots and Movies in the Multi Cam...

Страница 91: ...particular camera while the Multi Image screen is displayed Multi Image Screen Operations Pressing the controller shutter button or 0 Movie button while the cameras are in the PLAY mode will cause both cameras to switch simultaneously to the REC mode Pressing the shutter button or 0 Movie button of one of the cameras while it is in the PLAY mode will start an image recording operation on that came...

Страница 92: ... will switch to the REC mode Pressing the camera shutter button or 0 Movie button while the controller is in the PLAY mode will start an image recording operation on the camera If you start recording with the camera whose image is currently displayed by the controller the controller will switch to the recording mode screen Single Image screen playback operations are the same as those for the Singl...

Страница 93: ...ter and Saving Files page 98 to store the image you want to print and then display the image on your Macintosh screen 2 Click File and then Print 3 Configure print settings and then click Print This will print the selected image Professional Print Service You can take a memory card that contains the images you want to print to a professional print service and have them printed Printing on a Home P...

Страница 94: ... pages 97 100 To edit movies use commercially available software as required Windows users should refer to Using the Camera with a Windows Computer on page 94 Macintosh users should refer to Using the Camera with a Macintosh on page 98 Using the Camera with a Windows Computer When you want to do this Operating System Version Required Software See page Save images to a computer and view them there ...

Страница 95: ...turn on the camera check to make sure that the color of its operation lamp changes from red to green or amber page 23 Note that in this case the monitor screen will remain blank The first time you connect the camera to your computer with the USB cable an error message may appear on your computer If this happens disconnect and then reconnect the USB cable 3 Windows 10 users Click Start and then Exp...

Страница 96: ...o your Documents folder You now have a copy of the files that are in camera memory on your computer After copying images it is recommended that you right click the DCIM folder and change its name to something else 9 After you finish copying images disconnect the camera from the computer After the copy or read progress dialog on the computer s screen indicates that the process is complete close the...

Страница 97: ...bove are recommended system environments Configuring one of these environments does not guarantee proper operation Certain settings and other installed software may interfere with proper playback of movies Movie Playback Precautions Be sure to move the movie data to the hard disk of your computer before trying to play it Proper movie playback may not be possible for data accessed over a network fr...

Страница 98: ...System Version Required Software See page Save images to your Macintosh and view them there manually OS X Installation not required 98 Save images to your Macintosh automatically Manage images OS X Photos or iPhoto which comes bundled with some Macintosh products Play movies OS X 10 5 or higher QuickTime Player installed on computer 100 Connecting the Camera to Your Computer and Saving Files Never...

Страница 99: ...izes the memory card loaded in the camera or the camera s built in memory if it does not have a memory card loaded as a drive The appearance of the drive icon depends on the Mac OS version you are using The first time you connect the camera to your Macintosh with the USB cable an error message may appear on your computer If this happens disconnect and then reconnect the USB cable 3 Double click th...

Страница 100: ...m requirements described below are necessary to play back movies recorded with this camera on a computer The above are recommended system environments Configuring one of these environments does not guarantee proper operation Certain settings and other installed software may interfere with proper playback of movies Movie Playback Precautions Proper movie playback may not be possible on some Macinto...

Страница 101: ...t how file names are displayed on the camera s monitor screen see page 10 The total number of folders and files allowed depends on the image size and quality and capacity of the memory card being used for storage Files and Folders Name and Maximum Number Allowed Example File Each folder can contain up to 9999 files named CIMG0001 through CIMG9999 The extension on the file name depends on the file ...

Страница 102: ... DCF compliant When displaying an image recorded on another camera it may take a long time for the image to appear on this camera s monitor screen Built in Memory and Memory Card Data Handling Precautions Whenever copying memory contents to your computer you should copy the DCIM folder and all of its contents A good way to keep track of multiple DCIM folders is to change their names to dates or so...

Страница 103: ...up Tab Info Selecting On displays setup status and other information For information about menu operations see page 49 Adjusting Monitor Screen Brightness Screen 2 Brightness that is greater than 1 which makes the screen easier to view This setting consumes more power 1 Bright setting for outdoor use etc Brightness that is greater than 0 0 Normal monitor screen brightness for indoor use etc 1 Scre...

Страница 104: ... recording sound is emitted during an Interval Shooting operation Locking the Camera or Controller Screen Orientation Rotation Lock Camera Off The camera detects its orientation when you are shooting and stores orientation information along with the image data During playback of an image it is displayed in accordance with the orientation information On The camera does not detect its orientation an...

Страница 105: ...ust 1 Touch the value you want to change year month day hour minute 2 Touch or to change the currently selected value You can specify a date from 2001 to 2049 To switch between 12 hour and 24 hour format touch the 12 24 hour switch icon Touching and holding or scrolls at high speed 3 Touch OK Procedure MENU Setup Tab Date Style You can select from among three different styles for the date Example ...

Страница 106: ...tain geographic areas may not support display language selection Procedure MENU Setup Tab Sleep Use this function to specify how much time should be allowed to laps until the controller display goes blank and the controller enters the sleep state You can specify either 30 seconds 30 sec 1 minute 1 min or 5 minutes 5 min Specifying the Display Language Language Specifying the Controller Sleep State...

Страница 107: ...ormatting may not be performed correctly and the camera may stop operating normally if the camera powers down while formatting is in progress Procedure MENU Setup Tab Reset See page 139 for details about the camera s factory default settings The settings below are not reset Clock settings date style screen language WLAN password NOTE Resetting the camera does not unpair it from a smartphone page 7...

Страница 108: ...108 Other Settings Set Up Procedure MENU Setup Tab Multi Camera You can connect a second camera to the controller See page 79 for details Registering a Second Camera Multi Camera Mode ...

Страница 109: ...l are specifically prohibited The example at left indicates that disassembly is prohibited The black dot 0 means that the indicated action must be performed Indications within this symbol are actions that are specifically instructed to be performed The example at left indicates that the power plug must be unplugged from the electrical socket DANGER Built in Rechargeable Battery To charge the batte...

Страница 110: ... on it etc and never apply solder to it Never place the battery into a microwave oven dehumidifier high pressure generating device etc Never remove the outer sticker from the battery Do not use or leave the battery under direct sunlight in an automobile parked in the sun or in any other area subject to high temperatures Doing so can damage the battery and cause deterioration of its performance and...

Страница 111: ... or other vehicle or while walking Looking at the monitor while in motion creates the risk of serious accident USB AC Adapter Misuse of USB AC adapter creates the risk of fire and electric shock Be sure to observe the following precautions Use only the specified USB AC adapter Never use the USB AC adapter with another device Use a power outlet that matches the power supply specified for the USB AC...

Страница 112: ...t be sure to unplug the USB AC adapter from the power outlet and put in a place away from objects used by animals and pets An animal or pet chewing on the power cord can cause it short leading to the risk of fire Water and Foreign Matter Water other liquids or foreign matter especially metal getting inside the camera creates the risk of fire and electric shock Immediately perform the following ste...

Страница 113: ...e radio interference or other problems on other devices is being caused while using this product do not use the wireless functions of this product Use of wireless functions creates the risk of radio interference and abnormal operation of other devices When in a medical facility or aircraft comply with instructions of personnel in charge Electromagnetic waves and other signals emitted by the camera...

Страница 114: ...ot end normally within the specified charging time stop charging anyway and contact your local CASIO authorized service center Continued charging creates the risk of battery overheating fire and explosion Be sure to read the user documentation that comes with the camera before using or charging the battery Store batteries in a location that cannot be reached by infants and young children When usin...

Страница 115: ...t Doing so can cause the display panel glass to crack and lead to personal injury Should the monitor screen ever become cracked never touch any of the liquid inside the monitor screen Doing so creates the risk of skin inflammation Should monitor screen liquid ever get into your mouth immediately rinse your mouth out and contact your physician Should monitor screen liquid ever get into your eyes or...

Страница 116: ...uch panel operation is not supported under water 4 Test conditions defined by CASIO 5 Use during high speed travel on water during motor sports while riding a personal watercraft etc is not supported 6 Due to the characteristics of the camera s lens there will be some loss of image quality when shooting under water This is normal and does not indicate malfunction 0 Dustproof Corresponds to IEC JIS...

Страница 117: ...ashproofing Wireless communication with wireless LAN or Bluetooth wireless technology is not supported under water Connection between a submerged camera and a controller or smartphone is not supported Use of the controller s touch panel is not supported while the controller is submerged Precautions during Underwater Use The camera is designed for use at depths no greater than 1 5 meters 4 92 feet ...

Страница 118: ...T The temperature of the water used to wash the camera should be no greater than 30 C 86 F Never use detergent hot water or strongly running water to clean the camera Doing so creates the risk of leaking and malfunction Never swing the camera around to remove water and never use a dryer or other intense heat to dry it Never place the camera in a washing machine to wash it Precautions after Use Do ...

Страница 119: ...tions Should water ever leak into the camera and cause malfunction due to improper use CASIO COMPUTER CO LTD will not be held liable for any damage to internal components battery recording media etc loss of recorded data or any expenses incurred to shoot lost images CASIO COMPUTER CO LTD shall not be held liable for any accident that may occur while the camera is being used underwater CASIO COMPUT...

Страница 120: ... of a motor vehicle on a hot day or in an area subjected to strong vibration Condensation Sudden and extreme temperature changes such as that which occurs when moving from the outdoors on a cold winter day into a warm room can cause water droplets called condensation to form on interior and exterior surfaces creating the risk of malfunction To prevent condensation from forming seal the camera in a...

Страница 121: ...t may affect or may be affected by nearby devices that use wireless functionality Radio transmission interception The radio waves that are used to send and receive data can be intercepted by third parties Unauthorized access CASIO COMPUTER CO LTD shall be held in no way liable for any unauthorized access and or use of the access point equipped on this product if the product is ever lost or stolen ...

Страница 122: ... slightly warm during use This is normal and does not indicate malfunction Copyrights Except for your own personal enjoyment unauthorized use of snapshots or movies of images whose rights belong to others without the permission of the right holder is forbidden by copyright laws In some cases shooting of public performances shows exhibitions etc may be restricted entirely even if it is for your own...

Страница 123: ...ice mark of Apple Inc iOS is a trademark or registered trademark of Cisco Systems Inc of the United States Wi Fi is a registered trademark of the Wi Fi Alliance The Bluetooth word mark and logos are registered trademarks owned by Bluetooth SIG Inc and any use of such marks by CASIO COMPUTER CO LTD is under license Other trademarks and trade names are those of their respective owners This software ...

Страница 124: ...ULAR PURPOSE AND NONINFRINGEMENT IN NO EVENT SHALL THE AUTHORS OR COPYRIGHT HOLDERS BE LIABLE FOR ANY CLAIM DAMAGES OR OTHER LIABILITY WHETHER IN AN ACTION OF CONTRACT TORT OR OTHERWISE ARISING FROM OUT OF OR IN CONNECTION WITH THE MATERIALS OR THE USE OR OTHER DEALINGS IN THE MATERIALS bluedroid 5 0 0_r2 Copyright c 2014 The Android Open Source Project Copyright C 1998 2014 Broadcom Corporation L...

Страница 125: ...ated by a copyright notice that is included in or attached to the work an example is provided in the Appendix below Derivative Works shall mean any work whether in Source or Object form that is based on or derived from the Work and for which the editorial revisions annotations elaborations or other modifications represent as a whole an original work of authorship For the purposes of this License D...

Страница 126: ... a lawsuit alleging that the Work or a Contribution incorporated within the Work constitutes direct or contributory patent infringement then any patent licenses granted to You under this License for that Work shall terminate as of the date such litigation is filed 4 Redistribution You may reproduce and distribute copies of the Work or Derivative Works thereof in any medium with or without modifica...

Страница 127: ...t grant permission to use the trade names trademarks service marks or product names of the Licensor except as required for reasonable and customary use in describing the origin of the Work and reproducing the content of the NOTICE file 7 Disclaimer of Warranty Unless required by applicable law or agreed to in writing Licensor provides the Work and each Contributor provides its Contributions on an ...

Страница 128: ... of fees or royalties provided that 1 source code distributions include the above copyright notice this list of conditions and the following disclaimer 2 binary distributions include the above copyright notice this list of conditions and the following disclaimer in their documentation 3 the name of the copyright holder is not used to endorse products built using this software without specific writ...

Страница 129: ...ssions granted by this License Source form shall mean the preferred form for making modifications including but not limited to software source code documentation source and configuration files Object form shall mean any form resulting from mechanical transformation or translation of a Source form including but not limited to compiled object code generated documentation and conversions to other med...

Страница 130: ... Source or Object form 3 Grant of Patent License Subject to the terms and conditions of this License each Contributor hereby grants to You a perpetual worldwide non exclusive no charge royalty free irrevocable except as stated in this section patent license to make have made use offer to sell sell import and otherwise transfer the Work where such license applies only to those patent claims licensa...

Страница 131: ...Your modifications or for any such Derivative Works as a whole provided Your use reproduction and distribution of the Work otherwise complies with the conditions stated in this License 5 Submission of Contributions Unless You explicitly state otherwise any Contribution intentionally submitted for inclusion in the Work by You to the Licensor shall be under the terms and conditions of this License w...

Страница 132: ... and all other commercial damages or losses even if such Contributor has been advised of the possibility of such damages 9 Accepting Warranty or Additional Liability While redistributing the Work or Derivative Works thereof You may choose to offer and charge a fee for acceptance of support warranty indemnity or other liability obligations and or rights consistent with this License However in accep...

Страница 133: ...r will terminate it automatically even if the battery is not fully charged If the battery has not been used for a very long time charging may terminate automatically after only about 60 minutes 1 Using a battery that has not been used for a long time Disconnect and then reconnect the USB cable to resume charging 2 Insufficient power supply when connected to computer The camera can be charged only ...

Страница 134: ... some time fully use up its charge before storing it To prevent over discharging of an unused battery fully charge it and then load it in the camera and fully use up the charge about once every six months Precautions during Use The bundled USB AC adaptor is designed for operation with any power supply in the range of 100V to 240V AC 50 60Hz Note however that the shape of the power plug depends on ...

Страница 135: ...aced Make sure that the camera is turned off before removing the battery The edges of the back cover are sharp Take care not to cut your fingers when removing it When removing screws use a precision Phillips tip screwdriver Camera 1 Remove the four screws that secure the back of the camera 2 Remove the back cover 3 Hook your fingertip at the location indicated in the illustration and remove the ba...

Страница 136: ...ction of the arrow to remove the cover 3 Rotate the cover on the end of the controller in the direction indicated by the arrow to remove it 4 Remove the six screws that secure the back of the controller 5 Holding the monitor screen at the circled location in the nearby illustration swing it upwards in the direction indicated by the arrow to remove it ...

Страница 137: ...indicated in the illustration and lift the battery up to remove it Old Rechargeable Battery Handling Precautions Insulate the positive and negative terminals with tape etc Do not peel the covering off of the battery Do not try to take the battery apart ...

Страница 138: ...se of this periodic re formatting of a memory card is recommended Electrostatic charge electrical noise and other phenomena can cause data to become corrupted or even lost Make sure that you always back up important data on other media CD R CD RW hard disk etc Memory Card Handling Precautions Certain types of memory cards can slow down processing speed Whenever possible use an Ultra High Speed Typ...

Страница 139: ... IMPORTANT Some menu items may not be available depending on the recording mode being use REC Menu Depends on the recording mode NOTE Default setting depends on country or geographic region PLAY Menu Reset Initial Default Settings Touch Shooting AF Shoot Movie Quality 4K Movie Anti Shake Standard High Speed CS Off Brightness 0 0 White Balance Auto WB ISO Auto Mirror Image Off Wind Noise Cut Off Re...

Страница 140: ...to Send Off Auto Send File Settings T Only Resize When Sending 3M WLAN password Unpairing Screen 0 Info On Rotation Lock Camera Off Controller Off Camera Sound Vibration On Adjust Date Style Language Sleep 5 min Format Reset Version Multi Pairing ...

Страница 141: ...ct your retailer or a CASIO authorized service center Power will not turn off Nothing happens when a button is pressed Use a thin object to press the RESET buttons page 8 near the camera s memory card slot and controller s USB port to turn the camera off and then turn on the camera again Charging The operation lamp does not light red and the battery won t charge 1 Unplug the USB cable from the cam...

Страница 142: ... underexposure of images Adjust Brightness to the side page 53 The image is out of focus during movie recording 1 Focusing may not be possible because the subject is outside the focus range Shoot within the allowable range 2 The lens may be dirty Clean the lens page 121 3 Focus is fixed during movie recording so the image can go out of focus if there is a big change in the distance between the cam...

Страница 143: ...ting Note that initializing the password unpairs the camera and smartphone so you will need to pair them again For information about the initial default password settings see page 71 Bluetooth wireless technology A connection cannot be established between the camera and controller 1 The camera cannot connect with the controller if they are too far apart from each other 2 A Bluetooth connection can...

Страница 144: ...ay be a problem with the camera s memory data If this is the case perform the reset operation to initialize the camera s setup page 107 After that configure each setting If the language selection screen does not re appear when you turn the camera on it means that the camera s memory management data has been restored If the same message appears after you turn power back on contact your retailer or ...

Страница 145: ...der cannot be created You are trying to record a file while there are already 9999 files stored in the 999th folder If you want to record more delete files you no longer need page 36 Memory Full Memory is full with images you recorded and or files saved by editing operations Delete files you no longer need page 36 Overheating Power will turn off The camera protection function may have activated be...

Страница 146: ...um Recording Time with microSD Memory Card 2 File Size of 1 minute Movie 1 1 1440x1440 Stereo 14 2 Megabits second 30 frames second 29 minutes or 4 GB 26 seconds 3 2 hours 14 minutes 55 seconds 106 5 MB Panorama 2880x720 Stereo 3 8 Megabits second 30 frames second 1 minute 41 seconds 8 hours 33 minutes 37 seconds 29 3 MB 4K 3840x2160 Stereo 40 0 Megabits second 240 frames second 9 seconds 48 minut...

Страница 147: ...ng shot When using a memory card with a different capacity calculate the number of images as a percentage of 16GB The time it takes to play back a high speed movie will be different from the time it takes to record it If you record a high speed movie for 10 seconds for example it will take 80 seconds to play it back HS120 1280x720 No audio XX X Megabits second XXX frames second 29 minutes or 4 GB ...

Страница 148: ...ent to 16 mm in 35 mm format Zoom Up to 4 0X when Digital zoom is used Focusing Focus Mode Pan Focus Approximate Focus Range Snapshot From Lens Surface Pan Focus 55 cm to 9 21 7 to 9 Exposure Compensation 2 0 EV to 2 0 EV in 1 3EV steps White Balance Auto Daylight Overcast Shade Daywhite Fluorescent Daylight Fluorescent Tungsten Manual WB Sensitivity Standard Output Sensitivity Snapshots Auto ISO ...

Страница 149: ...nal Camera Micro USB port Hi Speed USB compliance USB charging USB powered operation External connection terminal Controller Micro USB port USB charging USB powered operation Microphones Camera Stereo Speaker Camera Monaural Power Requirements Camera Built in rechargeable lithium ion battery Controller Built in rechargeable lithium ion battery ...

Страница 150: ...t of time the camera is left turned on and ambient temperature in the area where the camera is used all greatly affect recording time and number of shots values Number of snapshots Operating Time 235 shots 1 285 shots 2 Camera stand alone operating time Actual movie recording time Full HD movie 1 55 minutes Approximate continuous movie recording time Full HD Movie 2 1 hour 20 minutes Approximate c...

Страница 151: ...d The power cord used must comply with relevant national and or international standards Input 100 to 240 V AC 50 60 Hz 100 mA Output 5 0 V DC 650 mA Operating Temperature Requirements 5 to 35 C 41 to 95 F Dimensions 53 W x 21 H x 45 D mm 2 1 W x 0 83 H x 1 8 D excluding projections Weight Approximately 37 g 1 3 oz ...

Страница 152: ...onformity can be found on http doc casio com To comply with the relevant European RF exposure compliance requirements this EX FR200CA EX FR200CT must not be co located or operating in conjunction with other transmitter Note This equipment is intended to be used in all EU and EFTA countries Outdoor use may be restricted to certain frequencies and or may require a license for operation For more deta...

Страница 153: ...eceiver Connect the equipment into an outlet on a circuit different from that to which the receiver is connected Consult the dealer or an experienced radio TV technician for help CAUTION Changes or modifications not expressly approved by the party responsible for compliance could void the user s authority to operate the equipment Proper connectors must be used for connection to host computer and o...

Страница 154: ...2016 CASIO COMPUTER CO LTD 6 2 Hon machi 1 chome Shibuya ku Tokyo 151 8543 Japan MA1607 A M29 ...

Отзывы: